Standard desktop installation using the installation wizard
-
Double click the installer ‘Panviva Browser Extender Installer-1.0.6.exe’ to launch the setup wizard.
-
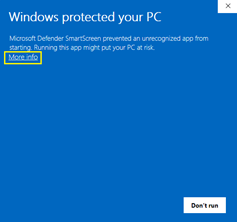
If Windows displays a protection message related to installing an unrecognized application:
-
Click the More info link
-
Click the Run anyway button.
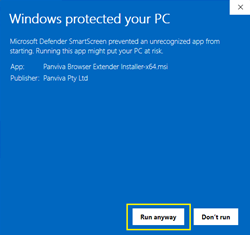
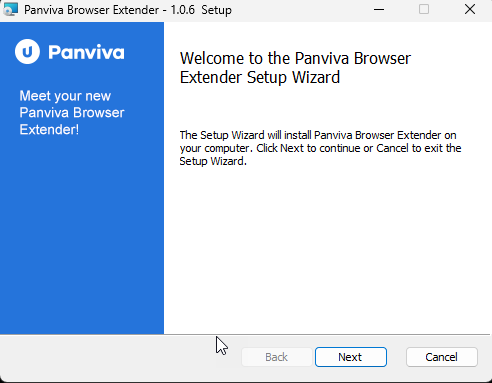
The Panviva Browser Extender setup begins.
-
-
In the Panviva Browser Extender Setup window, click Next.
-
In the Destination Folder window, select your preferences. The options are explained in the following table. Click Next to proceed.
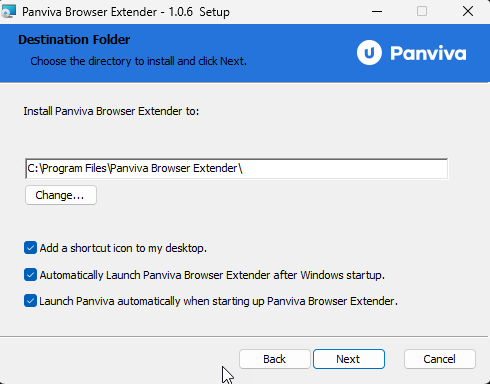
UI Components Instructions Installation path Displays the folder path in which PBE will be installed. By default, it displays the path to the Program Files folder.
Click Change to choose a different path.
Add a shortcut icon to my desktop Select if required Automatically Launch PBE at Windows start-up Select if required Launch Panviva automatically on our default internet browser when starting up Panviva Browser Extender Select if required -
In the Default Panviva URL window, enter the URL of your default Panviva database (For example: myorg.supportpoint.com). This will configure the PBE to use the specified URL to launch Panviva in the browser. Select your preference for updating the Panviva URL via the application menu.
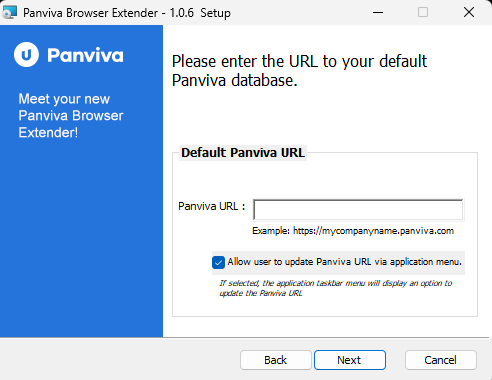
Select your preferences and click Next.
Field Instructions Panviva URL Enter the default Panviva URL which will be used when launching Panviva on an internet browser using PBE. Allow user to update Panviva URL via application menu. Allows the user to update the Panviva URL on the application menu after installation.
By default, this option is selected. Disable/uncheck this option if you do not want users to change the Panviva URL.
Note: If you have selected the option Allow user to update Panviva URL via application menu, you could update the Panviva URL later after PBE is successfully installed. Right-click the PBE icon in the system tray and click Update Panviva URL to enter the Panviva URL.
-
Click Install to begin the installation process.
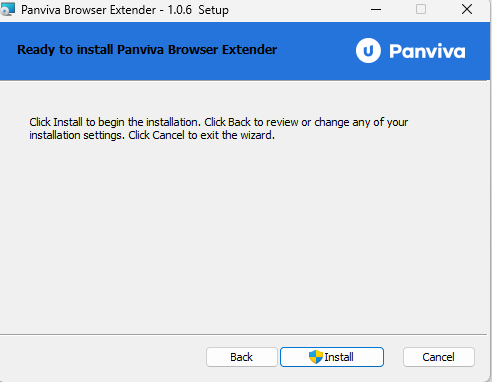
The setup wizard displays the status of the installation. If you are prompted about access permissions on your computer, click Yes to proceed with the installation.
-
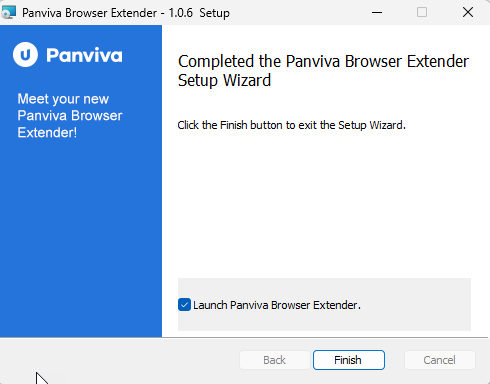
PBE will launch by default once installation is complete. If you do not want that to happen, you can deselect the Launch Panviva Browser Extender option in this screen before clicking Finish to complete the installation.
-
Click Finish to close the installation wizard. The installation is complete.
If the Launch Panviva Browser Extender option was selected during installation, the PBE icon will appear in the system tray (you may need to expand the system tray to see it. See FAQ section for how to dock PBE icon in the system tray.). If Launch Panviva Browser Extender option was selected during installation, Panviva will launch in your default internet browser. Once you log into Panviva, PBE establishes connection with Panviva.The PBE icon changes based on its connection status:
Panviva icon What it indicates 
Disconnected – no connection established between the PBE and Panviva 
Connected – successful connection established between PBE and Panviva