Folders associated with the Filescan connector are used to route and process inbound and outbound user-created documents for delivery by the
You can effectively manage Filescan folder monitoring and more with the following properties.
- Enable all or specific Filescan folders – Use to turn on/off folder monitoring by the Filescan connector for all or selected Filescan folders.
- Description – Use to describe the Filescan folder added to a Filescan connector.
- Rate Control – Use to specify the number of jobs and how fast to process those jobs in a Filescan folder by the Filescan connector.
- Time Control – Use to set time and weekdays the Filescan connector can process documents from an active Filescan folder.
Enabling monitoring for all or specific Filescan folders
You can turn on/off folder monitoring for all or specific Filescan folders by selecting the Enable all Folders or individual Folder checkboxes.
To enable all Filescan folders
- Start the Server Administrator, if necessary.
- Select the Filescan connector in the Connectors details pane. The Filescan connector Properties dialog box appears.
- Select the Folders tab. The folders list appears.
- Ensure the Enable all Folders check box is selected. This is the default.
- Ensure all folders on the list are selected. This is the default.
- Click OK on the New Folder dialog box.
- Click OK on the Filescan Properties dialog box.
See the Enable all folders example below.

To enable specific Filescan folders
- Start the Server Administrator, if necessary.
- Expand Connectors on the Server Administrator tree, if necessary.
- Select the Filescan connector in the Connectors details pane. The Filescan connector Properties dialog box appears.
- Select the Folders tab. The folders list appears.
- Ensure the Enable all Folders check box is selected. This is the default.
- Select specific and/or clear the appropriate folder check boxes.
- Click OK on the New Folder dialog box.
- Click OK on the Filescan Properties dialog box.
See the Enable specific folders example below.

Note: All individual folders must be selected if you want to enable folder monitoring for all Filescan folders. If you turn off this property and then turn it back on, it does not enable all folders automatically. Folder monitoring only occurs for selected folders. Ensure the appropriate folders are selected.
Adding a description to a Filescan folder
You can add a description to any new or current Filescan folder by using the Filescan Properties > Folders > Description box.
To add a description to a new Filescan folder
- Start the Server Administrator, if necessary.
- Expand Connectors on the Server Administrator tree, if necessary.
- Select the Filescan connector in the Connectors details pane. The Filescan connector Properties dialog box appears.
- Select the Folders tab.
- Click the New button. The New Folder dialog box appears.
- Type a folder description in the Description box.
- Use the Ellipsis (…) button to select a folder to scan.
- Click OK on the New Folder dialog box.
- Click OK on the Filescan Properties dialog box.
To add a description to a current Filescan folder
- Start the Server Administrator, if necessary.
- Expand Connectors on the Server Administrator tree, if necessary.
- Select the Filescan connector in the Connectors details pane. The Filescan connector Properties dialog box appears.
- Select the Folders tab.
- Double-click the appropriate folder on the Folder’s list or use the Properties button. The New Folder dialog box appears.
- Type a folder description in the Description box.
- Click OK on the New Folder dialog box.
- Click OK on the Filescan Properties dialog box.
Applying Rate Control to a Filescan folder
You can specify the number of jobs and how fast to process those jobs in a Filescan folder by using the Filescan Properties > Folders > Rate Control check box.
High priority vs. Low priority folders
For example, you can specify a rate of 2 jobs per 10 seconds for a low-priority folder. This reserves processing resources for more important and high-priority folders. Rate control is optional. The Filescan connector processes jobs as fast as it can if Rate control is not selected.
Note: The Filescan connector based on its rate control parameters attempts to process jobs as quickly as possible, but there may periods where it is unable to follow the rate control parameters set.
To apply rate control to a Filescan folder
- Start the Server Administrator, if necessary.
- Expand Connectors on the Server Administrator tree, if necessary.
- Select the Filescan connector in the Connectors details pane. The Filescan connector Properties dialog box appears.
- Select the Folders tab.
- Double-click the appropriate folder on the Folder’s list or use the Properties button. The New Folder dialog box appears.
- Select the Rate Control check box. The Rate Control parameters become active.
- Specify the number of jobs per seconds you want the Filescan connector to process.
- Click OK on the New Folder dialog box.
- Click OK on the Filescan Properties dialog box.
See a Rate Control example below.

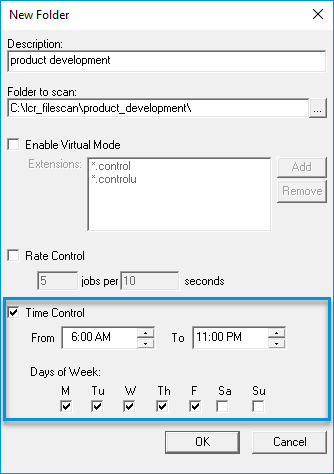
Applying Time Control to a Filescan folder
You can set the time and weekdays the Filescan folder is active so that the Filescan connector can process documents from it.
In addition, you can set multiple time control periods for the same folder. For example, you can set a time control period for Monday through Friday from 12:00 AM – 8:00 PM and have another one set for Saturday through Sunday from 8:00 AM – 5:00 PM. The Server Administrator prevents overlapping time periods for the same folder. Time control is optional.
Note: A folder is always active (Sunday through Saturday, 24 hours) if time control is not enabled. The parameters appear dim and are inactive. No additional time and day parameters can be configured if time control is not selected. The Server Administrator does not allow overlapping time periods since the folder is always active in this scenario.
To apply time control to a Filescan folder
- Start the Server Administrator, if necessary.
- Expand Connectors on the Server Administrator tree, if necessary.
- Select the Filescan connector in the Connectors details pane. The Filescan connector Properties dialog box appears.
- Select the Folders tab.
- Double-click the appropriate folder on the Folder’s list or use the Properties button. The New Folder dialog box appears.
- Select the Time Control check box. The Time Control parameters become active.
- Specify the time parameters by:
- Clicking the hour or minutes and then typing the hour and/or minutes value in the From and/or To boxes or
- Clicking the up and down arrows to increase or decrease the hour or minutes value.
- Specify the weekdays by selecting the appropriate check boxes.
- Click OK on the New Folder dialog box.
- Click OK on the Filescan Properties dialog box.
See a Time Control example below.
You can apply multiple time control periods to the same Filescan folder by creating duplicate folders. For example, you will need two folders if you need to apply two time control periods.
To apply multiple time control periods to the same Filescan folder
- Start the Server Administrator, if necessary.
- Expand Connectors on the Server Administrator tree, if necessary.
- Select the Filescan connector in the Connectors details pane. The Filescan connector Properties dialog box appears.
- Select the Folders tab.
- Click the New button. The New Folder dialog box appears.
- Type a folder description in the Description box; for example, mon thru fri period.
- Use the Ellipsis (…) button to select a folder to scan.
Note: If the Filescan folder currently exists, select it to create a duplicate folder for the time control period.
- Select Time Control and specify the time and weekday parameters required.
- Click OK on the New Folder dialog box.
- Click OK on the Filescan Properties dialog box.
See also
Guidelines for Creating a Filescan Folder