The SharePoint on the Server connector is used to route documents between the server and the Office 365 SharePoint document management system. You can add a SharePoint connector by using the Server Administrator > Connectors node.
To add a SharePoint connector
-
Start the Server Administrator.
On the Start menu, click Upland AccuRoute > -
On the console, expand the Server Administrator tree.
-
Right-click Connectors. The Connectors shortcut menu appears.
-
Select New Server connector > SharePoint. The Create New SharePoint DMS Connector wizard appears.
-
Select the appropriate Server Address for your configuration. The Run on the Message Server option is the default.
Note: If you want the connector to run on a remote server, click Remote Server and enter the server name.
-
Click Next. The Display Name dialog box appears.
-
Type a SharePoint connector name in the Name box, if necessary.
-
Click Next. The Congratulations > You have completed the configuration dialog box appears.
-
Click Finish. The DMS Configuration wizard page appears.
-
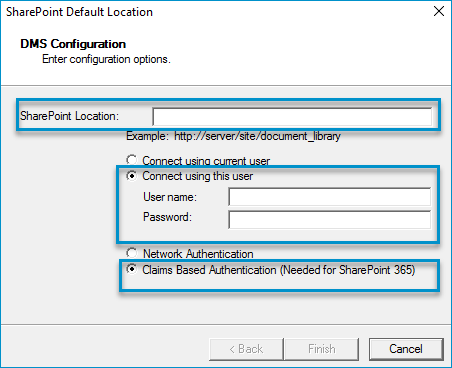
Specify the following Configuration options.
-
Type the SharePoint address in the SharePoint Location box. The address must begin with https://. See example below.
-
https://yoursite.sharepoint.com
-
Select the Connect using this user option and specify the username and password of the user with full access to the SharePoint site. The username must be in an email address format.
-
Select the Claims Based Authentication (Needed for SharePoint 365) option.
-
Click Finish.
See the DMS Configuration wizard page example below.