The Address Book Manager application enables WebApps users to manage Address Book entries by using their company’s database.
WebApps users can use the Address Book Manager to perform the following tasks.
-
New – Create new Address Book entries
-
Properties – Update Address Book entry properties
-
Delete – Delete Address Book entries
-
Search – Filter results based on search criteria
Note: Some WebApps users may not have access to all of the tasks listed above. Which tasks users get is based on the Administrator’s Address Book Manager configuration.
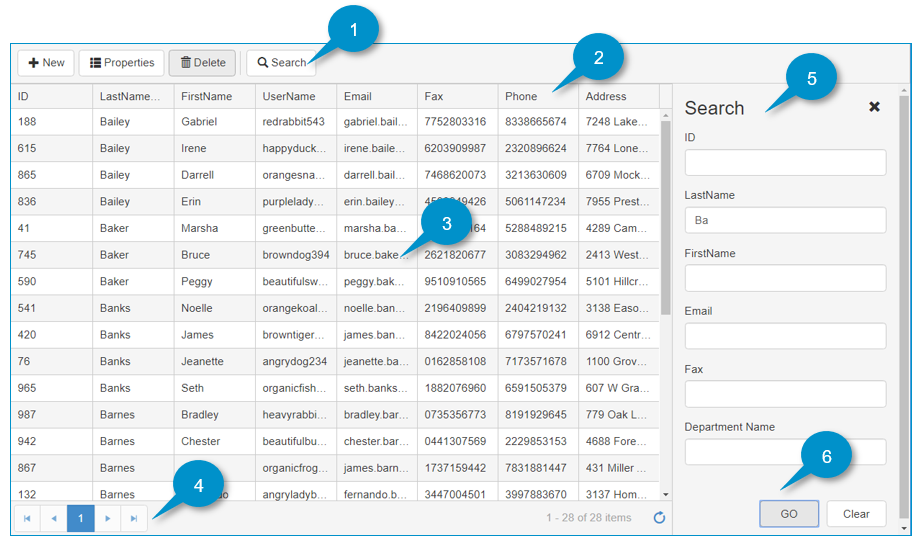
WebApps Address Book Manager at a Glance
|
WebApps Address Book Manager Legend |
Description |
|
1. Address Book Manager toolbar |
Use the toolbar to create new, update, delete, and search Address Book entries. |
|
2. Address Book column headings |
Use the column headings to sort the Address Book entries. |
|
3. Address Book table |
View and select Address Book entries. |
|
4. Address Book page navigation |
View current page, go to previous and next 30 entries, or first and last page. |
|
5.Address Book Search pane |
Use to specify Search criteria. |
|
6. Search Go and Clear buttons |
Use Go to get results. Use Clear to clear the criteria and start over. |
Creating new Address Book entries
WebApps users can create new Address Book entries by using the New button on the Address Book Manager toolbar.
To create new Address Book entries
-
Type the WebApps URL in the browser’s Address bar and press Enter.
-
Select the Address Book Manager tile on the WebApps Dashboard. The Address Book Manager table view appears.
-
Click the + New button. The New Address Book Entry dialog box appears.
-
Type the information in the appropriate boxes; for example, Last Name.
-
Click OK.
Updating Address Book entry properties
WebApps users can update Address Book entries by using the Properties button on the Address Book Manager toolbar.
To update Address Book entry properties
-
Select an entry on the Address Book table.
-
Click the Properties button on the WebApps toolbar. The Address Book Entry Properties dialog box appears.
-
Select the appropriate property and update.
-
Click OK.
WebApps users can also right-click any entry to update.
Deleting Address Book entries
WebApps users can delete Address Book entries by using the Delete button on the Address Book Manager toolbar.
To delete Address Book entries
-
Select an entry or press and drag to select multiple entries.
-
Click the Delete button on the WebApps toolbar. The Delete Confirmation dialog box appears.
-
Click OK.
WebApps users can also right-click any entry to delete.
Searching Address Book entries
WebApps users can search Address Book entries by using the Search button on the Address Book Manager toolbar.
To search Address Book entries
-
Click the Search button on the WebApps toolbar. The Search pane appears.
-
Type the Search criteria in the appropriate boxes; for example, Last Name.
-
Click Go.
-
Click Close (x) when you are done.
WebApps users can use the Clear button to clear the criteria from the Search boxes and start over, if necessary.
The Search button acts as a toggle key and can be used to open and close the Search pane.
See also
About WebApps Address Book Manager