The FileBound connector is integrated with Upland FileBound. This connector supports all standard DMS connector features, including Default Profiles, Distributions, and Routing Rules. With this connector; for example, you can scan documents to FileBound from an MFP device using either a Routing Sheet or a Personal Distribution that identifies FileBound as the recipient.
For documents processed using OCR, the system will automatically store the OCR text in the FileBound document's FullText property for search and indexing.
Note: The FileBound connector requires a DMS license.
Installation and Configuration
Before adding and configuring the FileBound connector, you must already have a FileBound project (with fields, dividers, and separators) configured.
To create and configure the FileBound connector on the server
-
Right-click Connectors on the Server Administrator tree and select New
-
FileBound on the Server appears as the default name. Accept this or type a name for this connector in the Name box and click Next
-
The Congratulations! dialog box appears. Click Finish
-
The Properties for FileBound on the Server dialog box automatically appears. Type a Rest EndPoint URL (the FileBound URL address) and the associated Username and Password.
The FileBound Rest Endpoint URL comes for your FileBound instance. -
Click OK.
To set up the default profile for the FileBound connector
-
In Properties for FileBound on the Server, go to the Advanced tab.
-
In the Default Profile Information section click the Create button. The Create Default Profile screen appears.
-
Select the Project of interest and click Next.
-
Enter the appropriate File values and click Next.
-
Select a Divider and/or Separator and click Finish.
A default profile for the FileBound connector now exists. This default profile can now be used by the Server Rules engine. See About Rules for information on configuring rules.
With the FileBound connector configured on the server, you can also enable access for
Desktop users need to add the FileBound connector as a recipient.
To add the FileBound connector as a Desktop recipient
-
Open the Upland AccuRoute Desktop.
-
Select Tools > Configure DMS > FileBound. The Configure FileBound screen appears.
-
Type the same credentials (Rest EndPoint URL and associated Username and Password) as used in the steps above.
-
Click OK to finish.
FileBound Line items
The server supports sending Line items to FileBound DMS. Line items are multiple values of information related to one item that is configured in the FileBound project and mapped in AccuRoute Server.
Line item data can be generated by
-
AccuRoute CX
-
Forms Data Extraction
-
Manually providing values in AccuRoute Queue
Note: Pre-requisite: Main Project and Line Items Project should be created and linked in FileBound DMS.
Configurations in AccuRoute Server
AccuRoute manages Line items data in Table Properties. The Table property must be configured with properties to store into the FileBound Line Items project, and the names must match the FileBound Line Items field names.
To create Line items (Job Properties)
-
Start the Server Administrator.
-
Navigate to the Configuration > Job properties.
-
Right-click on the User > New > Job Property.
-
Specify the name.
-
Select Single property and click OK.
To add the Line items to the Table property
Note: The name of the Table Property must match the name of the FileBound Line items Project.
- Start the Server Administrator.
- Navigate to the Configuration > Job properties.
- Right-click on the User > New > Job Property.
- Specify the name (use the same name as that of the FileBound project).
- Select Table property and click Add. The Job Property window appears.
- Under user node, select appropriate line items, Click OK.
- Click OK
to add the Table property.

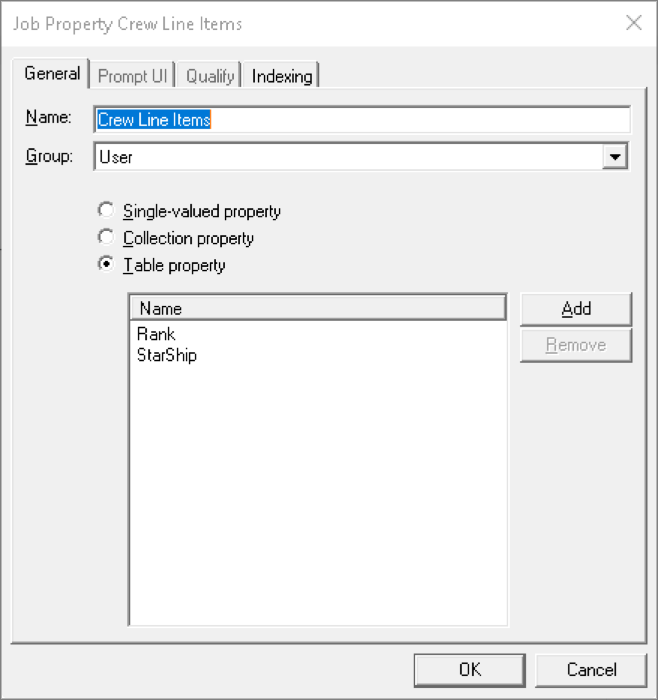
Note: The FileBound Line Items and AccuRoute Table Property configuration do not have to have a 1-to-1 relationship. Any FileBound fields not in the AccuRoute Table will be ignored and vice-versa any AccuRoute Table properties not configured in the FileBound Line Items will be ignored. To use the table property in AccuRoute Queue it must be indexed on the Active Volume list, and the line item properties do not need to be indexed.
Configuring AccuRoute Queue by selecting FileBound as a destination
To configure AccuRoute Queue by selecting Filebound as a destination
-
Create a Queue by email address and allow the admin to create a rule to route that email to the queue.
-
In the Destination tab, set it to Route to the FileBound connector.
-
Click Configure, Profile to FileBound wizard appears.
-
Select FileBound Main project and set the radio button to Create New File, Click Next.
-
Type appropriate data in the File Fields, Click Next.
Note: These values will get overwritten by the choices made in AccuRoute Queue.
-
TypeDelivery Details, Click Finish.
-
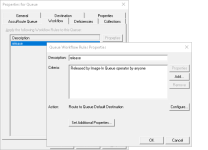
In the Workflow tab, Click Add, Queue Workflow Rules Properties window appears.
-
Type Description, Click Add to define criteria
The workflow criteria should be Released by AccuRoute Queue operator by anyone. -
Click Configure to define workflow action
The Workflow Action should be Route to Queue Default Destination. -
Click OK.
-
In the Properties tab, add the appropriate properties along with the Table property.
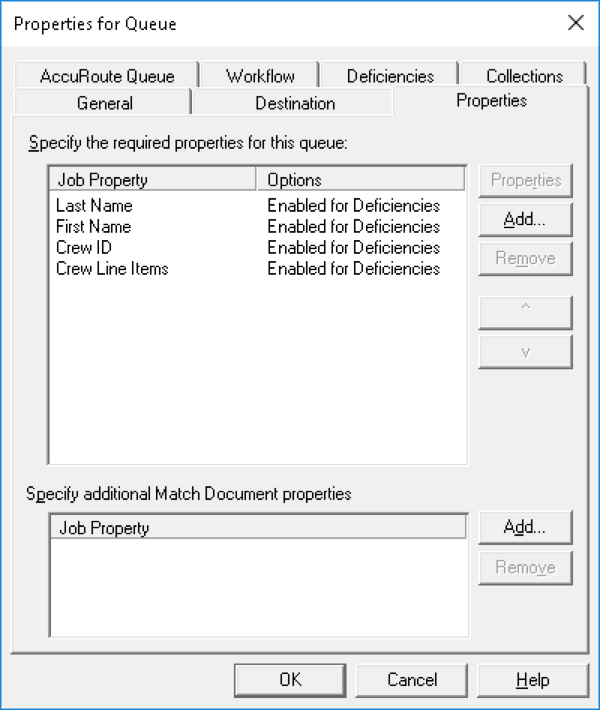

Note: In the Server Administrator, under Groups > Queue Access make sure you give users access to the queue.
Sending a Job using AccuRoute Client(s)
Sending line items to FileBound using AccuRoute Queue by manually providing values.
To send a job using AccuRoute Client(s)
-
Start AccuRoute Queue.
-
Select the Job, and Click Edit Data.
-
Click Add Item, Properties added to the Table property appears.
-
Specify values for the line items and Click Apply and Close the window.
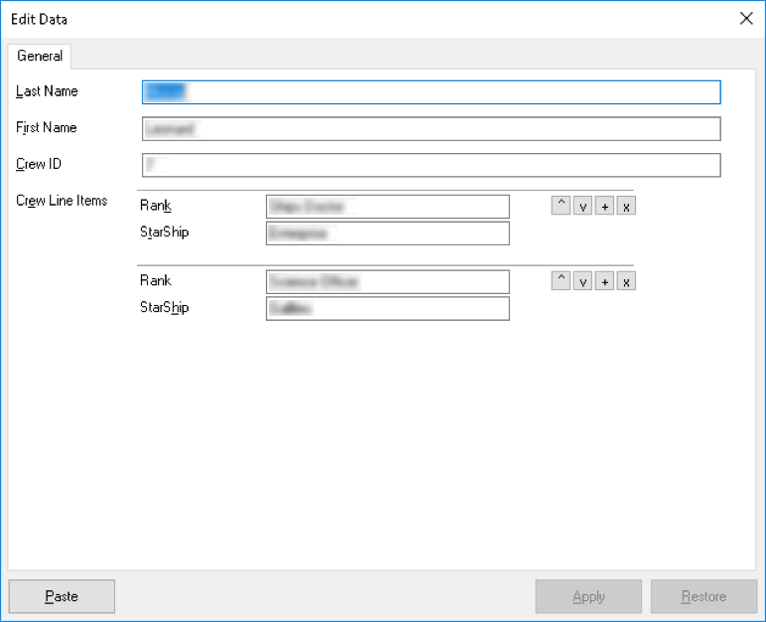
-
Click Release to Send file to FileBound.
Verify the Files on FileBound
To verify the files on FileBound
-
Log into FileBound.
-
Click magnifying glass on left-side menu.
-
Select the project and click Search. The file appears in the list.
-
Click on the Document icon to view the file.
-
Click on the Related Files. Line item values provided for the document can be viewed.