Secure Sockets Layer (SSL) is a standard security protocol for establishing an encrypted link between a server and a client. It allows sensitive data to be transmitted securely. Browsers and secured web servers have the capability of interacting with each other but require a SSL Certificate to establish a secure connection. SSL- secured websites begin with https.
Understanding SSL Certificates
A certificate is required for all SSL- related transactions to ensure secure data transmissions and prevent eavesdropping. There are 2 types of SSL certificates.
Self-Signed CA Certificate
A Self-Signed CA certificate is authenticated by a trusted Certificate Authority authorized to issue them. Certificate Authorities are trusted resources that meet all the requirements that have been set for issuing certificates. They have the appropriate safeguards in place to prevent misuse and other types of fraudulent behavior. It is recommended that a Self-Signed CA certificate is used for secure communication between the Upland AccuRoute server and Ricoh (Android) devices.
Self-Signed Certificate
A Self-Signed certificate is issued by the individual using it with their own software. It may be used on intranets or testing environments; however, if used on the Internet, they generate browser warnings that could dissuade potential customers from using a website. Although, this type of certificate provides encryption, it does not provide authentication and it is not recommended for secure communication between the server and Ricoh (Android) devices.
Note: Installation of the Self-Signed certificate is not allowed on the device’s trust store making it impossible for the client to ever trust the server’s certificate.
Before you begin
The following installations and setup are required in the order specified before SSL configuration can take place.
- Server installation
Note: See the Server Installation and Integration Guide for more information.
- Device Client installation on the server
- Using File Explorer, go to Program Files (x86) > Upland AccuRoute > AccuRoute > Clients > DeviceClient.
- Run setup as an administrator.
Note: The Device Client installation may have occurred during the server installation. The steps are provided in the event you have added devices that were not part of the original configuration.
- Ricoh Device Client installation on the server
- Using File Explorer, go to Program Files (x86) > Upland AccuRoute > AccuRoute > Clients > Ricoh ESA UDC.
- Run setup as an administrator.
- AccuRoute Server to Ricoh device installation
- Start the Server Administrator.
- Right- click Devices. The Devices shortcut menu appears.
- Select New > Ricoh group and create the device group, if necessary.
- Right-click the Ricoh device group. The Device group shortcut menu appears.
- Select Install.
There are several CA resources that you can use to obtain Self-SignedCA certificates. It is recommended that you research and select a CA resource that works for you and your company.
In addition, you must determine whether you are going to use a CA resource to create your own Self-Signed CA certificate and Private key or have the CA resource create and provide you with the Self-Signed CA certificate and Private key.
Note: The following instructions refer to the use of OpenSSL for illustrative purposes only. You are not required to use OpenSSL. If you obtained your Self-Signed CA certificate and Private key from a CA resource, then you can proceed to Creating a Server certificate request.
What you need to do to configure SSL
Complete the steps in the order specified.
- Create or obtain a Self-Signed CA certificate and Private key
- Install and import the Self-Signed CA certificate
- Create a Server certificate request
- Create a Server certificate
- Complete the Server certificate request
- Bind the Server certificate
- Require SSL for the Device Client and Web API
- Enable Directory Browsing for the Device Client and Web API
- Edit the OmlSAPIU.xml file
- Edit the Bootstrap.xml file
- Add the SSL URL to the Device Group Properties
- Add the Self-Signed CA certificate to the Ricoh device
Creating a Self-Signed CA certificate and generating a Private key
Using a CA resource, you must create a Self-Signed CA certificate and generate a Private key.
Note: Refer to the documentation provided by your CA resource. The next series of steps use OpenSSL as an example and may not apply to your specific SSL configuration.
To create a Self-Signed CA certificate and generate a Private key
- Download, open, and run the OpenSSL.exe file as an Administrator.
- Type or copy/paste the following command at the prompt to create a Self-Signed CA certificate, generate a Private key, and press Enter.
OpenSSL> req -x509-nodes -days 365 -newkey rsa:2048 -keyout privateKey.key -out certificate.crt-reqexts v3_req -extensions v3_ca
Note: X.509 version 1 certificatesare not allowed by some mobile platforms. Use the X.509 version 3 certificatesinstead. When creating Self-signed CA certificates, ensure that they are X.509 version 3 and have the following extension defined: basicConstraints= CA:TRUE.
- Verify the certificate version and extensions, if necessary, by typing the following command and press Enter.
openssl x509 -in certificate.crt-text -noout
Note: Refer to the documentation provided by your CA resource on how to specify the required version and certificate extensions.
See the OpenSSL.exe file example below.
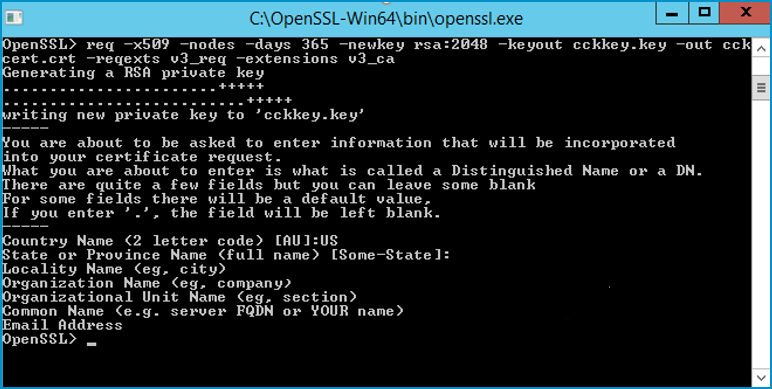
Type the following information that will be included in your certificate request and press Enter.
- Country Name; for example, US
- State or Province Name; for example, TX
- Locality Name; for example, Austin (City)
- Organization/Company Name; for example, Upland Software
- Organizational Unit Name; for example, AccuRoute Server Administration (Department)
- Common Name; for example, server FQDN (Fully Qualified Domain Name = hostname.domainname.com)
- Email Address; for example, username@company.com
Note: Some of these fields can be left blank. A Self-Signed CA certificate (certificate.crt) is created and a Private key (privateKey.key) is generated when you are done.
Installing and importing a Self-signed CA certificate
Using a CA resource, you must install and import a Self-Signed CA certificate into Internet Information Services (IIS).
To install and import a Self-signed CA certificate
- Using File Explorer, go to the OpenSSL > bin folder (if you are using OpenSSL).
Note: If you are using a different CA resource, go to the appropriate CA resource folder where the Self-signed CA certificate was saved to. These steps may not apply to the CA resource you are using. Refer to the CA resource's Help to determine whether installing and importing a Self-signed CA certificate is required. For illustrative purposes, these instructions are specific to OpenSSL.
- Right-click the certificate's filename; for example, *.crt. The File Explorer shortcut menu appears.
- Select Install Certificate. The Certificate Import Wizard appears.
- Select Local Machine and click Next.
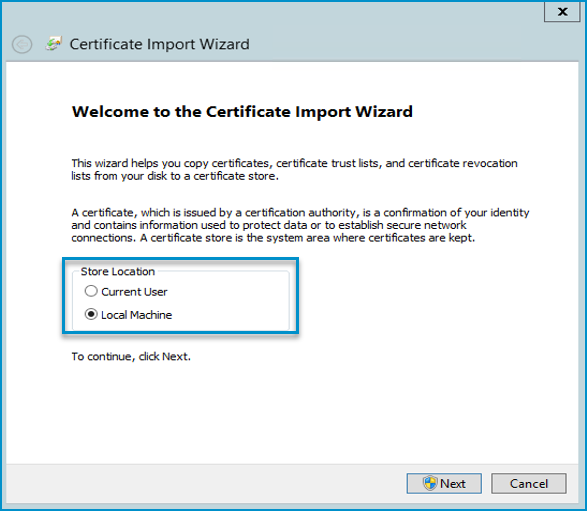
- Select Place all certificates in the following store.
- Click the Browse button, select Trusted Root Certification Authorities and click OK.
- Click Next. The Completing the Certificate Import Wizard dialog box appears.
- Click Finish.
- Click OK. The import was successful message appears.
See also
SSL Configuration Server Certificate Request
SSL Configuration Device Client and Web API
SSL Configuration Server and Device