AccuRoute CloudFax is installed on HP devices that run the HP Workpath application. This integration enables users to send scanned faxes from device to recipients in the cloud and more. Delivery of the faxes are managed by InterFAX used for cloud fax secure document distribution.
Users can use AccuRoute CloudFax to perform the following tasks after signing in.
-
Send scanned faxes to fax recipients.
-
Add a Reference number to a fax message for internal customer use.
-
Add a Notification email address.
-
Add, remove, and edit fax contact information.
-
Manage an address book.
-
View and print inbound faxes.
-
View fax history.
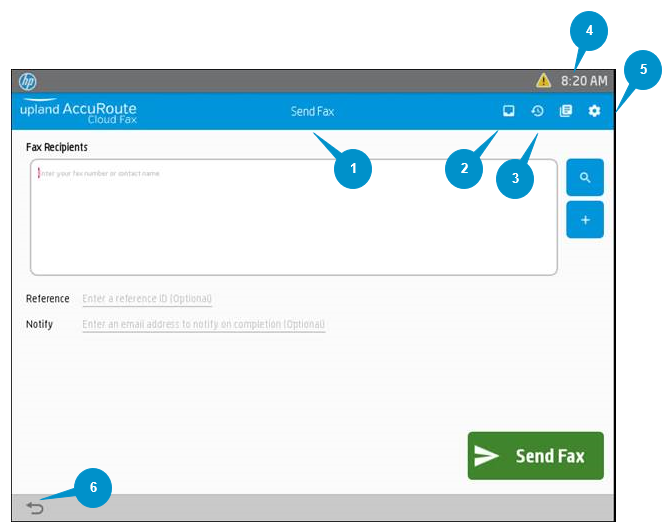
AccuRoute CloudFax at a Glance
|
AccuRoute CloudFax Legend |
Description |
|---|---|
|
1. Title |
Identifies the screen the user is working on. |
|
2. Inbound Faxes icon (from left to right) |
Use to view and print recent inbound faxes. |
|
3. Fax History icon |
Use to search and view fax delivery status. |
|
4. Address Book icon |
Use to view and modify the Address book. |
|
5. Settings icon (For Administrators only) |
Use to specify InterFAX Account settings and more. Note: Device users will not see the Settings icon. It is intended for Administrators only. |
|
6. Back icon |
Use the Back icon located at the bottom-left of the screen to go to the previous screen. |
The Send Fax screen has the following UI elements that is specific to sending faxes.
-
Fax Recipients box
-
Search
-
Plus (+) Add Fax Recipient
-
Reference
-
Notify
-
Send Fax
Sending scanned faxes to fax recipients
You can send scanned faxes to fax recipients by using the Send Fax screen.
To send scanned faxes
-
Use the Fax Recipients box to type the fax number or recipient name if it currently exists.
-
Or use the Plus (+) button to add the recipient name and fax number.
-
On the Fax Recipient screen, type the recipient name and fax number.
-
Select OK.
-
On the Send Fax screen, use Reference to add a Reference ID to the scanned fax (optional).
-
On the Send Fax screen, use Notify to add an email address for notification purposes (optional).
-
Select Send Fax.
The following messages appear on the Send Fax screen.
-
Document is being scanned and uploaded.
-
Fax sent successfully to all the recipients.
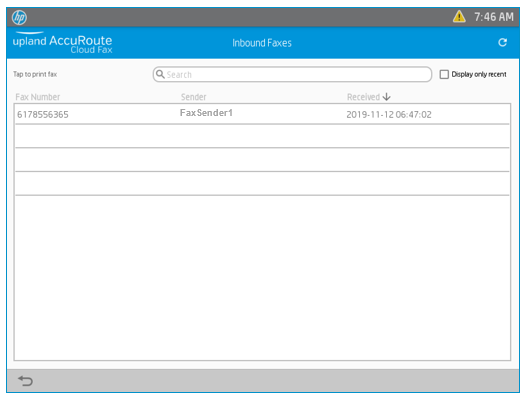
Viewing, searching, and printing inbound faxes
You can view, search, and print inbound faxes by using the Inbound Faxes screen.
To view, search, and print inbound faxes.
-
Select the Inbound Faxes icon. A list of inbound faxes appears.
-
Use the Search bar to search by fax number, sender, or date/time received, if necessary.
-
Filter the inbound faxes list to display only the most recent with the Display only recent check box. The most recent faxes are shown for the current day starting at 12:00 am.
-
Select an inbound fax to print.
Note: You can use the Refresh icon at the top-right to refresh the inbound faxes list, if necessary.
See the Inbound Faxes screen example below.
Viewing fax history
You can view a history of faxes and their delivery statuses by using the Fax History screen.
To view fax history
-
Select the Fax History icon. A list of the faxes and their delivery statuses appears.
-
Use the Search bar to filter fax history by date submitted, fax number, name, reference and status.
Note: You can sort any of the columns in ascending or descending order. Date Submitted is the default column. Tap on any column heading to change the sorting column. The reference information comes from the Reference field on the Send Fax screen, if used by the fax sender.
See the Fax History screen example below.

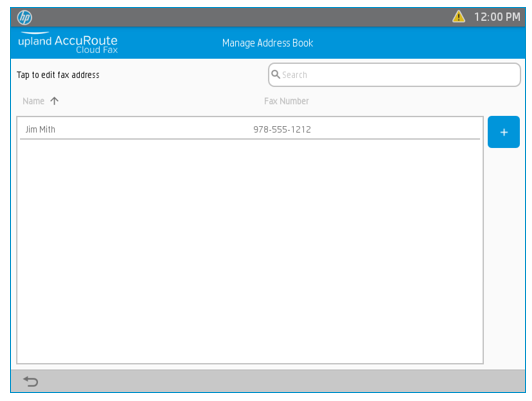
Managing the Address Book
You can add, edit, and delete address book contacts by using the Manage Address Book screen.
-
Select the Manage Address Book icon. The Manage Address Book screen appears.
Adding a contact
Use the Plus (+) icon to add contacts to the Address Book.
To add contact
-
Select the Plus (+) icon. The New Contact screen appears.
-
Type a name in the Name field.
-
Type a fax number in the Fax Number field.
-
Select OK.
Editing a contact
Use the contact list on the Manage Address Book to edit any contact.
To edit a contact
-
Select a contact on the list. The Edit Contact screen appears.
-
Edit the name and fax number, if necessary.
-
Click OK.
Deleting a contact
Use the Delete button on the Edit Contact screen to delete contacts.
To delete a contact
-
Select a contact on the list. The Edit Contact screen appears.
-
Select Delete. The Are you sure you want to delete message appears.
-
Click OK.
Note: You can use the Search bar to find specific contacts to edit or delete.
See the Manage Address Book screen example below.
See also