Device Group Prompts can be set up to request additional information from users when scanning documents at a device. The following properties related to where you want the prompts to appear are available for setup.
-
Workflow Individual Pages – Prompts are shown on individual pages.
-
Workflow Group – Prompts are shown as a group on a page.
-
More Options – Prompts are shown on the More Options page.
-
Ready to Scan – Prompts are shown on the Ready to Scan page.
Any or all prompts and respective locations can be combined for use at a device. In addition, you can set up a Display If condition for Workflow Group, More Options, and Ready to Scan to show the prompts only when certain criteria are met.
Note: Display If is not supported in Workflow Individual Pages. You can create separate Workflow Groups and use Display If to display prompts on individual pages, if necessary.
Before you begin
-
Set up your devices or device groups.
-
Determine what prompts are needed for your document workflows at a device.
-
Create your prompt job properties or use System-defined properties, if necessary.
Note: Spaces are not allowed when creating prompt job properties, for example, ClientID. The labels can contain spaces.
-
Determine where you want the prompts to appear.
-
Determine if any of the prompts require a Display If condition.
Note: Prompts are always shown when a Display If condition is left blank or not specified during setup.
Setting up a Workflow Group Display If prompt
A Workflow Group > Display If prompt example will be discussed below. This example is for illustrative purposes only and may not reflect your company’s unique configurations.
The Administrator of Legal Company XYZ has created the following prompt job properties.
-
ClientID
-
Matter
-
CompanyName
-
DivisionName
-
RepresentativeID
-
Priority (High, Normal, or Low)
Company Name, Client ID, Matter, and Division Name are set up as a Workflow Group with a Display If condition. If the Company Name is equal to XYZ then the device user must enter the Client ID, Matter, and Division Name values. If another company name is used, then the prompts will not appear. Priority is set up as a More Options prompt. The device user must specify whether the document has a High, Normal or Low priority. The Representative ID is set up as a Ready to Scan prompt. The legal professional must specify an ID before the document is scanned.
Adding the Prompt Job Properties
You can add your prompt job properties by using the Devices Group Properties > Buttons dialog box.
To add the prompt job properties on Workflow Group pages with Display If
-
Start the Server Administrator.
-
Expand Devices.
-
Right-click the device group. The Properties shortcut menu appears.
-
Select Properties. The Device Group Properties dialog box appears.
-
Select the Buttons tab.
-
Select a button, for example, Routing Sheet. The Button Properties dialog box appears.
-
Select the Prompts tab.
-
Select Add. The Select Prompt Job Property dialog box appears.
-
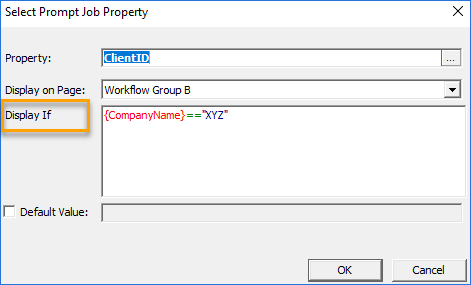
Type the Prompt Job Property name in the Property box, for example, CompanyName or use the Ellipsis (…) button to find and select the property from the drop-down list.
-
Select the Display on Page arrow and choose Workflow Group A.
Note: In this example, a condition is not specified in the Display If box so that it always appears as a prompt for the device user.
-
Select OK.
-
Select Add to add the following prompt job properties one at a time.
-
ClientID
-
Matter
-
DivisionName
-
-
Select Workflow Group B for these prompt job properties.
-
Type the following criteria example in the Display If box for ClientID, Matter, and DivisionName.
Example: {CompanyName}=="XYZ"
See the ClientID Display If example below.
-
Select OK.
How it works?
In this example, the Company Name prompt will appear after selecting the Routing Sheet button on the device. The device user types XYZ and selects Next to view the additional prompts. ClientID, Matter, and DivisionName will not appear on the device if the device user types another company name value. Default value is not selected.
Note: You can set a default value for a prompt by selecting the Default Value check box. The Device user can type or change the default value at the device, if necessary.
More Options
To add prompt job properties on the More Options page
-
Start the Server Administrator, if necessary.
-
Expand Devices.
-
Right-click the device group. The Properties shortcut menu appears.
-
Select Properties. The Device Group Properties dialog box appears.
-
Select the Buttons tab.
-
Select a button, for example, Routing Sheet. The Button Properties dialog box appears.
-
Select the Prompts tab.
-
Select Add. The Select Prompt Job Property dialog box appears.
-
Type the Prompt Job Property name in the Property box, for example, Priority or use the Ellipsis (…) button to find and select the property from the drop-down list.
-
Select the Display on Page arrow and choose More Options.
Note: In this example, a condition is not specified in the Display If box so that it always appears as a prompt for the device user on the More Options page.
-
Select OK.
Ready to Scan
To add prompt job properties on the Ready to Scan page
-
Start the Server Administrator, if necessary.
-
Expand Devices.
-
Right-click the device group. The Properties shortcut menu appears.
-
Select Properties. The Device Group Properties dialog box appears.
-
Select the Buttons tab.
-
Select a button, for example, Routing Sheet. The Button Properties dialog box appears.
-
Select the Prompts tab.
-
Select Add. The Select Prompt Job Property dialog box appears.
-
Type the Prompt Job Property name in the Property box, for example, RepresentativeID or use the Ellipsis (…) button to find and select the property from the drop-down list.
-
Select the Display on Page arrow and choose Ready to Scan.
Note: In this example, a condition is not specified in the Display If box so that it always appears as a prompt for the device user on the Ready to Scan page.
-
Select OK.
-
Select the Ready to Scan tab.
-
Select the Enable Enhanced User Interface check box.
-
Select OK on the Button Properties dialog box.
-
Select OK on the Device Group Properties dialog box.
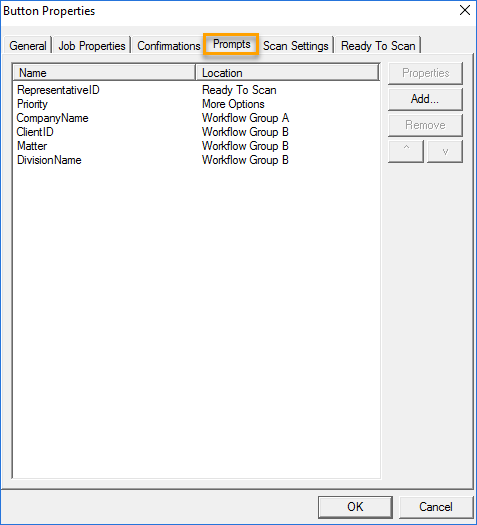
See the Button Properties > Prompts dialog box example below.
See the Workflow Group Display If example below.
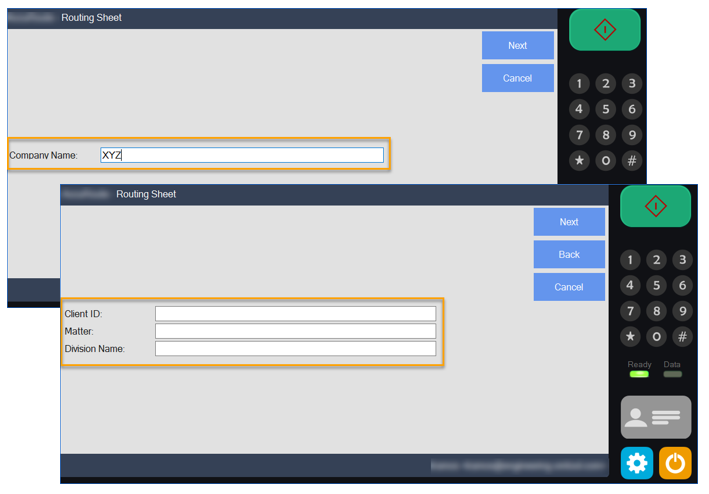
Note: A device simulator was used in the example above for illustrative purposes and may not reflect your actual device display.