The Web Service API connector enables communication between the
You will need to configure the following properties in the Server Administrator so that it matches your REST API parameters.
-
Endpoint, HTTP method, Timeout value and whether client certification is required when using HTTPS.
-
Headers and values
-
Body type – Document or Substituted Text parameters
Note: Communication between the server and REST API may fail if the parameters are not set up correctly, contact Technical Support for additional information. This connector is not part of the standard Server Administrator installation and requires a license.
Before you begin
Administrators must complete the following tasks.
You can add a WebService API connector by using Connectors in the Server Administrator.
To add a WebService API connector
-
Start the Server Administrator.
-
Right-click Connectors.
-
Select New AccuRoute connector > WebService API. The Create New WebService API Connector wizard appears.
-
Use the default Message Server setting or select Remote Server and specify its address.
-
Select Next.
-
Use the default name or specify a new connector name in the Name box.
-
Select Next.
-
Select Finish.
You can configure the WebService API connector by using Connectors in the Server Administrator. This is where you will configure the following properties for your REST API.
-
Endpoint, HTTP method, Timeout value and whether client certification is required when using HTTPS.
-
Headers and values
-
Body type – Document or Substituted Text parameters
To configure the WebService API connector
General Properties
-
In the Server Administrator, select Connectors. The Connectors details pane appears.
-
Select the WebService API on the Server connector from the list. The WebService API on the Server Properties dialog box appears.
-
In the General properties, ensure the Name, License, Instances and Enable Connector settings are accurate. Modify if necessary.
Note: Configuration of the Manager Connector Profile is not required or applicable for the WebService API connector.
End Point Properties
-
Select the End Pointt tab.
-
Select one of the following HTTP Methods from the Action drop-down list.
-
POST request is used to create data on a platform.
-
PUT request is used to modify a resource. It updates the resource with data passed in the body payload. If no resource matches the request, it will create a new resource.
-
GET request retrieves data.
-
-
Specify the Endpoint server or service URL in the URL box.
Note: The Use Client Certificate check box becomes active when you specify a HTTPS URL in the box.
-
Use the default Timeout value or modify, if necessary. This is the amount of time in seconds the server will wait to connect to the Rest API before it fails.
-
Select the Use Client Certificate check box if you want to use certificates for authentication purposes.
-
Select a certificate from the drop-down list.
Header Properties
HTTP headers are used to pass additional information between the clients and the server through the request and response header.
See the following standard header examples below.
-
Authorization: Basic <credentials> – is used to request HTTP basic authentication credentials.
-
Content – Type: application/x-www-form-urlencoded – is used to define the content type for the body of the request. This is used for POST and PUT requests.
-
X-API-Token: API Key value – is used to pass your API key. The API key is an access token that a client provides when making API calls. It is a straightforward way to secure access and a popular authentication method used with REST APIs.
-
Select the Headers tab.
-
Select the Add button. The HTTP Header Properties dialog box appears.
-
Specify a header, for example, Authorization in the Header box.
-
Specify a value, for example, basic username:password in the Value box.
-
Select OK.
-
Repeat Steps 12 through 14 until you are done.
See the HTTP Header Properties dialog box example below.
Body Properties
The body is used to send and receive data via the REST API. You can send/receive the actual document or manipulate the transmission of the document’s data by using substituted text.
Substitution allows the REST API configuration to use values from a document being processed, for example, customer name. The percent symbols (%) are used to enclose and specify a data value, for example, %CustomerName% anywhere in a field that supports substitution. Any number of substitutions can be done in a field.
Note: Substitution can be applied to all configuration fields, for example, REST URL, header name, and value fields.
-
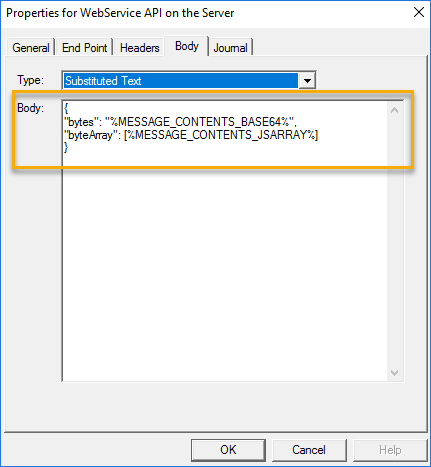
Use the default Document type or select Substituted Text from the Type drop-down list.
-
Specify the substituted text in the Body box if the Substituted Text option was selected.
See the following Substituted Text examples and syntax below.
-
MESSAGE_CONTENTS_BASE64 - is commonly used when there is a need to encode binary data for storage and transmission over media that is designed to deal with ASCII. This ensures data remains intact without changes occurring during the transmission.
-
MESSAGE_CONTENTS_JSARRAY- an array is a single variable in JavaScript that is used to store various elements. It is a collection of elements in a list, for example, objects, strings , numbers or other data type.
Note: Substitute your information within the syntax provided.

Troubleshooting with the Journal
The Journal displays a history of events related to a message on the server. If a message has not been delivered or if it fails on the server, the journal is essential in helping you troubleshoot any issues.
-
Select the Journal tab.
-
View the events related to the server and REST API.
-
Select the journal entry of interest. Additional information is provided.
-
Select Close.
-
Select Copy to Clipboard to copy the entire contents of the journal so that you can paste it into an email or another application. Switch to the other application and paste the contents.
-
Select OK.
See the Journal example below.
See also