You can set up primary customized options to configure the features available on the Web Client. Define these options in the Web Client View Properties page.
Configuring Primary customized options
To configure primary customized options
1. Launch the Server Administrator.
2. Click Configuration > Legacy Web Views.
Note: Two views are available for configuration: View.admin.xml and View.default.xml. Enable the view of choice per user group in the Web Client tab of Group Properties. For user groups assigned View.admin.xml, an Administration feature can be configured in the Folders tab of the Web Client View Properties page.
3. Right-click either View.default.xml or View.admin.xml in the results pane and select Properties. The Web Client View Properties page appears.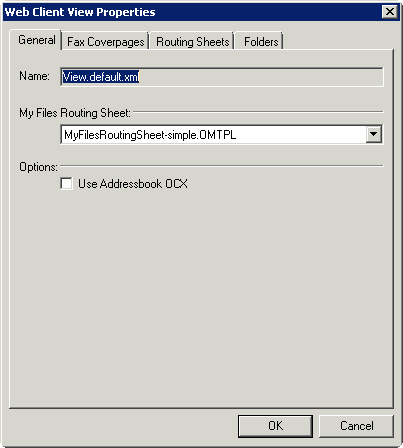
Use the Web Client View Properties page for the following procedures.
On the Web Client View Properties page (General tab), select a template file from the My Files Routing Sheet drop-down.
Note: Typically, the default Routing Sheet template for Personal and Public Distributions is different from the template used for the Scan to My Files feature. See also instructions for Making Routing Sheet templates available and setting a default template.
You can use the OCX for Address Book browsing. Enabling this feature requires two steps:
-
Selecting the Use Addressbook OCX option on the General tab of the Web Client View Properties page
-
Enabling ActiveX options on the desktop
After you complete these steps (described below), the Web Client will have two additional buttons:
Step 1: Enabling the Use Addressbook OCX option
-
On the Web Client View Properties page (General tab), select the Use Addressbook OCX option in the Options section.
-
Click OK to save your changes.
Step 2: Enabling ActiveX options on the desktop
-
In Internet Explorer, open the Tools menu and select Internet Options.
-
Click the Security tab.
-
Click Trusted sites (the green tick mark).
-
Click the Sites button.
-
Enter the web client URL in the Add this website to the zone box. Click the Add button to add the web client URL to the trusted sites.
-
Click Close.
-
Click the Custom level button.
-
Scroll down to ActiveX controls and plug-ins in the Security Settings - Trusted Sites Zone window.
-
Set the following conditions:
-
Allow previously unused ActiveX controls to run without prompt — select Enable
-
Allow Scriptlets — select Enable
-
Automatic prompting for ActiveX controls — select Enable
-
Binary and script behaviors — select Enable
-
Download Signed ActiveX controls — select Enable
-
Download unsigned ActiveX controls — select Prompt
-
Initialize and script ActiveX controls not marked as safe for scripting — select Prompt
-
Run ActiveX controls and plugins — select Enable
-
Script ActiveX controls marked safe for scripting — select Enable
-
Click OK and Apply.
-
Close all the instances of Internet Explorer and relaunch the site.
You can make fax cover page templates available for use by using the Web Client View Properties page.
To make Fax Cover Page templates available
-
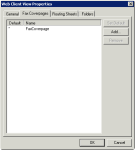
On the Web Client View Properties page, click the Fax Coverpages tab.
-
To add a cover page, click the Add button. The Select Fax Coverpages dialog is displayed.

-
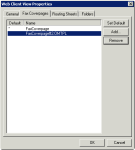
Select a cover page file. Click OK. The file is added to the list. For example:
-
If you want to change the default cover page selection, highlight the name and click the Set Default button. An asterisk (*) appears in the Default column to the left of the cover page name.
-
Click OK to save your changes.
You can make Routing Sheets templates available for use and set a default template by using the Web Client View Properties page.
Note: Typically, the default Routing Sheet template for Personal and Public Distributions is different from the template used for the Scan to My Files feature. See Setting a default Routing Sheet template for use with the Scan to My Files feature. for more information.
To make Routing Sheet templates available and set a default template
-
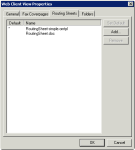
On the Web Client View Properties page, click the Routing Sheets tab.
-
To add a Routing Sheet, click the Add button. The Select Routing Sheets dialog is displayed.

-
Select a Routing Sheet file. Click OK. The file is added to the list.
-
If you want to change the default Routing Sheet selection, highlight the name and click the Set Default button. An asterisk (*) appears in the Default column to the left of the Routing Sheet name.
-
Click OK to save your changes
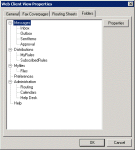
You can enable folders for display in the Web Client by using the Web Client View Properties page and the Folders tab.
To enable folders for display in the Web Client
-
On the Web Client View Properties page, click the Folders tab.
-
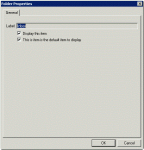
To set the properties for a folder, select the folder of interest and click the Properties button. The Folder Properties dialog appears.
-
For each feature (Messages, Distributions, etc.) and related folder (Inbox, Outbox, etc.), you can select a check box to:
-
Display the item for the user.
-
Set the item as the default to display when the user starts to use the User Interface.
(Only one feature and one related folder within the feature can be set as the default to appear. In the example shown above, Inbox (in Messages) will appear by default.)
-
Click OK twice to save your changes.
To enable the Administration Folder for authorized View.admin.xml users
-
In the Web Client View Properties for View.admin.xml, select the Folders tab.
-
Select Administration > Properties.
-
Select the Display this folder check box and click OK.
Note: Verify that the User Group properties have the View.admin.xml selected for the Web Client Views tab.
The following topics provide an overview of the Administration Folder options for End User Interface users.
You can configure routing tables by using the Web Client > Administration button.
To configure routing tables
1. In theWeb Client, click the Administration button. Click Routing and then click the New button. The Routing Destination Properties page opens.
2. Enter the following information in the New Routing Destination page:
-
Fax Number: Enter the fully normalized fax number; for example, +10005551234
-
Device Serial Number: Enter the serial number for the HP device.
-
For the Manual Hold option, check the Hold all jobs option if all jobs to this device number are to be held indefinitely.
-
If you selected the Manual Hold option, go to the Manual Override Pin text box and enter the PIN value to be used for enabling or disabling Manual Hold.
-
Fax Release Calendar:
-
Check the Enabled option.
-
Select the Calendar from the drop-down menu.
-
Select the Time Zone from the drop-down menu.
-
Note: To be an option, the Fax Release Calendar must be created first.
-
Destination: Choose Print on Device Printer, Route via RightFax, or the Email/UNC option:
-
For the Print on Device Printer option, provide the device IP Address or the UNC path to the device.
-
-
If using a Regulated Printer, select the Regulated Destination check box and enter the IP Address or the UNC path to the regulated printer.
-
You can select the Print on specific Media check box and identify from the drop-down menu the paper size on which incoming faxes will be printed.
-
You can also select the Apply Document Stamp check box and choose the stamp type of interest from the drop-down men
-
-
For the Email/UNC option, select either E-mail or UNC and enter the email address or UNC path in the Destination text box.
-
-
You can define a specific document format from the Delivery Format drop-down menu.
-
You can also specify a document name in the Delivered Document Name text box.
-
-
3. Click OK to finish.
To verify that a device was added properly
-
In the Web Client, click the Administration button and then click Routing.
-
In the Find drop-down menu choose Fax Number. Optionally, you can choose the Device Serial Number.
-
Enter the fax number and click Go.
-
Verify that the DTT entry shows up.
-
Click on the fax number or the Device Serial Number, verify that the properties for the DTT entry appear.
You can configure fax release schedules by using Web Client > Administration > Calendars.
To configure fax release schedules
-
In the Web Client, click the Administration button.
- Click Calendars.
-
Click the New button and enter a name for the Calendar.
-
Enter start and end times for Monday - Friday.
-
Select Saturday and enter start and end times for Saturday.
-
Select Sunday and enter start and end times for Sunday.
Note: Saturday and Sunday must be configured for all calendars that are created.
Administrative access to the Help Desk provides authorized users (of View.admin.xml) the ability to oversee and manage Messages and Distributions (both their own and those of others).
Help Desk users can perform administrative tasks related to Messages and Distributions, including:
-
searching based on specific criteria
-
viewing process details and history
-
canceling from the active queue
-
resending processed messages
-
viewing associated attachments
Note: Server administrators authorize Administrative access to Help Desk for user groups on the Web Client tab of Group Properties. Permission to perform individual Help Desk tasks, such as opening attachments, is granted on the Security tab of Folder Permissions, accessed from Web Client View Properties.
Searching Messages and Distributions
Help Desk users can conduct searches based on any of the following criteria.
-
Status (in process, succeeded, or failures)
-
Date and time ranges
-
Job ID
-
Sender
-
Destination
To search Messages and Distributions
-
Click Search from the Help Desk menu bar.
-
Select the criteria of interest and click the Search button. A list of results appears.
-
To resend or cancel items in the list, see Managing Messages and Distributions below.
Managing Messages and Distributions
Help Desk users can work directly with the list of Help Desk items or with any individual message. Click any message in the list to view its Message Properties.
Managing from Message Properties
-
To resend the current message, click Resend.
-
To view the message attachment(s), click the filename. You can forward or print the document directly from the desktop application in which it is being viewed.
Managing from the Help Desk list or Search results
Resending messages
-
Select the check boxes for those items of interest.
To select all messages, click the check box at the top of the table. -
Click Resend on the Help Desk menu bar.
Canceling messages
-
Select the check boxes for those items of interest.
To select all messages, click the check box at the top of the table. -
Click Cancel on the Help Desk menu bar.
Note: Help Desk users can only cancel messages that are still in progress.
Viewing messages
-
Click the message of interest from the Help Desk list or from Search results.
-
The Message Properties screen appears with detailed information for the selected message.
Viewing attachments
-
Click the message of interest from the Help Desk list or from Search results. The Message Properties screen appears.
-
In the Attachments section, click directly on the attachment filename to view the file.
You can forward or print the document directly from the desktop application in which it is being viewed.
See also
About Legacy Web Views (Web Client)
Legacy Web Views Secondary Customized Options