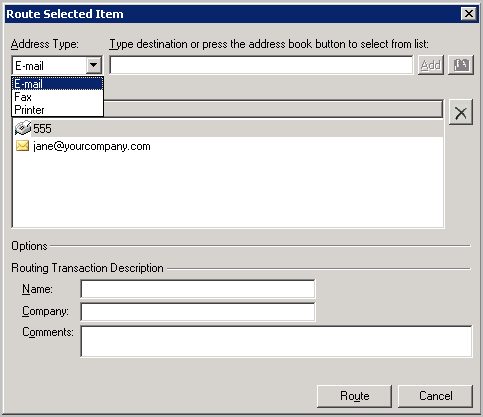
The Send option allows you to route a selected document to Email, fax or a printer destination.
To send a document:
-
Select the document you want to send and click the
 icon. Alternately, click
File >Send or right click the
document and choose Send from the
drop down menu.
icon. Alternately, click
File >Send or right click the
document and choose Send from the
drop down menu. -
Click on the Address type drop down and select from E-mail, Fax or Printer.
-
If you select E-mail, enter an email address in the text box beside the Address type text box. If you select Fax, enter the fax number in the text box beside the Address type text box. if you select Printer, enter the printer destination in the text box beside the Address type text box.
-
Click Add. The destination you added is listed in the Destinations section.
-
Click Route to send the document.
Note about Routing Transaction Description
When sending a message, any details you enter in the Name, Company and Comments text box in the Routing Transaction Description text box are not retained.
If you want to retain these information, you must enter the information in the omNotification-IIQ.omtpl template as shown below:
Name:%SENDER_CUSTOM1%
Company:%SENDER_CUSTOM2%
Comments:%SENDER_CUSTOM3%
The value set by the Queue user will replace the matching value found in the %%s, and will remove percents as well.
See also
Working with Messages in New Items Folder