Setting up OneDrive with Limited Permissions
Minimizing the risk of unauthorized access and use of a company's applications, resources, and data and protecting user identities and their credentials is a top priority for companies conducting business globally. Administrators can set up OneDrive for Business with limited permissions by using Microsoft Azure Active Directory.
Registering the Server with limited permissions
You can register the server with limited permissions by using Azure Active Directory.
To register the server with limited permissions
-
Sign in to Azure AD. The Azure AD Admin Center page appears.
-
In the left pane, click the All services icon. The All services page appears.
-
Click App registrations. The App registrations page appears.
-
Click + New registration. The Register an application page appears.
-
Type a server application name in the Name box.
-
Select who can use this application or access this API from the Supported account types list.
-
Set the Redirect URL to Public client/native (mobile & desktop) and https://license.omtool.com/redirect in the appropriate boxes.
-
Click Register at the bottom of the page. The Registered application page appears.
-
Make a note of or copy the Application (client) ID and the Directory (tenant) ID for OneDrive Folder Properties > Settings configuration after delegating the appropriate permissions.
-
Click View API Permissions. The Request API permissions page appears.
-
Click Microsoft Graph. The Select Permission page appears.
-
Ensure Delegated permissions is selected.
-
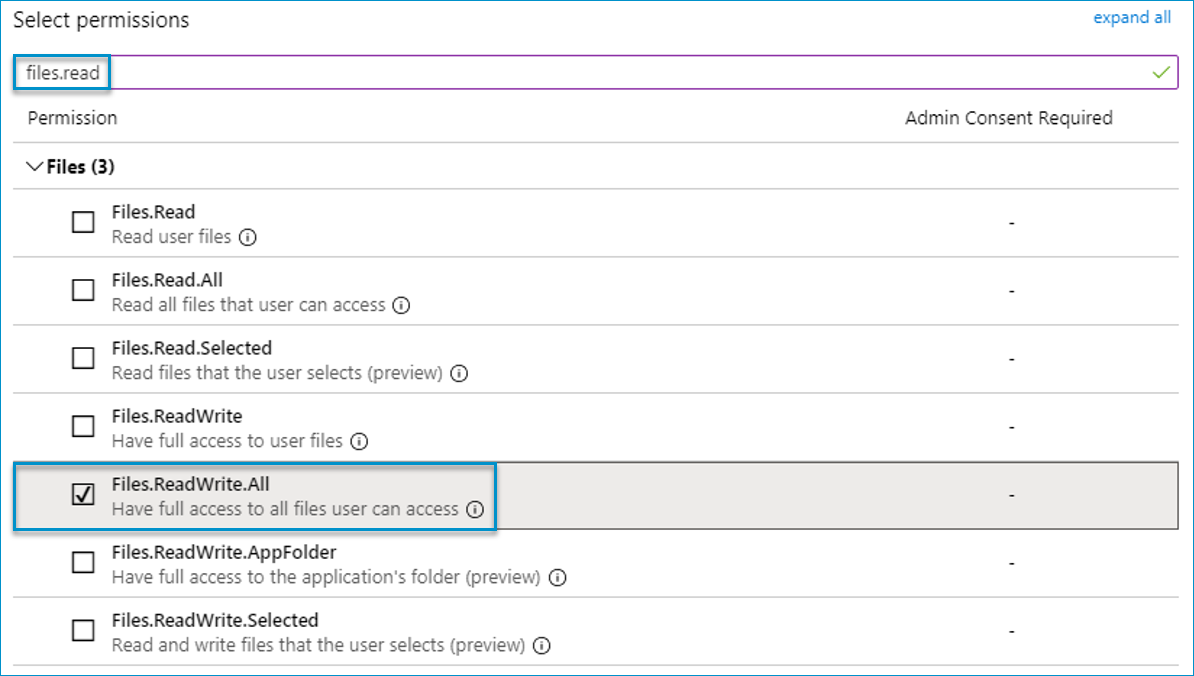
Type files.read in the Select permissions box.
-
Select Files.ReadWrite.All on the Select permissions > Files list.
-
Select Add Permissions.
You can configure the OneDrive folder by using the Server Administrator > Configuration node.
To configure the OneDrive folder
-
Start the Server Administrator, if necessary.
-
Expand Configuration, if necessary.
-
Right-click Folders. The Folders shortcut menu appears.
-
Select New > OneDrive. The Folder Properties dialog box appears.
-
Specify the General parameters.
-
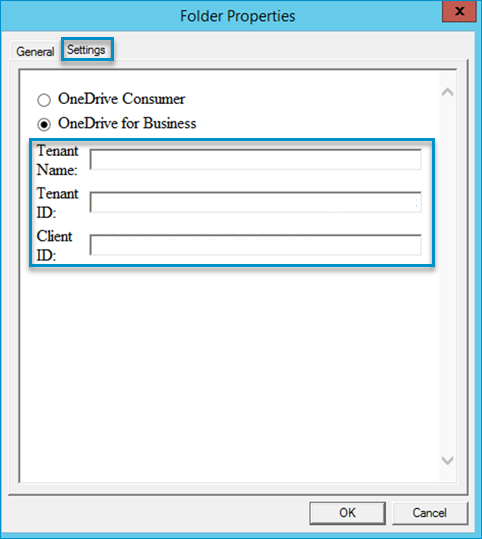
Select the Settings tab.
-
Ensure OneDrive for Business is selected.
See the Folder Properties > Settings dialog box example below.
-
Specify the Tenant (Primary Domain) name.
Note: The Tenant name is the Primary Domain name, for example, primarydomain.onmicrosoft.com found on the Azure Active Directory > Overview page. You will need to sign in. It shows your specific primary domain name. Only use the information that appears before the first period in onmicrosoft.com.
-
Specify the Tenant and Client ID.
-
Click OK.
OneDrive folder users can authorize their folders by using WebApps > Preferences > Authorizations.
To authorize the OneDrive folder.
-
Open WebApps.
-
Select Preferences > Authorizations.
-
Select the OneDrive folder and click Properties. The WebApps : Folder Authorization Properties dialog box appears.
-
Click OK.
-
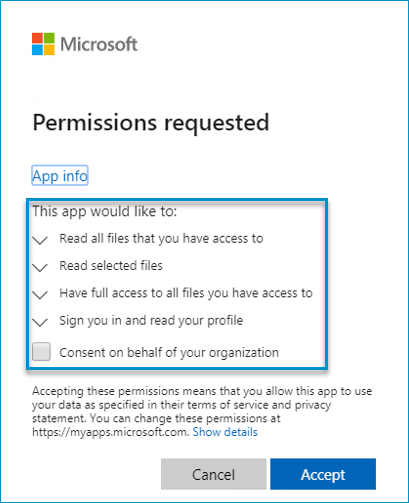
Sign in to OneDrive. The Microsoft Permissions requested dialog box appears.
See the Microsoft Permissions requested dialog box example below.
-
Click Accept. The OneDrive folder with red x icon changes to a blue check mark on the WebApps > Preferences > Authorizations page.
Note: Users will be able to scan to OneDrive on a device if the button has been set up.