The Server-to-Server Routing 2 (SSR2) connector has been developed to allow server-to-server routing of outbound fax messages in an On-premises and Cloud environment. Using the SSR2 connector, an Upland AccuRoute server can send fax messages to another Upland AccuRoute server or receive fax messages from a different Upland AccuRoute server.
The messages are relayed via WebApps REST APIs. Therefore, WebApps and SSR2 connectors must be configured on both the sending and receiving servers. The fax workflow is determined by routing rules set on both servers. Configuring the routing rules and the SSR2 connector make it possible for the modem server closest to the fax destination to deliver the fax.
Note: Before you create the routing rules, review the flow of traffic in your company to ensure that all routing situations are covered, and that each server has all of the rules required to route and receive messages via server-to-server routing 2.
Expand to view more information.
Server-to-Server Routing 2 (SSR2) routes faxes between two or more Upland AccuRoute servers reducing the cost of sending faxes long distance over phone lines. The servers with SSR2 connectors use routing rules to determine how a fax is routed via server-to-server routing 2. For example, when a fax message in Server A matches a routing rule specifying the SSR2 connector as the routing action and destination, Server A routes the message via SSR2 connector, over the internet, to the WebApps REST API endpoint of another Server B.
Server B picks up the fax message through its Web Apps REST API, processes the message and routes it according to its routing rules. When the message on server B is fully processed, it generates a status message (success or failure). Server B sends a confirmation message to server A via its SSR 2 connector, over the internet, to the WebApps REST API endpoint of server A. Then server A, on receiving the confirmation through its WebApps REST API, updates the status of the original fax message.
Before you begin
Administrators must complete the following tasks.
-
Install and set up the Upland AccuRoute server if necessary.
-
Set up supported fax board.
-
Configure supported Telco and service from a telephone company.
-
Install WebApps on the sending and receiving servers.
-
Get the WebApps URLs for the sending and receiving servers.
Note: You will need this information for the SSR2 connector setup.
-
Activate SSR2 connector licenses and set up connectors on both servers.
-
Create routing rules.
Note: WebApps and SSR2 connector must be set up on each server used to route fax messages.
New York to Florida Server-to-Server Routing Example
In this example, the instructions show how the sending and receiving servers, SSR2 connectors, and routing rules are set up to route fax messages from one office to another.
Note: This example is for illustrative purposes and may not reflect your unique workflow configuration.
A company has offices in New York (NY) and Florida (FL). Each location has an Upland AccuRoute server and a SSR2 connector setup. Both Administrators are responsible for the WebApps Client installation, the SSR2 connector setup and the creation of the appropriate routing rules. The New York Administrator configures Server A as the sending server. The Florida Administrator configures the remote Server B as the receiving server.
Expand to view more information.
The NY Administrator creates and sets up the SSR2 connector by using Connectors in the Server Administrator.
Creating the SSR2 connector
To create the NY Server A (sending server) SSR2 connector
-
In the Server Administrator, right click Connectors. The Connectors shortcut menu appears.
-
Select New AccuRoute connector. The connectors list appears.
-
Select SSR2. The Create New SSR2 Connector wizard appears.
-
Use the default Server Address and select Next.
-
Use the default name and select Next.
-
Select Finish. The SSR2 connector appears in the Connectors details pane.
Setting up the SSR2 connector
The SSR2 connector uses http or https protocols over the internet to transmit faxes from one Upland AccuRoute server to another. The protocol depends on the WebApps endpoint of the receiving server, whether it is configured as http or https.
To set up the NY Server A (sending server) SSR2 connector
-
In the Server Administrator, select Connectors if necessary.
-
Select SSR2 on the Server in the Connectors details pane. The SSR2 Connector Properties dialog box appears.
-
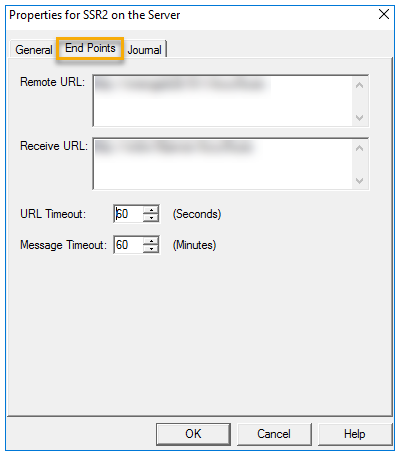
Select the End Points tab.
See the SSR2 on the Server Properties > End Points dialog box example below.
-
Type the receiving server WebApps URL in the Remote URL box. This URL is used to route and deliver the fax messages to the Florida remote server’s WebApps REST API endpoint.
-
Type the sending server WebApps URL in the Receive URL box. This URL is used to send routing and delivery notifications back to the New York sending server’s WebApps REST API endpoint.
-
Use the default or spin box to specify a new URL Timeout value in seconds.
Note: The URL Timeout value is the number of seconds the API call to the remote server’s WebApps REST API will wait before the call is timed out due to slow or unavailable networks.
-
Use the default or spin box to specify a new Message Timeout value in minutes.
Note: The Message Timeout value is the number of minutes you want the SSR2 connector to wait before it fails a message bound for another SSR2 connector. The default is 4320 minutes (72 hours). The timeout affects the sending SSR2 connector's record of the fax only; the receiving connector may still successfully process and send the fax after the timeout has passed.
-
Select OK.
Creating SSR2 routing rule
The SSR2 connector automatically creates a default ruleset. An additional ruleset must be created for the routing and delivery of the fax messages to the remote (receiving) server. The NY Administrator creates a routing rule by using RuleSets in the Server Administrator.
To create the NY Server A (sending server) SSR2 connector routing rule
-
In the Server Administrator, select RuleSets.
-
Select Default. The default rulesets appear in the Default > RuleSets details pane.
-
Find the SSR2 ruleset and right click. The RuleSets shortcut menu appears.
-
Select Duplicate. A copy of the rule appears in the Default > RuleSets details pane.
Note: The default SSR2 ruleset is duplicated to create the new fax rule.
-
Select the copy of the rule. The Rule Properties > General dialog box appears.
-
Remove the words: Copy of in the Name box.
-
Change ssr2 to fax in the Name box.
-
Select the Criteria tab.
-
Change SSR2 to FAX.
-
Select the Actions tab.
-
Select the Deliver action on the Actions list. The Action Properties dialog box appears.
-
Select the Deliver tab.
-
Select or ensure the SSR2 on the Server connector is selected.
-
Select OK on the Action Properties dialog box.
-
Select OK on the Rule Properties dialog box. The fax routing rule appears in the Default > RuleSets details pane.
See the General, Criteria, and Action rule properties dialog box examples below.
Select to maximize and minimize images.
| General | Criteria | Action |

|

|

|
The FL Administrator creates and sets up the SSR2 connector by using Connectors in the Server Administrator.
Creating the SSR2 connector
To create the FL Server B (receiving server) SSR2 connector
-
In the Server Administrator, right click Connectors. The Connectors shortcut menu appears.
-
Select New AccuRoute connector. The connectors list appears.
-
Select SSR2. The Create New SSR2 Connector wizard appears.
-
Use the default Server Address and select Next.
-
Use the default name and select Next.
-
Select Finish. The SSR2 connector appears in the Connectors details pane.
Setting up the SSR2 connector
To set up the FL Server B (receiving server) SSR2 connector
-
In the Server Administrator, select Connectors if necessary.
-
Select SSR2 on the Server in the Connectors details pane. The SSR2 Connector Properties dialog box appears.
-
Select the End Points tab.
Note: In this example, no Remote and Receiving URLs are required for the SSR2 connector setup. The End Points information set up on the NY Server A (sending server) is sufficient to identify the sending and receiving servers. The FL Server B (receiving server) SSR2 connector is only used to send notification (confirmation) messages to the NY Server A.
-
Use the default or spin box to specify a new URL Timeout value in seconds.
-
Use the default or spin box to specify a new Message Timeout value in minutes.
Note If changes are made to the URL Timeout value for the receiving server, it will affect the timeout of API calls made from this server to the sending Server A. Each server can have its own timeout value; however, it is recommended that the URL timeout value be the same on all servers in the same network.
The Message Timeout value is only required for the sending Server A. Server B in this example is participating as a receiving server; therefore, its message timeout value is not used.
-
Select OK.
Creating SSR2 routing rule
The SSR2 connector automatically creates a default ruleset. In this example, an additional rule is not needed for the routing and delivery of the fax messages. However, the FL Administrator should verify that the SSR2 connector default ruleset was automatically created and appears in the default ruleset list.
To verify the FL Server B (receiving server) SSR2 connector routing rule
-
In the Server Administrator, select RuleSets.
-
Select Default. The default rulesets appear in the Default > RuleSets details pane.
-
Find the SSR2 ruleset to ensure it appears in the Default > RuleSets details pane.
See FL Server B (receiving server) SSR2 default routing rule example below.

Note: You can create additional routing rules to other destinations to meet the requirements of your workflows if necessary.
The NY Administrator creates a fax message to test SSR2 by using Messages in the Server Administrator. The NY and FL Administrators confirm the successful delivery of the fax message and receipt of notifications by using the Messages > In Process and History folders.
Creating the SSR2 test fax message
Use Messages in the Server Administrator to create a test fax message.
To create the NY Server A (sending server) test fax message
-
In the Server Administrator, right click Messages. The Messages shortcut menu appears.
-
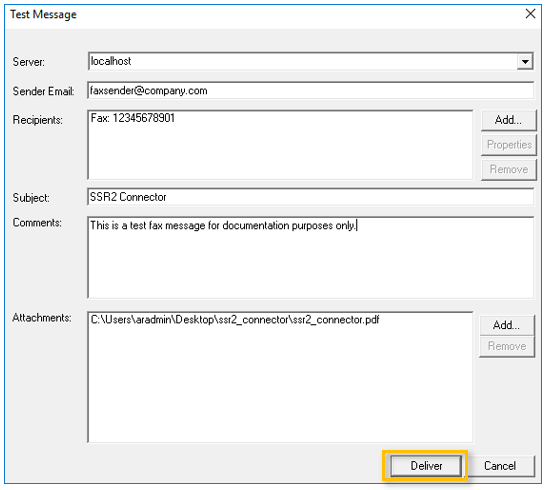
Select New > Test Message. The Test Message dialog box appears.
-
Use the default Server setting, for example, localhost.
-
Type an email address in the Sender Email box, for example, faxsender@company.com.
-
Select Add. The Add New Recipient wizard appears.
-
Select Fax in the Type list and select Next.
-
Specify the fax number and other recipient details in the appropriate boxes.
-
Select a fax cover page on the Cover page list.
-
Select Finish. The recipient details appear in the Recipients box.
-
Specify subject and comments in the appropriate boxes, for example, “SSR2 connector test” and “This is a test fax message”.
-
Select Add and open an attachment.
-
Select Deliver.
See SSR2 test fax message example below.
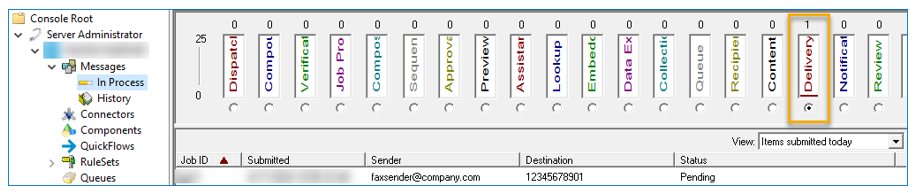
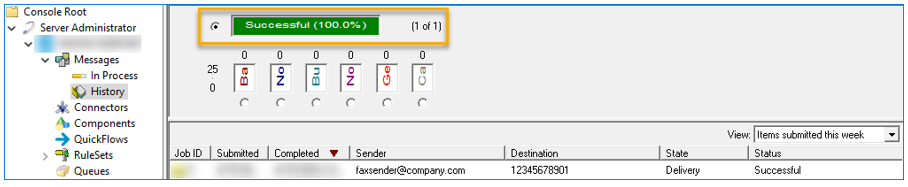
See the delivery status messages between the NY and FL server examples below.
NY Server A (sending server)
In Process
History
FL Server B (receiving server)
History
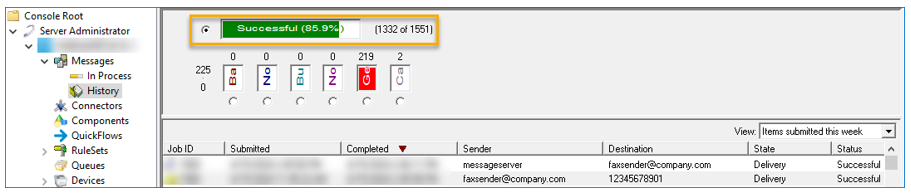
Note: In this example, the message from Sender, messageserver, is the job status confirmation message that is sent back to sending Server A. The message from Sender, faxsender, is the actual fax job created on receiving Server B when the job is received via the WebApps REST API from sending Server A.
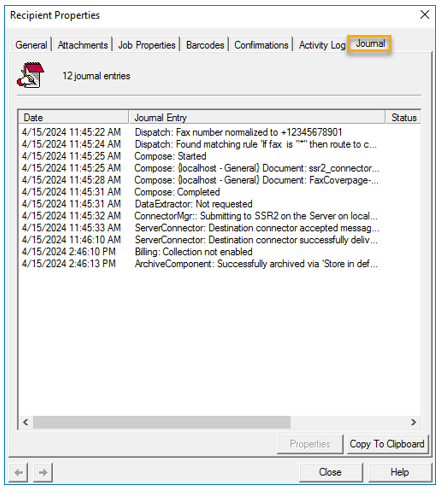
The Journal is another tool that can be used to track message delivery. It displays a history of events related to a message on the Upland AccuRoute server. If a message has not been delivered or if it fails on the server, the journal can assist you with troubleshooting SSR2-related or other issues.
Accessing Journal
-
In the Server Administrator, select Messages > History.
-
Select a job from the list. The Recipient Properties dialog box appears.
-
Select the Journal tab. All event details related to the job are displayed.
-
Select Close.
See the NY Server A (sending server) SSR2 event example below.
Note: Other tabs are available to view additional information about the job, for example, attachments, job properties and more.