You can configure a Zonal OCR Connector after a Zonal Form Definitions User has completed and saved a Zonal Form Definitions project by using the Server Administrator Console and the Create New Zonal OCR Connector wizard. In addition, you must create and map job properties to a form project and create a Zonal OCR workflow.
To configure the Zonal OCR Connector
-
Start the Server Administrator.
-
Right-click the Connectors node.
-
Select New Connector > Zonal OCR. The Create New Zonal OCR Connector wizard appears.
-
On the Server Address wizard page, use the default Server address or select Remote Server and type the name of the computer where the connector is installed.
-
Click Next.
-
On the Display Name wizard page, use the default or type a ZOCR Connector name in the Name box.
-
Click Next.
-
On the Forms Project wizard page, select a form project on the Forms Project list.
See the Forms Project wizard page below.
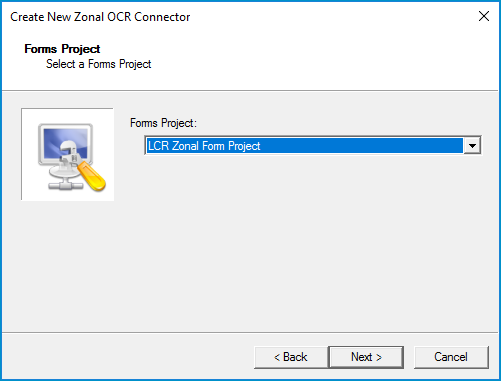
Note: You may periodically have to change the form project that the Zonal OCR Connector is associated with. Although a single Zonal OCR Connector can have multiple projects only one form project can be associated with the connector at a time.
-
Click Next.
-
On the Route to wizard page, select a routing destination for the extracted data fields; for example, a database, document management system, or queue.
-
Click Next.
-
Click Finish.
Note: Ensure the Zonal OCR Connector on the server is enabled on the Connector list.
More Administrator Zonal OCR tasks
After configuring the Zonal OCR Connector, you must also complete the following Zonal OCR tasks.
-
Create and map job properties to a form project.
-
Create Zonal OCR workflow.
Before creating a Zonal OCR workflow, you will need to create and map job properties to a form project data fields.
Note: The instructions below illustrate how to create and map user job properties. You can also use System job properties for mapping.
To create and map user job properties
-
Open the Server Administrator Console.
-
Go to the Connectors node on the Server Administrator tree.
-
Select the Zonal OCR Connector on the list. The Properties for Zonal OCR on the Server dialog box appears.
-
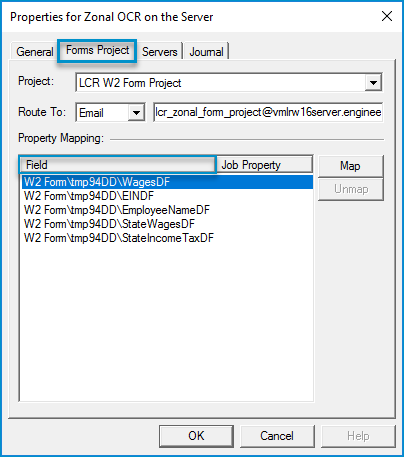
Click the Forms Project tab.
-
Look up the form project data fields, make a note of the data field names used by the Zonal Form Definitions User and click Cancel when you are done. You will need the data field names to name the job properties.
Note: Auto mapping takes place if a data field name matches an existing job property.
-
Go to the Configuration node on the Server Administrator tree and click the arrow to expand, if necessary.
-
Go to the Job Properties node and click the arrow to expand.
-
Right-click User and select New > Job Property. The Job Property dialog box appears.
-
Type a job property name for the form project data field in the Name box and click OK.
-
Repeat Steps 8 – 9 until all required job properties are created.
-
Ensure the required user job properties appear on the list.
See User Job Properties example below.

To map job properties to a form project
-
Open the Server Administrator Console, if necessary.
-
Go to the Connectors node on the Server Administrator tree.
-
Select the Zonal OCR Connector on the list. The Properties for Zonal OCR on the Server dialog box appears.
-
Click the Forms Project tab.
See Properties for Zonal OCR on the Server dialog box below.
-
Go to the Property Mapping area and select a field on the list. The Map button is enabled.
-
Click Map. The Select Job Property dialog box appears.
-
Type the name of the job property in the box or click the Collapse icon (-) icon next to the System label to access all User job properties.
-
Select the appropriate job property from the User job property list.
-
Click OK.
-
Ensure you have mapped the correct job property to the form project data field.
-
Repeat Steps 5 – 9 until all job properties are mapped to the form project data fields.
-
Ensure all required job properties are mapped.
-
Click OK.
By creating a Zonal OCR workflow, forms are routed to the Zonal OCR Connector where data fields are extracted and then routed to a company’s resource; for example, a database for further processing. A Zonal OCR Connector must be configured, and job properties must be mapped to the appropriate data fields in a form project before creating the Zonal OCR workflow.
Zonal OCR workflows are created based on a company’s unique form processing requirements and vary from one company to the next. Administrators should consider including the following rules in their form processing workflows.
-
A rule to route forms to the Zonal OCR Connector for data extraction.
-
A rule to route the extracted data fields from the Zonal OCR Connector to a company resource; for example, a document management system.
-
A rule to manage exceptions that the Zonal OCR Connector may encounter.
See About rulesets and routing rules for more information.
Exceptions may occur if jobs submitted do not match the form's definitions set up by a Zonal Form Definitions user or if form definition changes are made that do not match job properties created and mapped to a form project by an Administrator. The system property FormRecognitionResult Unrecognized is set up as a default and is used to automatically identify form exceptions. No additional property setup is required. Data extraction may not occur completely with form exceptions flagged as “Unrecognized” by the Zonal OCR Connector.
Tip: A rule can be created to route form exceptions to a Zonal Form Definitions user or to a queue for review and resolution, if necessary. The use of a queue requires a license and additional server configuration. Contact your Account Manager for more information.
See also
About Zonal Form Definitions and Data Extraction
Using Zonal Form Definitions Quick Start Guide