Creating Adestra Zaps
After connecting Adestra to Zapier, you will need to create Zaps to automate your tasks.
Zaps use an API connection to send information from a source, the trigger app, to a target, the action app, without you needing to write code.
To create a Zap:
-
Open the Zapier navigation menu and press the Create Zap button, or
Select Zaps to open the Zaps menu and then press the create button within the Zaps page to open the Zap editor.
-
Select your trigger app, i.e. the source of information to trigger an action in Adestra.
Note:
-
Adestra cannot be selected as a trigger app.
-
How you configure the trigger app will depend on the selected app.
-
The examples in this article used Google Sheets as a trigger.
-
-
Select Adestra as your action app.
-
In the action menu, select an event to perform when the Zap runs. You can:
-
Create or update contact record.
-
Send an email to a contact.
-
Subscribe a contact to a list and optionally remove them from unsubscribe lists.
-
Remove a contact from one or more lists and (optionally) add them to one or more unsub lists.
-
Find a contact in the specified core table. Optionally, create a contact if none are found.
-
-
Press the continue button.
-
Select the Adestra account to use in the Zap and then press the continue button.
-
Enter the details for your action in the action dropdown (refer to the specific event details below for more information).
-
Press the continue button to proceed to testing.
-
Verify the summary of your settings is correct and press the test step button.
In the event of an error, e.g. campaign ID not found, you will get a prompt indicating why the test failed.
Tip: if you enter all your action details correctly, e.g. campaign IDs are valid, etc., but the Zap does not work, you can contact Zapier for assistance at help.zapier.com.
-
If the test is successful, press the publish button to create your Zap.
Create or update a contact
To create a new contact or update an existing one when the Zap activates, enter the following details in the action dropdown:
-
Core Table ID - expand the dropdown and search for the number or name of the core table to add your new contact to.
-
Dedupe field - expand the dropdown and select the field to use for deduping. This will typically be email.
-
Contact data - enter key and value pairs to map your Adestra table fields to the source data. Use the plus icon to add more items.
A key and value pair is a constant and a related variable that, together, make up your data.
Example: your core table may include a field called first_name (the key) which contains the first names of your contacts (the pair).
To enter this key and value pair, you would type first_name (your core table field) into the text box and then select the field from your source data that contains the first names of your contacts.
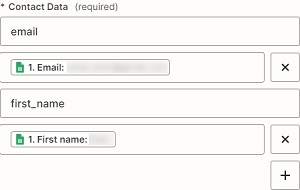
Note: this list should include at least an email key with the email address in the value.
-
List ID - (optional) if you also want to add the contact to a list, enter the list ID from your Adestra lists menu, e.g. 6308.
Send an email
To send an email to a contact when the Zap activates, enter the following details in the action dropdown:
-
Campaign ID - enter the ID of the Adestra campaign to send.
-
Contact data - enter key and value pairs to map your Adestra campaign to the source data. Use the plus icon to add more items.
A key and value pair is a constant and a related variable that, together, make up your data.
Example: your core table may include a field called first_name (the key) which contains the first names of your contacts (the pair).
To enter this key and value pair, you would type first_name (your core table field) into the text box and then select the field from your source data that contains the first names of your contacts.
Note: this list should include at least an email key with the email address in the value.
-
Transaction data - (optional) enter data that will be made available to the email template for personalization. You can provide any data here, but if a brand ID is provided then this is expected to match the format for transactions. For a normal email you can usually just leave this blank.
-
Launch reference - (optional) field defining a launch reference. A new launch is created each time you change the launch reference, e.g. create a new launch weekly for transactional emails by updating the week number in your launch reference.
-
Brand ID - (optional) enter the ID of a brand. If provided, the transaction data will be treated as a transaction that's stored against the brand.
Note: this option requires that you have a suitable brand already configured in your Adestra account. If you just want to send an email, leave this blank.
Subscribe
To add a contact to a subscribe list when the Zap activates, enter the following details in the action dropdown:
-
Contact ID - enter the ID of the contact to subscribe.
-
Add list ID - enter the ID of a list to add the contact to.
-
Remove unsublist ID- (optional) enter the ID of an unsub list to remove the contact's email address from. Use this when contacts are signing up and you want to override any previous unsubscribe.
Unsubscribe
To remove a contact from a subscribe list when the Zap activates, enter the following details in the action dropdown:
-
Contact ID - enter the ID of the contact to unsubscribe.
-
Remove list ID - enter the ID of a list to remove the contact from.
-
Add unsublist ID- (optional) enter the ID of an unsub list to add the contact's email address to.
Find contact
To find a contact in the specified core table when the Zap activates, enter the following details in the action dropdown:
-
Core Table ID - expand the dropdown and search for the number or name of the core table to add your new contact to.
-
Email - select the text box and add the field that contains the email address to be used in the search.
-
If you want the step to be considered a success when nothing is found, change the dropdown option to yes.
Note: this is typically used in combination with filters or paths where branching requires a success when no contact is found.
-
If you want to create a contact if one is not found, select the checkbox to create an Adestra.
This will add the following additional fields to the action:
-
Dedupe field - expand the dropdown and select the field to use for deduping. This will typically be email.
-
Contact Data - enter key and value pairs to map your Adestra table fields to the source data. Use the plus icon to add more items.
A key and value pair is a constant and a related variable that, together, make up your data.
Example: your core table may include a field called first_name (the key) which contains the first names of your contacts (the pair).
To enter this key and value pair, you would type first_name (your core table field) into the text box and then select the field from your source data that contains the first names of your contacts.
Note: this list should include at least an email key with the email address in the value.
-
List ID - (optional) if you also want to add the contact to a list, enter the list ID from your Adestra lists menu, e.g. 6308.
Note: you cannot have a yes response for the success when nothing is found dropdown when creating a contact. Zapier will recognise that this option is unused and prompt for you to remove the field.
To avoid potential conflicts, press the remove these extra fields button.
-