Salesforce Lightning Upgrade
To preserve your data when you upgrade your Salesforce Lightning installation, first back up your data and then re-import it after the upgrade is complete. For more information on installing Salesforce Lightning, see Salesforce Installation and Configuration.
Note: You must download your data within 48 hours of uninstalling Salesforce Lightning.
On this page:
Back up your data
You can automatically download your data during the uninstall process in Salesforce Lightning.
-
Go to the ‘Setup’ page.
-
Search for installed packages.
-
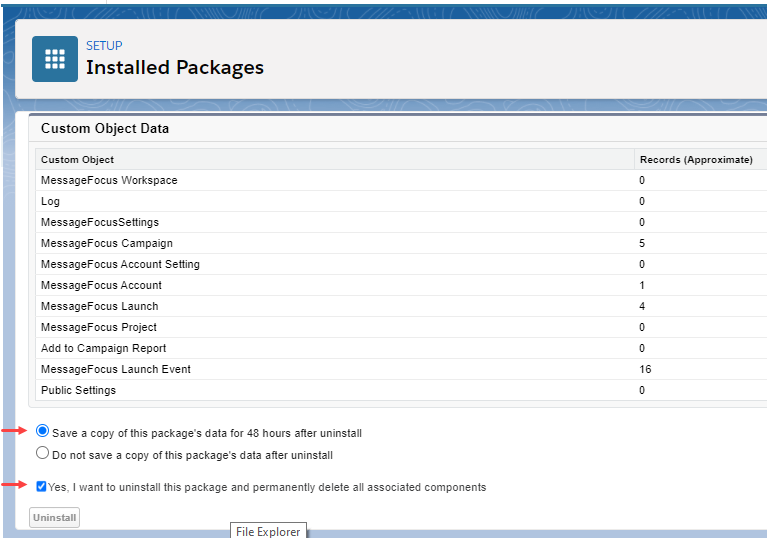
Locate the package named ‘messagefocus’ and then click the ‘Uninstall’ link.
- Review the uninstall settings:
Ensure that the ‘Save a copy of this package's data for 48 hours after uninstall’ option is selected. If it is not, tick the radio button to select it.
Tick the ‘Yes, I want to uninstall this package and permanently delete all associated components’ checkbox to select it.
-
Click ‘Uninstall’.
The uninstall process generates the data backup files and uninstalls Salesforce Lightning.
Note: If you encounter a problem with the uninstall process, you may need to remove any custom elements that you have added.
-
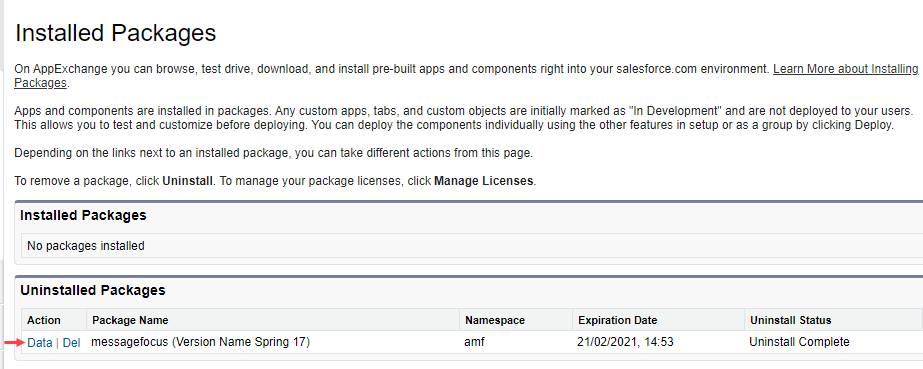
Go back to the ‘Installed Packages’ page.
-
To download the MessageFocus data files to a folder, locate the relevant uninstalled packages that will have been generated and then click the ‘Data’ link for each one.
-
Make a note of the folder where your data files are stored.
Re-import event data
After you finish uninstalling Salesforce Lightning, you can restore the following event data:
-
Campaigns
-
Launches
-
Launch events
Note: You must have downloaded your data within 48 hours of uninstalling Salesforce Lightning.
Re-import campaigns data
You must prepare your campaigns data files to replace the account ID before re-importing them.
To prepare your files:
-
Go into the folder containing your downloaded data files.
-
Open the ‘MFCampaign__c’ file.
-
Locate the rows for ‘amf__mfAccount__c’.
You will need to change the account ID to the new instance that is created when the new instance of the integration is generated.
-
To change the account ID, go to the ’MessageFocus Accounts’ tab.

-
Click into the account. Make a note of the unique ID in the URL of the page, as highlighted in the following example:
lightning/r/amf__MFAccount__c/a024K000003YvNBQA4/view
-
In the open ‘MFCampaign__c’ data file, update the account ID in the ‘amf__mfAccount__c’ rows.
-
Be sure to save your changes.
Next, you will re-import your campaigns data.
Note: The importing process in the instructions below uses Workbench, a Salesforce-specific third-party importer application. For more information, see https://workbench.developerforce.com/insert.php.
You can also use the Dataloader application, which has similar functionality, but it does not have an option to run queries on the existing data, which is needed in some steps. For more information, see https://dataloader.io/static/#tasks.
To re-import your campaigns data:
-
In the Workbench app, go to the ‘Data’ tab, and then select ‘Insert’ from the dropdown list.

Note: This form is available in the Workbench app and is subject to change.
-
From the ‘Object Type’ dropdown list, select 'amf__MFCampaign__c'.
-
Select ‘Choose file’, navigate to the downloaded data file folder, and then select ‘MFCampaign__c.csv’.
-
Click ‘Next’ to open the Field Mapping page.
-
Click ‘Map Fields’, which displays the mapping preview.
-
Click ‘Confirm Insert’ to start the import process.
-
When the import is competed, go to the ‘MessageFocus Campaigns’ tab in the integration to verify that the campaigns have been imported correctly.
Re-import launches data
You must prepare your launches data files to replace the campaign’s unique IDs before re-importing them.
Note: The importing process in the instructions below uses Workbench, a Salesforce-specific third-party importer application. For more information, see https://workbench.developerforce.com/insert.php.
You can also use the Dataloader application, which has similar functionality, but it does not have an option to run queries on the existing data, which is needed in some steps. For more information, see https://dataloader.io/static/#tasks.
To prepare your files:
-
In the Workbench app, go to ‘Queries’.
-
Select ‘SOQL Query’ from the dropdown list.

Note: This form is available in the Workbench app and is subject to change.
-
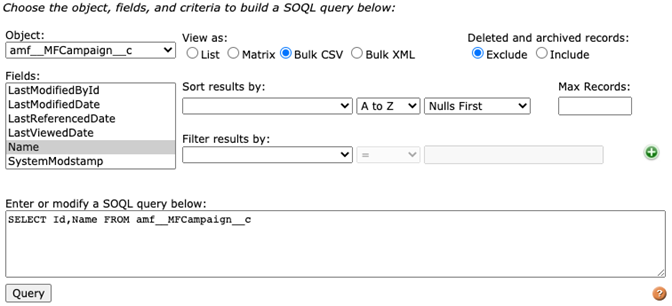
In the query builder, make sure the ‘Object’ is 'amf_MFCampaign__c'.
-
Select the 'ID' and 'name' fields.
-
Make sure the ‘View as’ option is set to ‘Bulk CSV’.
-
The query should show at the bottom, as follows:
SELECT Id,Name FROM amf__MFCampaign__c
-
Click ‘Query’.
When the query is complete, the results page opens.
-
In the Batches section of the results page, click the ‘Download’ icon in the ‘ID’ column.
The new ‘amf__campaign__c’ IDs are downloaded to a folder.
Next, you will map these IDs to the corresponding ‘amf__campaign__c’ rows in the ‘MFLaunch__c’ file from the downloaded data folder.
-
Go into the folder containing your downloaded data files.
-
Open the ‘MFLaunch__c’ file.
-
For the rows within the ‘amf__campaign__c’ column, update with the corresponding new IDs from the query file.
-
Be sure to save your changes.
Next, you will re-import your launches data.
To re-import your launches data:
-
In the Workbench app, go to the ‘Data’ tab, and then select ‘Insert’ from the dropdown list.

Note: This form is available in the Workbench app and is subject to change.
-
From the’ Object Type’ dropdown list, select 'amf__MFLaunch__c'.
-
Select ‘Choose file’, navigate to the downloaded data file folder, and then select ‘MFLaunch__c.csv’.
-
Click ‘Next’ to open the Field Mapping page.
-
Click ‘Map Fields’, which displays the mapping preview.
-
Click ‘Confirm Insert’ to start the import process.
-
When the import is competed, go to the ‘MessageFocus Campaigns’ tab in the integration to verify that the campaigns have been imported correctly.
Re-import launch events data
You must prepare your launch events data files to replace the campaign’s IDs and reformat the date/time format before re-importing them.
Note: The importing process in the instructions below uses Workbench, a Salesforce-specific third-party importer application. For more information, see https://workbench.developerforce.com/insert.php.
You can also use the Dataloader application, which has similar functionality, but it does not have an option to run queries on the existing data, which is needed in some steps. For more information, see https://dataloader.io/static/#tasks.
To prepare your files:
-
In the Workbench app, go to ‘Queries’.
-
Select ‘SOQL Query’ from the dropdown list.

Note: This form is available in the Workbench app and is subject to change.
-
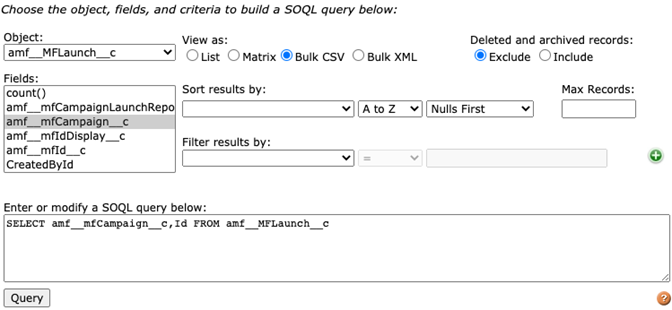
In the query builder, make sure the ‘Object’ is ‘amf_MFLaunch__c’ .
-
Select the 'ID' and ‘amf_mfCampaign__c’ fields.
-
Make sure the ‘View as’ option is set to ‘Bulk CSV’.
-
The query should show at the bottom, as follows:
SELECT amf__mfCampaign__c, Id FROM amf_MFLaunch__c
-
Click ‘Query’.
When the query is complete, the results page opens.
-
In the Batches section of the results page, click the ‘Download’ icon in the ‘ID’ column.
The new ‘amf__campaign__c’ IDs are downloaded to a folder.
Next, you will map these IDs to the corresponding ‘amf__mflaunch__c’ rows in the ‘MFLaunchEvent__c’ file from the downloaded data folder. You will also update the ‘amf__timestamp__c’ field to the following format:
'YYYY-MM-DDThh:mm:ssZ'.
-
Go into the folder containing your downloaded data files.
-
Open the ‘MFLaunchEvent__c’ file.
-
Locate the rows for ‘amf__mflaunch__c’ and update with the new IDs from the query file.
-
Select the ‘amf_timestamo_c’ column, right-click, and then point to ‘Format cells” and select ‘Custom category.” Add the following type:
'YYYY-MM-DDThh:mm:ssZ'.
-
Be sure to save your changes.
Next, you will re-import your launch events data.
To re-import your launch events data:
-
In the Workbench app, go to the ‘Data’ tab, and then select ‘Insert’ from the dropdown list.

Note: This form is available in the Workbench app and is subject to change.
-
From the ‘Object Type’ dropdown list, select 'amf__MFLaunchEvent__c'
-
Select ‘Choose file’, navigate to the downloaded data file folder, and then select ‘MFLaunchEvent__c.csv’.
-
Click ‘Next’ to open the Field Mapping page.
-
Click ‘Map Fields’, which displays the mapping preview.
-
Click ‘Confirm Insert’ to start the import process.
-
When the import is competed, go to the ‘MessageFocus Campaigns’ tab in the integration to verify that the campaigns have been imported correctly.

