All users with the Send Faxes service can log in to AccuRoute CloudFAX and send faxes quickly and easily using the Send Fax option. Send Fax allows you to send faxes to multiple recipients or contact lists, assign subjects for internal use, and attach files. There are also advanced options for fax transmission.

-
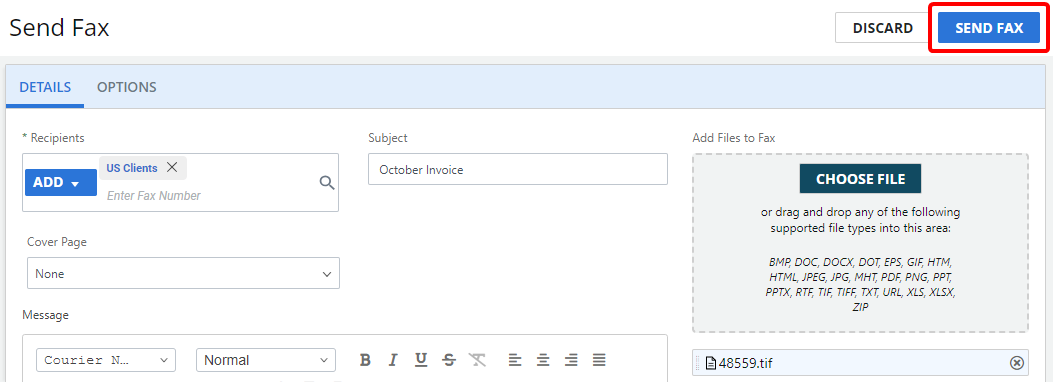
On the Details tab, click Add, then select one of the following:
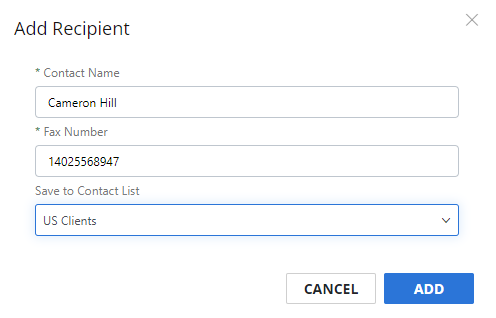
 Recipient
Select this option to add one or multiple fax recipients.
- Enter the name of the person you are sending the fax to in the Contact Name box. This field is optional and is for your reference only.
-
Enter the fax number you are sending the fax to in the Fax Number box. See Fax number formats for more information about the correct formatting of fax numbers.
-
To save the fax recipient to an existing contact list, select the contact list name from the Save to Contact List drop-down list.

-
Click Add.
 Contact List
Select this option to send the fax to a contact list(s). See Contact lists for more information.
-
Click Add (>) next to the contact list(s) you want to send the fax to. Or, move contact lists from the Available box to the Selected box using a drag-and-drop operation.
To remove a contact list, click Remove (X) next to the contact list in the Selected box.
-
Click Add.

-
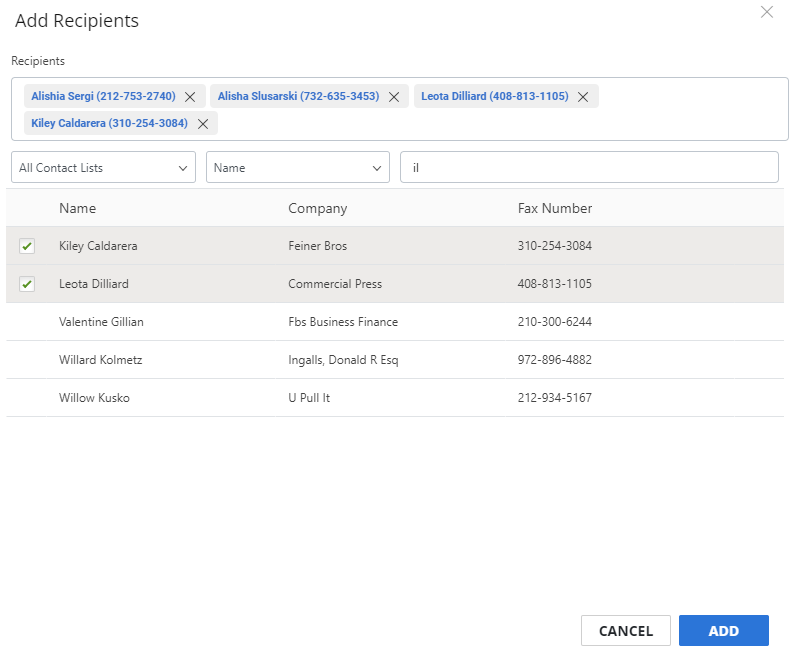
Or, click Search to search for specific recipients within contact lists.

 Search for recipients in a contact list
-
Select the contact list you want to search within from the first drop-down list.
-
Select the property you want to search for from the second drop-down list, then enter the value you want to search for in the box to the right. Once you start typing, search results will appear.
-
Select the check box next to one or contacts.
-
Repeat Steps 1 - 3 until you have selected all of the contacts you want to add as fax recipients, then click Add.

-
-
Enter a subject line in the Subject box (optional).
-
Click Choose File to select the documents you want to attach, or move documents to the Add Files to Fax area using a drag-and-drop operation.

-
To use a pre-defined cover page, select the cover page name from the Cover Page drop-down list. Cover pages available in the drop-down list are templates configured by an Account Manager. Cover pages appear in this list if they are public, assigned to you as a user, or assigned to a group that you belong to.
-
To add a cover page to your fax, enter text in the Message box. Use the formatting bar along the top to format the text, add images, insert barcodes and tables, or use substitution variables
Note: Fax Page Count and Document Page Count substitutions are not supported for DOT, ZIP, HTM, MHT, URL, or EPS file formats.
-
By default, fax options are taken from your Outbound settings; however, you can modify these options before sending a fax. Click the Options tab to access fax options.

CSID: Your identification as seen in your outgoing fax.
Number of Sending Attempts: The number of attempts to perform when fax transmission fails.
Page Orientation: Specify portrait or landscape page orientation for the transmission.
Page Size: Specify the page size to be transmitted (A4, B4, legal, or letter).
Rendering Optimization: Specify whether to render documents in grayscale, black and white, or fine.
Resolution: Specify standard or fine resolution for the transmission.
Notification Email: An optional email address to which feedback messages are sent.
Send Fax After: Allows you to delay sending the fax until after the specified date and time. Fax submission into the system can be delayed for up to 30 days.
Note: High-authentication (PCI) users will not have this option.
Use these settings as the default settings: Remembers the selected options and uses them as the default options for your outbound faxes. These settings will override any settings configured in your Outbound settings.
-
Click Send Fax.
