AutoClassifier Engine Post-Installation Configuration
The BA Insight AutoClassifier Engine uses SQL Server as a backend repository.
- If you use Azure SQL, initialize and configure your database using the instructions at the bottom of this page.
- If your company policy prevents services accounts from having db_creator permissions, the database can be manually created by a DBA.
- If this applies to you, perform the steps in the section Setup AutoClassifier Database Manually, then return to this section and perform the steps in the topics below.
Single Server and Scaled Configurations
- Navigate to the IIS Manager:
- If you installed to run on a single server, a single AutoClassifier site is shown.
- If you installed for scale, both the AutoClassifier and Lucene sites are shown.

-
Browse the BA Insight AutoClassifier Admin website.
Info
As of AutoClassifier v6.0, any database settings specified within the MSI are automatically applied upon launching the AutoClassifier Site (in IIS).
If the automated process fails due to a permissions issue, timeout, or invalid database settings specified in the MSI, the user is automatically re-directed to the Database Settings page which enables the user to manually correct the issue and re-apply the settings.
Steps 3 - 7 will not be seen when the Automation succeeds.
-
Database settings:
-
Update this connection string with the settings of your existing AutoClassifier database.
- For On-Premise installations,
AutoClassifier_OnPremis the default Initial Catalog value in v5. - The screenshot below is shown as an example only.
- This setting must be specified regardless of whether you chose to create your own database or use the database created by AutoClassifier.
- If you enable AutoClassifier to create the database and standard SQL security is used, DO NOT enter the password in the Connection String.
- If using Integrated Security, the Password text box should not be used.
- If you enable AutoClassifier to create the database and standard SQL security is used, DO NOT enter the password in the Connection String.
-
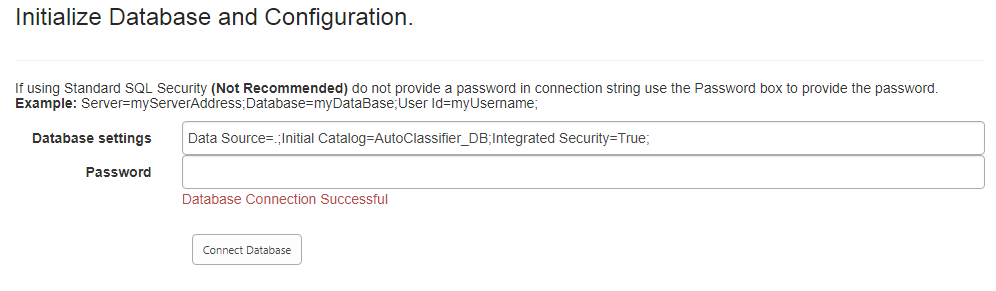
- Click the button Create or Connect Database.
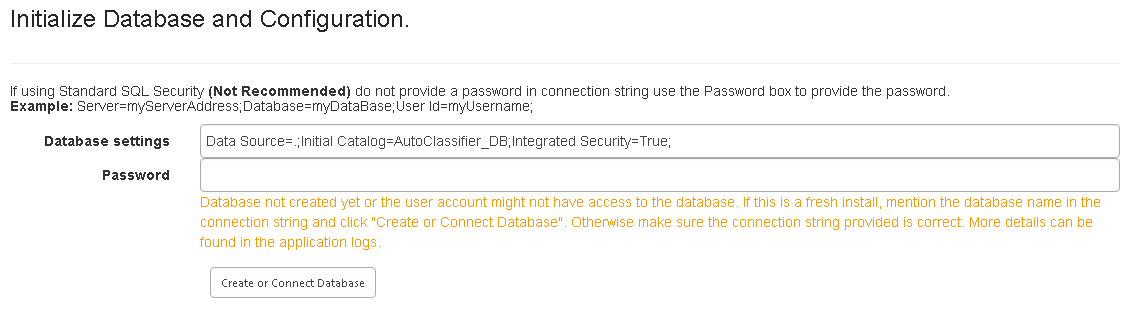
- After the database has been successfully created, or connected, the page refreshes and you are prompted to configure the database if required

- Click the Configure button to continue.
-
Click the Close button to return to the AutoClassifier Management Site.
Note: If Standard SQL Server Securing is used, the Web.config section is automatically encrypted.
Once encrypted, you cannot manually edit the Connection String.
Scale Configuration Only
If you are installing in a scaled environment, you must update the web configuration for both the:
- Admin Site
- Lucene Site
After you have completed step 6 above, complete the following steps to edit these files:
- Manually edit the Web.config file from the Admin Site installation location:
Update the Lucene Site location.
Copy<setting name="LuceneServiceUrl" serializeAs="String">
<!--Leave Value Empty to run In-Line -->
<!--Point to Installed Lucene Web to Run in
Scale Out Mode -->
<value></value>
</setting>
<setting name="LuceneServiceUrl" serializeAs="String">
<!--Leave Value Empty to run In-Line -->
<!--Point to Installed Lucene Web to Run in
Scale Out Mode -->
<value>http://lucenesitename:800</value>
</setting>Update the Lucene site connection string:
Open the Lucene Site Default.aspx page.
- Update this connection string with the settings of your existing AutoClassifier database and click Connect Database, if necessary.
Copy the Admin Site Web.config file and use this file to replace the current Web.Config file on any additional web servers where you have installed the Admin Site.
Azure SQL
If you use Azure SQL, use the following instructions.
Azure SQL is supported by AutoClassifier under the following conditions:
- In the Initialize Database and Configuration screen, you enter your SQL Database string in the "Database Settings" field. See the graphic below.
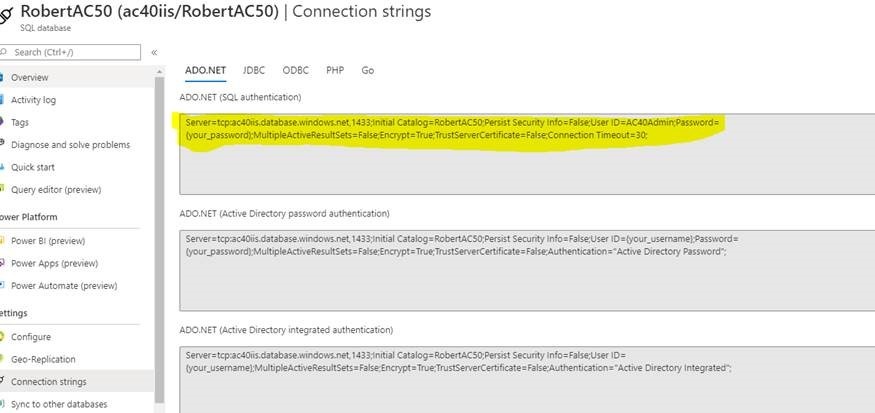
- This string can be taken from Azure itself under Settings > Connection strings.
- Do not copy and paste the connection string.
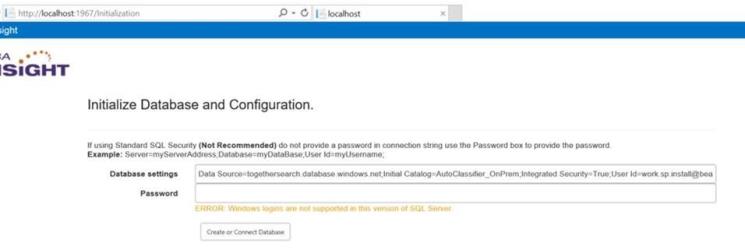
- Azure SQL strings require special attention : the string provided by Azure in the field "ADO.NET (SQL authentication)" shown below does not contain the password. See the code string at the bottom of this page.
- There are two solutions to this:
- Enter Your SQL Password in the "Database Settings" Page:
- Simply remove the password field from the connection string and put the password in the "Password" text box in the AutoClassifier "Database Settings" page
- Modify the Connection String:
- Enter the password in the connection string and it will be processed with the rest of the SQL database script at runtime.
- See the example below:
- Enter Your SQL Password in the "Database Settings" Page:
Azure SQL Database Connection String Example
Server=tcp:ac40iis.database.windows.net,1433;Initial Catalog=RobertAC50;Persist Security Info=False;User ID=AC40Admin;Password=ThePasswordHere;MultipleActiveResultSets=False;Encrypt=True;TrustServerCertificate=False;Connection Timeout=30;