How to Configure AutoClassifier for .NET Authorization
.NET Authorization can be configured to secure access to the AutoClassifier Engine.
Use the following steps to enable .NET Authorization.
Info
Azure Virtual Machines may not have the Windows Authentication feature/role enabled by default as Azure Virtual Machines are not required to be attached to a domain.
The server is not required to be connected to a domain.
Local Users and Groups are sufficient.
Procedure
- The server where AutoClassifier is installed must have the Windows Authentication feature/role enabled.
If the feature is already enabled, skip this step.- Open the Windows Server Manager application.
- Select "Add roles and features."
- Navigate to Web Server (IIS) → Security.
- Enable "Windows Authentication."
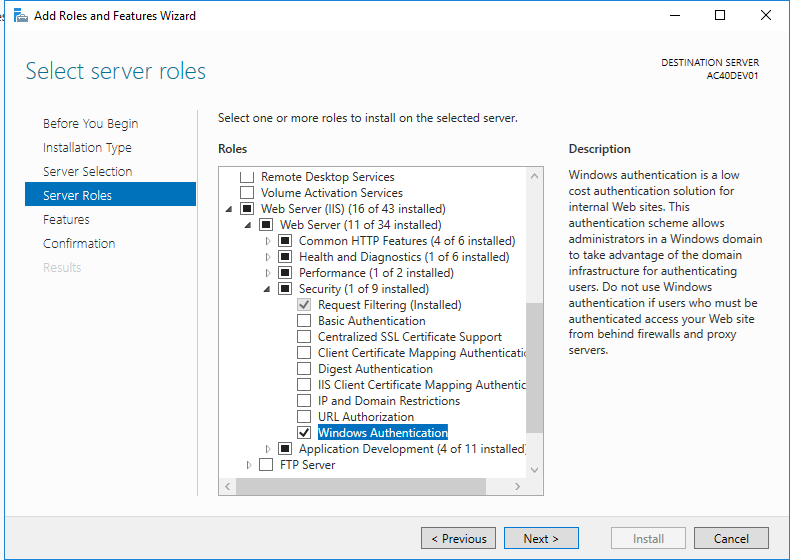
- Click Next and lastly Install.
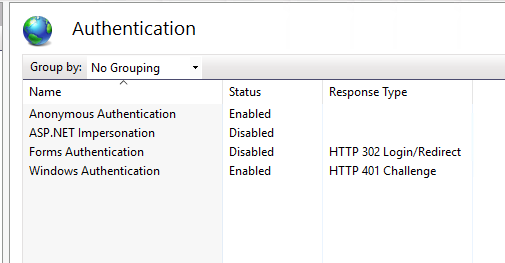
- Open IIS Manager, if it is not already open.
- Select the AutoClassifier Engine site from within the list of sites.
- Enable Windows Authentication for the AutoClassifier Engine site.
Enable the AutoClassifier Engine
- Navigate to the file web.config from the AutoClassifier Engine site.
- Edit the file using a program like Notepad++.
-
Under the <system.web> section of the web.config file, enable Windows Authentication and list accounts to enable access.
Examples:ExampleCopy<system.web>
<authentication mode="Windows"/>
<authorization>
<allow users="domain\account1,domain\account2" />
<deny users="*" />
</authorization>OR if NOT attached to a domain
Example - NO DOMAINCopy<system.web>
<authentication mode="Windows"/>
<authorization>
<allow users="computername\account1,computername\account2" />
<deny users="*" />
</authorization>The App Pool user for the AutoClassifier Engine must be added to the list of Allowed Users.
If you are running any additional Components or Services, also add either of the following:
- App Pool user
- Windows Service(s) user(s)
If you use an Add-In site, the App Pool user for the Add-In site is required in the list of Allowed Users.
** By default the AutoClassifier Engine installation uses a single service user to run all components ** - App Pool user
Set AutoClassifier Engine Bindings
Use the following steps to set your AutoClassifier Engine site bindings for:
- .NET authorization
- Windows authentication
- HTTP or HTTPS bindings
Configuration for HTTP Bindings
- Under the <binding> section of the web.config enable the bindings (webHttpBinding and basicHttpBinding) for .NET Authorization:
<webHttpBinding>
<binding name="httpsBinding" maxReceivedMessageSize="2147483647" openTimeout="01:00:00" sendTimeout="01:00:00">
<readerQuotas maxDepth="2147483647" maxStringContentLength="2147483647" maxArrayLength="2147483647" maxBytesPerRead="2147483647" maxNameTableCharCount="2147483647" />
<security mode="TransportCredentialOnly">
<transport clientCredentialType="Windows" />
</security>
</binding>
<binding name="httpBinding" maxReceivedMessageSize="2147483647" openTimeout="01:00:00" sendTimeout="01:00:00">
<readerQuotas maxDepth="2147483647" maxStringContentLength="2147483647" maxArrayLength="2147483647" maxBytesPerRead="2147483647" maxNameTableCharCount="2147483647" />
<security mode="TransportCredentialOnly">
<transport clientCredentialType="Windows" />
</security>
</binding>
</webHttpBinding>
<basicHttpBinding>
<binding name="httpsBinding" maxReceivedMessageSize="2147483647" openTimeout="01:00:00" sendTimeout="01:00:00">
<readerQuotas maxDepth="2147483647" maxStringContentLength="2147483647" maxArrayLength="2147483647" maxBytesPerRead="2147483647" maxNameTableCharCount="2147483647" />
<security mode="TransportCredentialOnly">
<transport clientCredentialType="Windows" />
</security>
</binding>
<binding name="httpBinding" maxReceivedMessageSize="2147483647" openTimeout="01:00:00" sendTimeout="01:00:00">
<readerQuotas maxDepth="2147483647" maxStringContentLength="2147483647" maxArrayLength="2147483647" maxBytesPerRead="2147483647" maxNameTableCharCount="2147483647" />
<security mode="TransportCredentialOnly">
<transport clientCredentialType="Windows" />
</security>
</binding>
</basicHttpBinding>
Configuration for HTTPS Bindings
- Under the <binding> section of the web.config enable the bindings (webHttpBinding and basicHttpBinding) for .NET Authorization:
<webHttpBinding>
<binding name="httpsBinding" maxReceivedMessageSize="2147483647" openTimeout="01:00:00" sendTimeout="01:00:00">
<readerQuotas maxDepth="2147483647" maxStringContentLength="2147483647" maxArrayLength="2147483647" maxBytesPerRead="2147483647" maxNameTableCharCount="2147483647" />
<security mode="Transport">
<transport clientCredentialType="Windows" />
</security>
</binding>
<binding name="httpBinding" maxReceivedMessageSize="2147483647" openTimeout="01:00:00" sendTimeout="01:00:00">
<readerQuotas maxDepth="2147483647" maxStringContentLength="2147483647" maxArrayLength="2147483647" maxBytesPerRead="2147483647" maxNameTableCharCount="2147483647" />
<security mode="Transport">
<transport clientCredentialType="Windows" />
</security>
</binding>
</webHttpBinding>
<basicHttpBinding>
<binding name="httpsBinding" maxReceivedMessageSize="2147483647" openTimeout="01:00:00" sendTimeout="01:00:00">
<readerQuotas maxDepth="2147483647" maxStringContentLength="2147483647" maxArrayLength="2147483647" maxBytesPerRead="2147483647" maxNameTableCharCount="2147483647" />
<security mode="Transport">
<transport clientCredentialType="Windows" />
</security>
</binding>
<binding name="httpBinding" maxReceivedMessageSize="2147483647" openTimeout="01:00:00" sendTimeout="01:00:00">
<readerQuotas maxDepth="2147483647" maxStringContentLength="2147483647" maxArrayLength="2147483647" maxBytesPerRead="2147483647" maxNameTableCharCount="2147483647" />
<security mode="Transport">
<transport clientCredentialType="Windows" />
</security>
</binding>
</basicHttpBinding>
Testing Configuration
Test the new Security configuration using the following steps:
- Launch the Site in a browser.
- Log in as a user within the "Allowed" list.
- Log in as a user within the "Allowed" list.
- Launch the Site in a browser.
- Do not log in as a user NOT within the "Allowed" list.
Troubleshooting
Problem
A valid user is continually prompted for credentials when accessing the site on the installation server.
Solution
Depending upon network configuration, TCP/IP loopback can cause .NET Authorization to fail.
- To resolve, first identify if TCP/IP loopback is causing the issue.
- From a different server or laptop, attempt to open the site from a browser.
- If login is successfully obtained, TCP/IP loopback is blocking access on the server.
- Disable TCP/IP loopback on the server and re-test, accessing the site from the server.
- If login is unsuccessful, re-check the previous configuration steps.
For Seamless Log in
To avoid logging in each time, set your web browser to seamlessly carry your credentials.
Add the site address to the Trusted sites list.
Procedure:
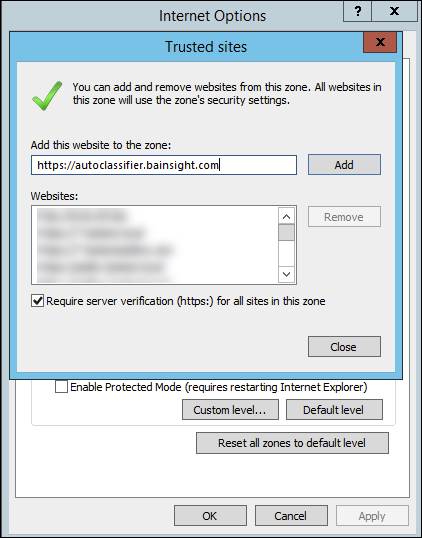
- Open Internet Explorer → Internet Options → Security → Trusted Sites.
- Add the address to the Trusted sites zone.
- In the Security level part of the dialogue, click "Custom level..."
- Scroll to User Authentication section of the Security Settings dialogue.
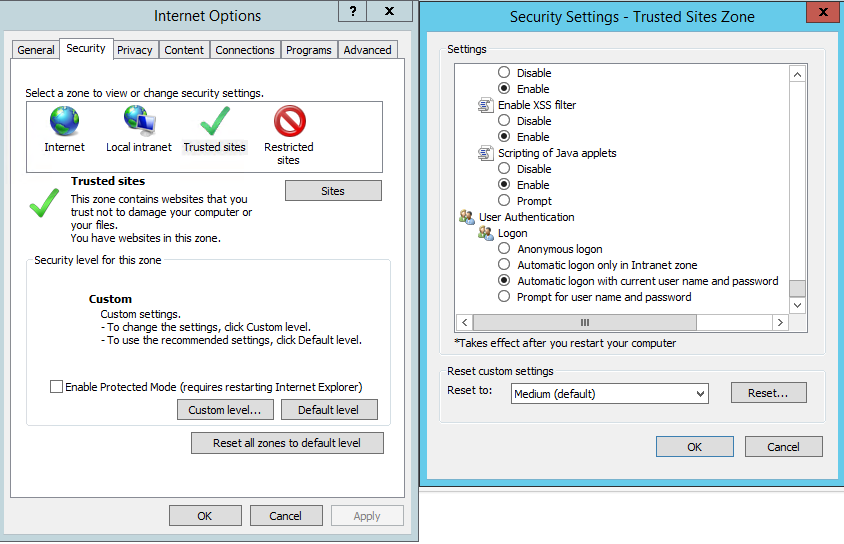
- Select "Automatic logon with current username and password."
- Click OK.
- Apply the settings. Close the dialogue.
- Close your internet browser.
- Open and access the AutoClassifier Engine site.
-
The site no longer prompt for credentials so long as the user is in the authorized configuration.
Info
** Internet Settings are per user**
Setting the Internet Settings to enable seamless log on only applies to the user who is logging in when the browser settings are made.
Each user who desires seamless log on must make these Security changes to their browser to enjoy seamless log on.