3 How to Install Connector Framework
The installation process is the same regardless of the version of SharePoint you are running.
Video Walk-through
To see a basic walk-through of the installation process, watch this video by BA Insight Technical Account Executive Jason McCullagh.
Download the Installation File
- Download the ZIP file to a location of your choice on your server.
-
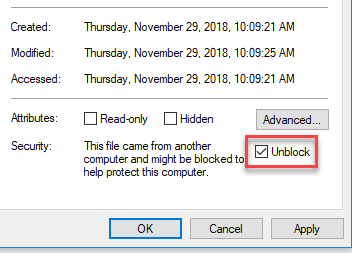
Right-click the ZIP file and select Properties from the menu that appears. Check the Unblock checkbox at the bottom of the dialogue and click OK.
Failure to check the Unblock checkbox can result in your Connector Framework installation failing. DO NOT skip this step.
- Extract the BA.Connector.Installer4.0<version number>.msi file to the folder of your choice.
Installation Configurations
Review the following options before you install the Connector Framework:
- Single Application Server Environment
- Multi-server Farm
- SharePoint 2013 Multi-Server
- SharePoint 2016 with MinRoles Configured
Single Application Server Environment
Perform the installation steps on the SharePoint application server.
Multi-Server Farm
To install Connector Framework to a multi-server environment, perform the following high-level steps, detailed in the topics below:
- Install Connector Framework on:
- The Central Admin server
- Each Crawl server
- Each Application server
SharePoint 2013 Multi-Server
- Install to the Central Admin server, by making the following selections in the installation wizard:
- Do not register indexing component: Check.
- Register indexing component: Select this option if your Central Admin server is also a crawl server.
- Add solution to SharePoint: Check.
- Deploy solution to Central Admin: Check.
Restart services after install: Check this option if your Central Admin server is a crawl server.
If your Central Admin server is not a crawl server, manually restart services after the install is completed.
- On any other Central Admin server where the product is not yet installed, select ALL of the following options in the install wizard:
- Do not register indexing component
- Do not add solution
Do not restart services after install
- Install Connector Framework on each Crawl server, selecting the following options in the install wizard:
- Register indexing component
- Do not add solution
Restart services after install
Manually restart services after the install is completed.
-
Go to Central Administration > Site Settings > Site collection features.
-
Find the Connector Framework feature and click Activate.
The MinRoles install operation deploys the Connector Framework code to all of the servers that can run custom timer jobs.
Before running a custom timer job as part of step 5 above, Connector Framework attempts to run a custom timer job on a server, in the following order:
- Central Administration server.
- If the Central Admin server cannot execute the custom timer job, Connector Framework tries any of the web front ends (WFEs).
- If none of the WFEs can execute the custom timer job, Connector Framework tries any search server.
- If none of the search servers can execute the custom timer job, Connector Framework uses the first server that can execute a custom timer job.
- If the search servers fail, an error is logged.
-
SharePoint 2016 with MinRoles Configured
- Install to the Central Admin server, by making the following selections in the installation wizard:
- Do not register indexing component: Check.
- Register indexing component: Select this option if your Central Admin server is also a crawl server.
- Add solution to SharePoint: Check.
- Deploy solution to Central Admin: Check.
- Do not activate feature in Central Admin: Check.
Restart services after install: Check this option if your Central Admin server is a crawl server.
If your Central Admin server is not a crawl server, manually restart services after the install is completed.
- Go to Central Administration > System Settings > Manage farm solutions and deploy bainsight.connectorframework.wsp to the web application where search is running.
- Install Connector Framework on each Crawl server, selecting the following options in the install wizard:
- Register indexing component: Click.
- Do not add solution: Click.
- Restart services after install: Click.
- Install on each application server, where the product is not yet installed by selecting the following options in the install wizard:
- Do not register indexing component: Check.
- Do not add solution: Check.
Do not restart services after install: Check.
Manually restart services after the install is completed.
-
Go to Central Administration > Site Settings > Site collection features. Find the Connector Framework feature and click Activate.
The MinRoles install operation deploys the Connector Framework code to all of the servers that can run custom timer jobs. Before running a custom timer job as part of step 5 above, Connector Framework will try to run a custom timer job on a server, in the following order:
- Central Administration server.
- If the Central Admin server cannot execute the custom timer job, Connector Framework tries any of the web front ends (WFEs).
- If none of the WFEs can execute the custom timer job, Connector Framework tries any search server.
- If none of the search servers can execute the custom timer job, Connector Framework uses the first server that can execute a custom timer job.
- If the search servers fail, an error is logged.
Installing Connector Framework
To install Connector Framework:
- Double-click the installer file, BA.Connector.Installer<version number>.msi, to launch the installation. Note: Alternatively, run msiexec using the command line interface.
-
Click Next and the End User Licensing Agreement page appears.
-
If you are prompted to allow the program to run, click Run, Yes, or OK.
If you see a message that is similar to "SharePoint Administration Service is not running. If you continue installation you'll need to deploy the solution manually. Continue installation?," click Yes to continue the installation.
- The Setup Wizard appears. Click I Agree.
- Click Next and the Select Installation Folder page appears.
- Folder: The folder location is automatically entered. Click Browse to change this folder.
- Click Next. The first Install Options page appears.
- SharePoint Foundation Install Only: Click if you are running SharePoint Foundation 2013 and not an Enterprise edition.
- Click Next and the second Install Options page appears.
- Choose either:
- Register indexing component: Leave this selected (default).
- Do not register indexing component: For special circumstances only. Contact BA Insight Support.
- Click Next and the third Install Options page appears.
- Choose either:
- Add solution to SharePoint: Leave this default selection for the Central Admin server.
- Do not add solution: For all subsequent indexing servers, click this option.
- Click Next and the fourth Install Options page appears.
- Choose either:
- Deploy solution to Central Admin: Leave this default selection when you are installing to the SharePoint Application server to the Central Admin server.
- Do not deploy solution: Click if one of the following is true:
- You are installing Connector Framework on additional servers on your farm
or - For a manual install
- You are installing Connector Framework on additional servers on your farm
- Click Next and the fifth Install Options page appears.
- Choose either:
- Add solution to SharePoint: Leave this default selection for the Central Admin server.
- Do not add solution: For all subsequent indexing server installations, click this option.
- Click Next and the sixth Install Options page appears.
- Choose either:
- Activate feature in Central Admin site collection: Leave this default selection when you are installing to the SharePoint Application server or to the Central Admin server.
- Donot activate feature: If you are installing on additional servers on your farm, or for a manual install, click this option.
- Next: Click and the seventh Install Options page appears.
- Choose either:
- Restart services after install: Automatically restart your services.
- Do not restart services: Manually restart your services.
- Click Next and the Confirm Installation page appears.
- Click Next: and the Installing Connector Framework 4.0 page appears.
- The BA Insight Connector Framework 4.0 Information page appears. Read the Upgrade and Notes information.
- Click Next and see the Installation Complete page.
- Click Close.
If you created a backup, even if you ran a full uninstall operation, see the restore operation progress window.
If you have any issues with the install or restore operation, go to the Connector Framework WebHelp > Tools > Backup and restore the site > If your backup restoration operation fails section.
How to Perform a Silent Install
-
To perform a silent installation of Connector Framework, open a command line with Administrator privileges and use the following example commands with the parameters listed below:
The values provided below, including the Connector Framework MSI file name, are for the sake of example. Use only the values that apply to your installation file and network environement.
For the Central AdminMsiexec /quiet <file>.msi TARGETDIR="C:\XXX” OPTION_PROTOCOLHANDLER=0 OPTION_ADDSOLUTION=1 OPTION_DEPLOYSOLUTION=1 OPTION_ACTIVATEFEATURE=1 OPTION_RESTARTSERVICES=1
For the Crawl ServersMsiexec /quiet <file>.msi TARGETDIR="C:\XXX” OPTION_PROTOCOLHANDLER=1 OPTION_ADDSOLUTION=0 OPTION_DEPLOYSOLUTION=0 OPTION_ACTIVATEFEATURE=0 OPTION_RESTARTSERVICES=1
Parameters
- TARGETDIR: Path to install ConnectivityHub.
- AUTHORIZEDROLE: Security group allowed to access the web admin. Default is Administrators. Optional.
- SERVICELOGIN: Service account that ConnectivityHub runs under.
- SERVICEPASS: Password for the account.
- WEBPORT: Port number for the admin website. Default is 55001. Optional.
- SERVICEPORT: Port number for the job scheduler service.Default is 555. Optional