How to Manage Tasks (Jobs)
A task (job) is a SharePoint timer implementation that preloads specific data from a Connector. After you configure your connection, you must run the following tasks:
- Security Synchronization task: The Connector Framework monitors security changes and ensures that items are recrawled whenever membership changes. (The Connector Framework monitors the expanded group membership to make sure that the appropriate items are crawled. This security job ensures that the security levels for the users and groups are fetched and updated from the source system using the Connector.
- Run a Datastore Type Load task: Load the content types or the item types (depending on the Connector), which are required for filtering, from the source system (using the Connector).
After you run these tasks and continue configuring your Connector, you perform other tasks:
- Run a Security Purge task: Clean any of the fetched data from the Connector Framework.
- Run a Mailboxes/Datastore Load task: Use this task with Connectors that use mailboxes, such as the Exchange and eVault Connectors. This task loads the new mailboxes for the Connector connection into the mailbox list for manual updates and edits. Alternatively, load the containers or repositories from the source system (using the Connector). For example, for the SharePoint Connector these are the sites and site collections for which you want to enable crawling.
- Run the Site Backup task: Run the Site Backup task to extract all the Connector configuration information.
How to Run a Security Synchronization Task
The security synchronization task is required for the BA Insight Connectors that use the Security Mapping function of the Connector Framework. This task loads user and group tables and executes the mapping based on the Connector configuration.
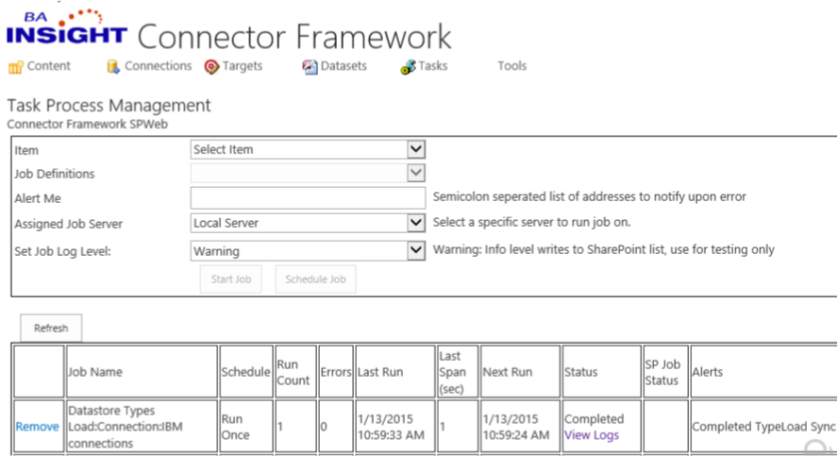
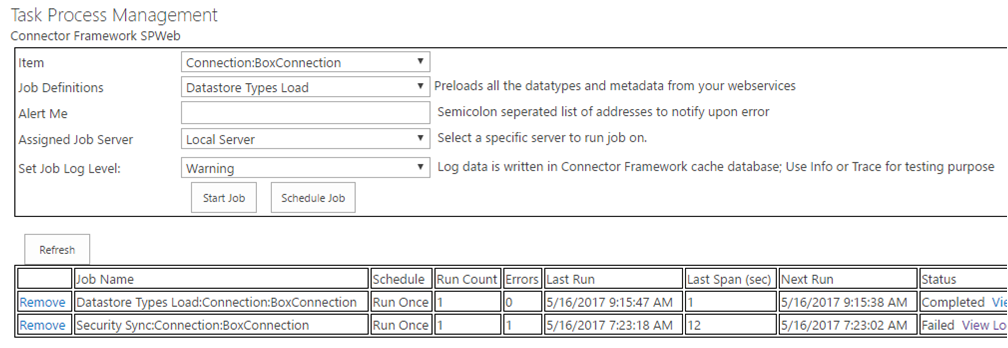
- Click Tasks and the Task Process Management page appears.
- Item: Select your Connector.
- Job Definitions: Select Security Sync.
- Alert Me: Enter a semicolon (;) delimited list of address used to notify you when there is an error.
- Assigned Job Server: Use the drop-down arrow to select the server where the job will run.
- Set Job Log Level (optional): Set to:
- Error: See all the errors.
- Warning: By default, view all the warnings.
- Info: See diagnostic information messages. This value can generate a significant number of log messages.
- Trace: Record the full details that are required for troubleshooting with all the log messages. BA Insight recommends that you specify this value only for troubleshooting purposes.
- Start Job/Schedule Job: Click to view the job status information in the table below. (For information about scheduling a job, see Schedule a security synchronization task).
- Refresh: Click to update the table.
Hint: When the job is complete, see a message such as Completed in the Status column. - Choose the following options you desire (optional):
- No header:
- Remove: Click to delete the selected job from the table.
- Pause: Click to stop a scheduled job.
- Job Name: See the name of the job.
- Schedule: See the scheduling information.
- Run Count: See the number of items that were processed.
- Errors: See the number of errors.
- Last Ran: See the date and time for the latest run of this job.
- Last Span: See the length of this job (in seconds) run.
- Next Run: See the date and time when this job is schedule to be run again.
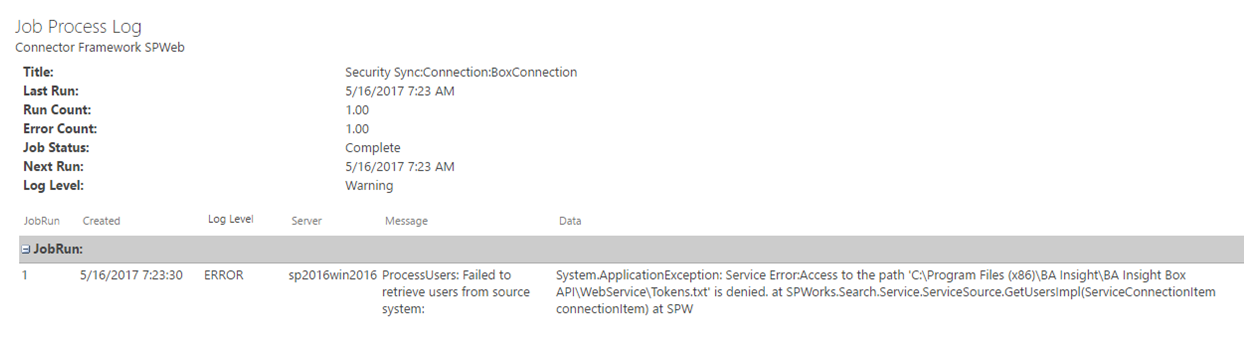
- Status: See the status for this job. You can also click View Logs to see the log page:
- SP Job Status: See the SharePoint job status.
- Alerts: See any alerts.
- No header:
- It is important to note that any job can be started using SharePoint Management Shell. For example, run the above job from PowerShell using this cmdlet:
Start-ConnectivityEngineJob -ConnectionTask - You are asked to supply values for the following parameters:
- Start-ConnectivityEngineJob: For example: http://contoso:2013/Longitude.Connectors
- ScheduleTaskFor: For example,
MySharepointConnection(the name of your connection) - JobName: For example, Security Sync.
- If all the parameters are correct, you see a message similar to "Task has been started."
- Otherwise an exception is thrown so that you can correct your cmdlet.
- If you are starting a content job, switch to ContentTask:
Start-ConnectivityEngineJob -ContentTask - If you are starting a target job, switch to TargetTask:
Start-ConnectivityEngineJob -TargetTask
Frequency Requirements
Schedule the security synchronization job when you are ready to begin indexing for production. The frequency depends on the changes made in the source system for security related items such as new accounts, group membership changes, and so on.
BA Insight recommends that you run this job at least once a day. More frequent intervals are sometimes required, but these depend on the impact to AD and the source system.
How to Schedule a Security Synchronization Job
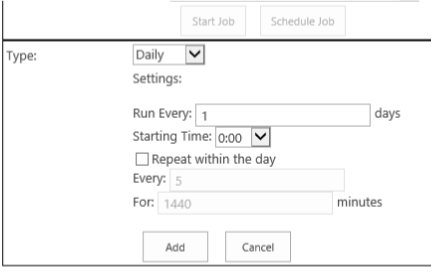
- In the Task Process Management page, click Schedule job.
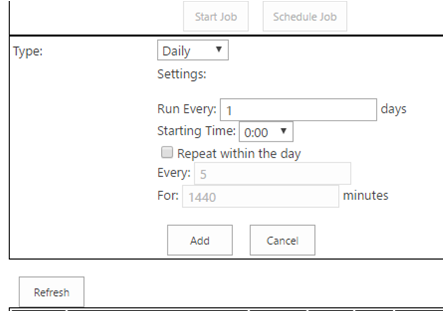
- Daily: Click the down arrow, if you want to change the schedule to Weekly or Monthly.
- (Optional) Change the default setting (1);
- Run Every _ Days: Enter the number of days.
Hint: If you select Weekly or Monthly, "Run Every" changes to "On" and the days of the week or months of the year appear below this checkbox. - Starting Time: Click the drop-down arrow to enter.
- Run Every _ Days: Enter the number of days.
- Repeat within the Day: Check in order to access the Every and For fields where you can enter the number of minutes for each occurrence of a synchronization job.
- Click Add to schedule this job.
You should note that any job can be scheduled from PowerShell. Open the SharePoint Management Shell and type:
Schedule-ConnectivityEngineJob
You are asked to provide the following parameters:
-
- Switch parameter:
ContentTask|ConnectionTask|TargetTaskand specify only one depending on whether you are running a job on content, a connection, or a target. - Switch parameter:
Schedule recurrence. Select between Daily, Weekly, or Monthly. - Schedule-ConnectivityEngineJob: For example, specify: http://contoso:2013/Longitude.Connectors
- ScheduleTaskFor: For example,
MySharepointConnection(the name of your connection). - JobName: For example,
Security Sync. - Depending on the Schedule recurrence, you are asked to specify other parameters.
See the following example of a Security Sync job that is scheduled to run daily at 10 AM: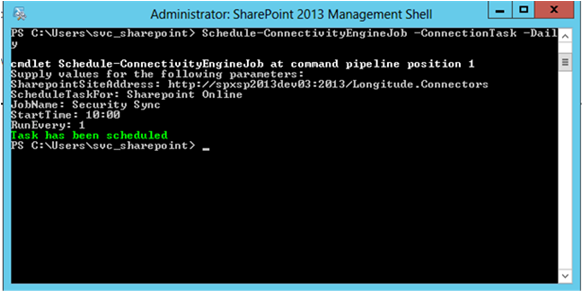
- Switch parameter:
How to Run a Security Purge Task
To remove all user and group mappings for this connector, run this job.
- Tasks tab: Click and the Task Process Management page appears.
- Item: Select your connector.
- Job Definitions: Select
Security Purge Job. - Job Log Level (optional): Set to:
- Error: See all the errors.
- Warning: By default, see all the warnings.
- Info: See diagnostic information messages. This value can generate a significant number of log messages.
- Trace
- Start Job: Click to see the job status information in the table below Refresh.
How to Run a Datastore Type Load Task
The datastore types are content or item types. These types differ according to the Connector that you use. For example, the SharePoint Connector uses content types that you can define in lists or sites.
You must perform the Datastore Types Load task for the BA Insight Connectors that support multiple types of content within the Connector source system. For example, some systems have different areas for discussion forums, blogs, document libraries, and so on. The Datastore Types Load task inspects the connected system and retrieves the schema to enable advanced metadata generation and filters.
If you are performing install and configuration operations, this is a required step. If you skip this step, you can expect to see an error when you define the content source. For more information, see the configuration instructions for your Connector.
- Go to the Connector Framework - Content Management page. Click Tasks.
- Item: Select your Connector such as Connection:BoxConnection.
- Job Definitions (if available): Select Datastore Types Load.
- Set Job Log Level: Use the down arrow to select.
- Click the button Start Job.
How to Run a Mailboxes/Datastore Load Task
- Use this task with Connectors that use mailboxes, such as the Exchange and eVault Connectors.
- The Mailbox Load task loads the new mailboxes for the Connector connection into the mailbox list for manual updates and edits.
- Each Connector has the option to create newly discovered mailboxes as
ACTIVE. - New mailboxes are automatically included during the next processing step such as crawling, target synchronization, or mailbox synchronization.
Run this task at least once a day. For some Connectors or to support changes to the master mailbox list for new mailboxes, run this task more frequently .
- Go to the Task Process Management page.
- Item: Use the drop-down arrow to select a Connector that uses mailboxes.
- Job Definitions: Use the drop-down arrow in to select Mailboxes/Datastores Load.
- Click Start Job to run this job.
For more information, see the documentation for your BA Insight Connector.
How to Run the Site Backup Task
Run the Site Backup task to extract all the Connector configuration information. This data includes connections, content, security mapping, mailbox lists, configuration settings, targets, and so on. This data is exported as a .zip file that can be stored in another location such as off the server for recovery purposes.
To back up or restore your site, use the backup and restore operation (go to Restore using a backup).
A common method of using this operation is to back up the configuration from a DEV/TEST environment and restore to a production environment. This task is typically run:
- At a scheduled time, with a repeat if this repetition is necessary
- Manually, at a time and for reasons that you determine
Use this operation when you want to save and download your backup files to a site that is not local.
BA Insight recommends that you run the backup operation at least once a week. However, the frequency also depends on the level of changes to the configuration and mappings.
The backup files are stored in the following locations:
- SharePoint 2013: C:\Program Files\Common Files\Microsoft Shared\Web Server Extensions\15\LOGS\ESC
- SharePoint 2016: C:\Program Files\Common Files\Microsoft Shared\Web Server Extensions\16\LOGS\ESC
These files have a .zip extension. An example of the naming format is shown below:
sitebackup20150220063807.zip
The backup files have this format:
Sitebackup/year/month/day/hour/minute/second
For example:
Sitebackup/2015/02/20/06/38/07
How to Run the Site Backup Job
Use the following procedure to schedule a site backup job. For immediate, non-scheduled backup jobs, see How to Backup/Restore.
- Go to the Task Process Management page.
- Item: Use the down arrow to select Site Jobs.
- Job Definitions: Select Site Backup.
- Choose:
- Schedule Job: Click and the scheduling pane appears:
Type: Use the Running a security synchronization task > Scheduling a security synchronization task topics.
Always download the backup from your SharePoint farm and save this backup file to a safe location. The actual backup files are stored in a hidden document library in central admin.
- Schedule Job: Click and the scheduling pane appears: