Map Source System Users and Groups to AD
Use the Active Directory page to map users and groups from the source system to Active Directory.
- If you are doing an initial configuration, click AD Settings tab the top of the Connection Manager page, and go to step 4.
To access AD Settings for an existing connector:
- Select the Connections tab.
- Select your connector by clicking on a connector link under the Connection Column.
- Click the AD Settings tab the top of the Connection Manager page.
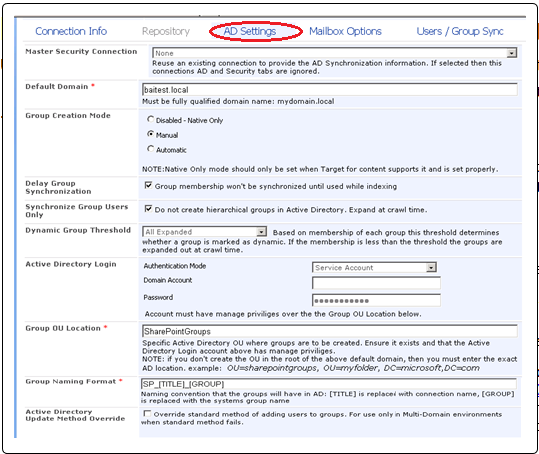
- Master Security Connection
- Enter the name of an existing Connection to enable the Connections to share the input Connection’s mapping.
- If an existing Connection is entered into this field:
- The connection's mapped users and groups are used
- The rest of the settings on this page are replicated from your current Connection
- In the Default Domain field, you can enter the Domain Name that is used to map users from your source system into Active Directory.
- Your entry must be the fully qualified domain name format.
- For example: subdomain.mydomain.local.
- For Group Creation Mode, elect whether to create mapped groups in Active Directory when the group loading job is run.
The following selections are available:- Disabled - Native Only:
- Dynamic Groups are marked as native and not added to AD.
- These Groups will be used only for Targets and if the target supports native security.
- For more information, see:Advanced Security Module for SharePoint 2013.
- Manual:
- Group not created but can be flagged manually in the group list to be added.
- Automatic:
- Groups are automatically created in AD when you run the job.
- Disabled - Native Only:
- Activate the Delay Group Synchronization option to delay membership synchronization of Groups until an item is found to be secured by that Group.
- This minimizes the impact on Active Directory, by only adding Users to groups that are actually used for security processes.
- Activate the Synchronize Group Users Only option to synchronize users only, and not hierarchical groups.
- Select a Dynamic Group Threshold from the drop-down menu to determines whether a Group is marked as dynamic.
- If the membership of the Group is less than the established threshold, the Group is expanded out at crawl time.
- For more information, see: Multiple Group Mapping Options.
- For Active Directory Login:
- Enter the Authentication Mode and Account credentials, which will enable Longitude Connectors to create and synchronize groups in Active Directory.
- You must grant the proper rights to these accounts as directed below.
- Service Account: Choose this option to use the service account that the SharePoint Timer Job runs as.
- Impersonate: Choose this option to enter the valid AD User Name and Password.
- For Group OU Location,
- Enter the name of the specific Organizational Unit (OU), an Active Directory folder, where the SharePoint Groups will be created.
- You can keep the default value "SharePointGroups", or create your own.
- The purpose of creating a Group OU is to maintain SharePoint groups separately from all other central Active Directory groups.
- This reduces any potentially negative security impact, by not interfering with other Groups or the security of any other system or OU.
- Ensure this location exists and that the Active Directory Login account entered in the previous field has Group management privileges.
- For more information, see:Configure the AD Organizational Unit Group ("OU")
- Make sure this location exists and that the Active Directory Login account entered in the previous field has Group management privileges.
- For Group Naming Format, Enter the naming convention that the groups will have in Active Directory:
[TITLE]is replaced with connection name,[GROUP]is replaced with the system's Group name. - Active Directory Update Method Override (If available with your connector): Check this box to override the standard method of adding users to Groups. This option should be used only in multi-domain environments when standard methods fail.
- All Users Group (If available with your connector): Check this box to create an "All Users" or "Public" Group that contains all the valid users in the system (public documents are restricted to valid system users only.)
- Click Save.