How to Setup and Configure the NetDocuments Connector
All BA Insight connectors can be downloaded from Right Answers under Knowledge > BA Insight > Product Downloads > Connectors.
This connector is installed with the same generic steps as any BA Insight connector.
Satisfy the Prerequisites for your connector before installing.
Configuration specifics are detailed below.
Note: This Connector requires one installation per tenancy.
How to Authorize the Connector
The NetDocuments Connector must be authorized with appropriate permissions for your NetDocuments content.
If you are indexing from the European or Australian NetDocuments data centers, follow these instructions in the section below: How to Customize Your NetDocuments Connector.
Use the following steps to grant the NetDocuments connector access to your NetDocuments tenancy:
- On the server where the NetDocuments Connector is installed, navigate to: http://localhost: number>/OAuth.aspx
- <port number>: This is the port number that you selected during the Connector installation. Default is 2281.
If you changed the port number, follow the instructions at How to Customize Your NetDocuments Connector to create your own application
- <port number>: This is the port number that you selected during the Connector installation. Default is 2281.
- Click Authorize to start the authorization process.
-
Log into NetDocuments using an account that has READ access to all content that you want to crawl.
This Connector has the same permissions in NetDocuments as the user account that is used to log in here.
* If multiple instances of the connector are deployed, you must use different user accounts for each connector instance. - Click Allow.
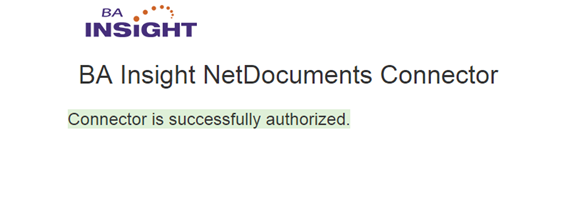
- If the authorization is successful, the following message is displayed:
- If the authorization is unsuccessful, ensure you are using the correct user or service account and that account contains the correct permissions.
Content Configuration Specifics
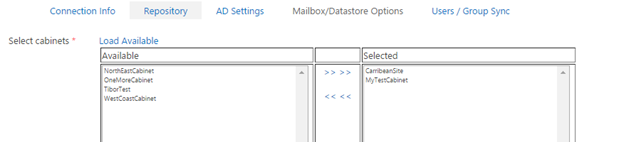
Index your cabinets:
- In the connection configuration Repository tab, click Load Available.
- A list of all the cabinets available in selected NetDocs repositories is displayed.
- Select the "cabinets" to index.
- Run the Datastore Types Load job from the Tasks page.
Content Filters
Repository ID Setting
- This is an optional setting used for content filtering.
- If the authorized user is connected to multiple repositories, you can use this filter to specify only the repositories you want the user to crawl.
- By default, the Connector crawls all repositories the user can access.
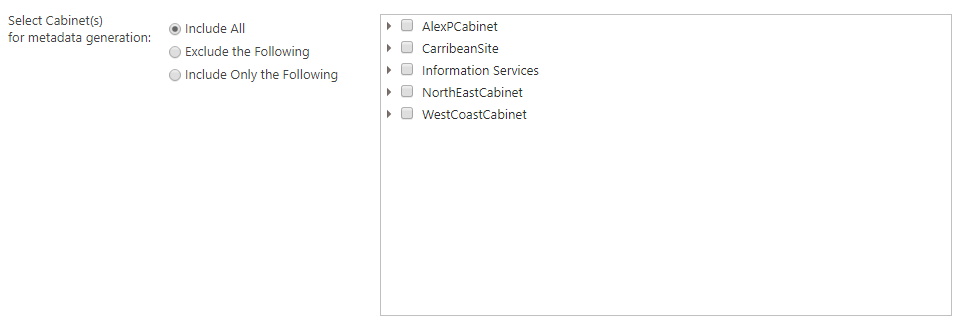
Cabinet Filter
Specify the Cabinet filter for metadata generation and content indexing.
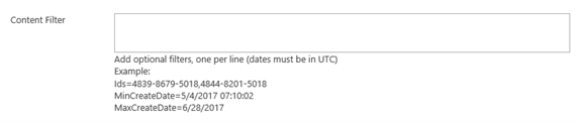
- There is an optional content setting to filter which documents to crawl.
- Specify a comma (,) separated list in order to include a limited set of documents.
- You can also set the minimum and/or maximum document "created" date.
Use the following requirements and graphic below to specify your filters:
- One filter per line
- Datetime
- Can be in any format, however:
- The ordering of the year, month, and day must match the international settings of your operating system.
- All times must be specified in UTC.
- Can be in any format, however:
How to Customize Your NetDocuments Connector
This topic describes how to customize your NetDocuments connector to use your own application registration or index from the European or Australian data centers.
- The NetDocuments Connector is pre-configured to work with the Vault (US) Region and comes with the BA Insight application ID for the OAuth authorization process.
If you want to use the connector in a different region or register your own application, follow the instructions below:
- Log on to the NetDocuments developer portal.
- If you don't have access to it or do not know what it is, contact NetDocuments.
- If you don't have access to it or do not know what it is, contact NetDocuments.
- Create a new application.
- Select the proper region for your application
- Use a client type of REST.
- Use an application type of Confidential.
- Enter the following as the default redirect URL: http://localhost:2281/oauthresult.aspx
- If you used a different port number or HTTPS, change the redirect URL accordingly)
- Save the new application and write down the generated ClientId and ClientSecret values.
- Return to the server where the NetDocuments connector is installed.
- Edit the web.config file found in <installation directory\WebService
Change the
clientIdandclientSecretvalues as shown below:<add key ="clientId" value="enter your client ID here"/><add key ="clientSecret" value="enter your client secret here"/>
-
If you are indexing a NetDocs tenancy from EU or Australia, change the
baseUrlpath in the web.config file. For more information see the REST API v1 Guide for your region:For instance:
<add key ="baseUrl" value="https://api.eu.netdocuments.com"/>