How to Configure Your Elasticsearch Backend
Use the following procedure to configure the Elasticsearch backend.
Prerequisites
- Elasticsearch v7.x must be installed.
- If Elasticsearch is not installed, download Elasticsearch and install it.
Connect SmartHub to an Elastic Cloud or Self-hosted Elasticsearch On-Premise Instance
Make sure that you have the following information and access for the backend(s) that you are configuring:
- Elastic Cloud URL
- Access to Elasticsearch On-Premise
Add an Elastic Backend
- Navigate to the SmartHub Administration page at http(s)://[web-app-url]/_admin.
- For example: http://smarthub.azurewebsites.net/_admin.
- For example: http://smarthub.azurewebsites.net/_admin.
- From the General Settings page click the "Add New Backend" link to add your new Elasticsearch backend.
- Next, enter the Backend Name and corresponding information in the appropriate fields. See the following graphic.
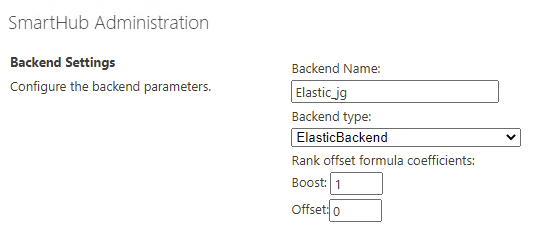
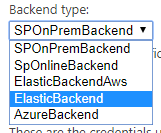
- Backend type: Select ElasticBackend or ElastcBackendAws (for AWS hosted Elastic Search service) from the drop-down list.
-
Rank offset formula coefficients
-
Optional.
-
Enter these values only if you selected the Rank Based mixing algorithm that is set in the Properties for SSA page:
-
BOOST: Enter the boost factor.
-
OFFSET: Enter the rank offset.
-
-
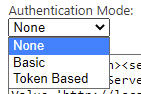
Authentication Mode
These are the credentials that are used to access the Elasticsearch service.
Select the authentication mode for your environment's Elasticsearch type, detailed below.
Available authentication modes:
- None
- Basic
- Token
AWS-hosted Elastic
-
AWS Access Key:
-
Enter your access key
-
-
AWS Secret Key:
-
Enter your secret key
-
- Authenticate via AWS Profiles:
- Store profiles in a share AWS credentials file and use to access AWS Elastic Backend content.
- Note: The file must be saved with an .ini extension:
- Example: credentials.ini
- AWS Profile name:
- Enter AWS profile name.
- Example: basic_profile
- AWS Credentials file location:
- Enter the location of AWS Credential file.
- Example: C:\\Users\sdkuser\customCredentialsFile.ini
[{profile_name}]
aws_access_key_id = {accessKey}
aws_secret_access_key = {secretKey}
All On-Premise Cloud Elasticsearch Instances
For any on-premise instance of Cloud Elastic Search service (not AWS-hosted elastic):
Authentication mode
- Basic
- Account: Enter your account name.
- Password: Enter your password.
- Token Based
- How to configure Token-Based Authentication can be found here.
-
Modify the Backend configuration by entering your configuration settings into the Parameters field.
See the following example code:Backend Configuration Example
Copy<configuration>
<settings>
<setting Name='ElasticServerAddress' Value='http://localhost:9200' />
<setting Name='Indices' Value='index1, index2' />
<setting Name='Timeout' Value='30' />
<setting Name='SourceMappings' Value='00000000-0000-0000-0000-000000000000#index1,index2;' />
</settings>
</configuration>-
Use the following table to specify this code:
Parameter Description Default Value ElasticServerAddress
Required.
The URL of your Elastic Cloud service instance.
Obtain this URL from your Elastic Could provider.
http://localhost:9200 Indices
Required.
Specify one or more comma (,) separated indices to be used for search.
index1,index2 Timeout
Optional.
Specify the configurable timeout of the search.
Note: If the search takes longer than 30 seconds, the search is cancelled.30 SourceMappings
Optional.
A mapping between
SearchQuery.SourceIdand Elasticsearch indices.A Search Query with a matching Source ID is executed against the specified indices.
This option is used for performance tweaks when you have multiple backends.
00000000-0000-0000-0000-000000000000#index1,index2
-
Pipeline Stages
After creating the Backend, two "Elastic translator" pipeline stages are automatically added to the pipeline categories:
-
Query Pipeline Stage
-
Result Pipeline Stage
Make the modifications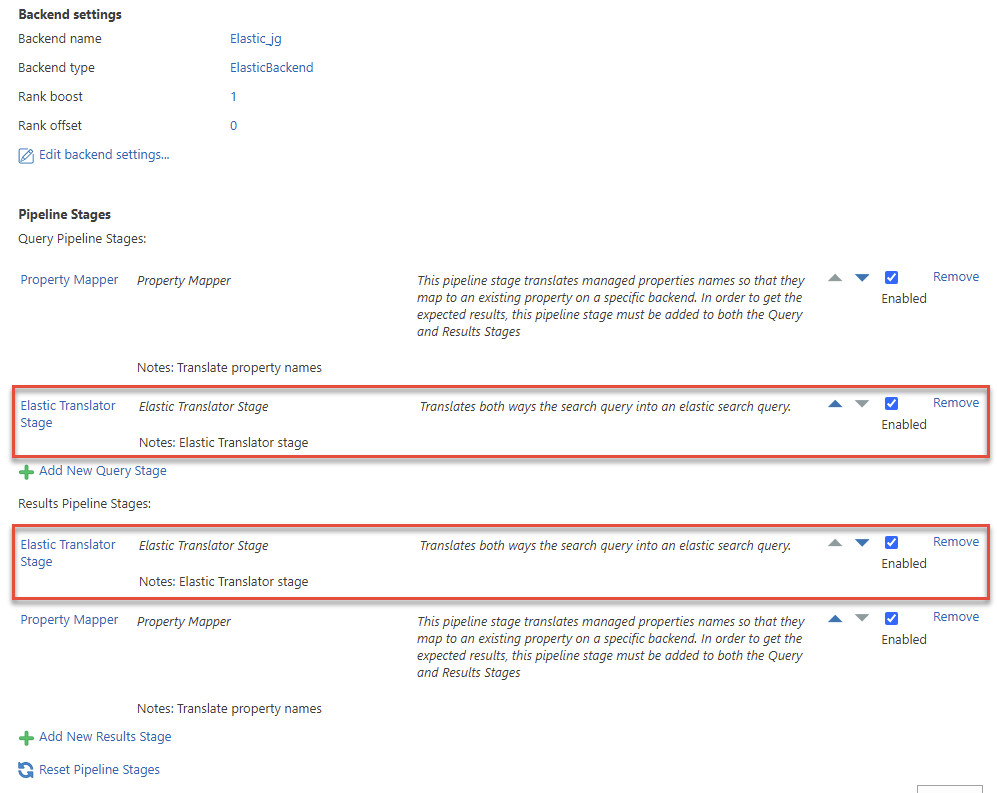
- These are backend-specific pipeline stages and do not apply to any other backends you have configured.
Perform the following steps for both the Query Pipeline and Results Pipeline Elastic Translator stages:
- Click the stage name.
-
Modify the Stage Configuration by entering your configuration settings into the Parameters field.
See the following example code.Stage Configuration Example
Copy<configuration>
<settings>
<setting Name='Indices' Value='index1,index2' />
<setting Name='RefinablePropertiesSuffix' Value='' />
<setting Name='HighlightTagContent' Value='c0' />
<setting Name='Timeout' Value='30' />
<setting Name='EnableFuzziness' Value='true' />
<setting Name='TextQueryType' Value='best_fields' />
<setting Name='DateProperties' Value='ElasticLastUpdate' />
<setting Name='NumericProperties' Value='FileSize' />
<setting Name='SourceMappings' Value='00000000-0000-0000-0000-000000000000#index1,index2;' />
<setting Name='FieldBoost' Value='' />
<setting Name='ShowAccurateResultCount' Value='false' />
<setting Name='BodyField' Value='FileContent' />
</settings>
</configuration>-
Use the following table to specify this code:
-
| Parameter | Description | Default Value |
|---|---|---|
|
Indices |
Required Specify one or more comma (,) separated indices to be used for search. |
index1,index2 |
|
RefinablePropertiesSuffix |
Optional Suffix to append to the Elasticsearch field name when building an aggregation on top of it. |
|
|
HighlightTagContent |
Optional. HTML element to be used as a wrapper for the highlighted terms |
c0 |
|
Timeout |
Optional. Specify the configurable timeout of the search.
|
30 |
|
EnableFuzziness |
Optional The fuzzy query uses similarity based on Levenshtein edit distance. |
false |
|
TextQueryType |
Optional. The |
best_fields |
|
DateProperties |
Optional Specify the date properties that are to be used as refiners |
ElasticLastUpdate |
|
NumericProperties |
Optional Specify the numeric properties that are to be used as refiners |
FileSize |
|
SourceMappings |
Optional.
|
00000000-0000-0000-0000-000000000000#index1,index2 |
| FieldBoost |
Optional
Note that the field names should be taken from elastic, not from the property mapper. |
|
| ShowAccurateResultCount |
Specify if the elastic max count of 10000 results or the accurate count is used. Enabling this might affect the performance |
false |
| BodyField |
Optional
Note that if the setting is missing the default value will be used. |
FileContent |
Logs
By default, logs appear in the directory <SmartHub_Install_Directory>\Logging.
Note: Operator NEAR
Elastic Backend supports operatorNEAR.
Supported syntax:
- (A OR B) NEAR(5) C => "A C"~5 OR "B C"~5
- (A OR B) NEAR(5) (C OR D) => "A C"~5 OR "B C"~5 OR "A D"~5 OR "B D"~5
- (A OR "B C") NEAR(5) D => "A D"~5 OR ("B C D"~5 AND "B C")
- (A AND B AND C) NEAR(5) (D AND E) =>"A B C D E"~5