How to Add Refiners to Your Search Results
About Refiners (Facets)CoveoFacetSlider
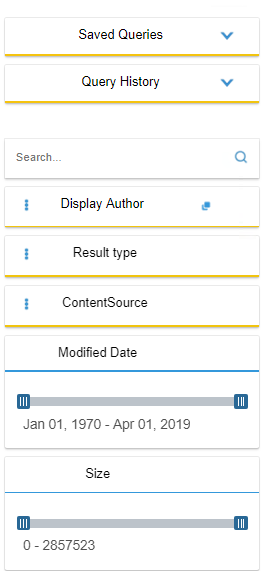
- SmartHub, by default, provides the out-of-the-box refiners, or "facets" shown in the graphic below.
- These refiners help users to narrow down their query results to focus on what they are searching for.
- Adding additional refiners can help you refine your search results beyond what is provided by default.
- To do this, use custom settings, such as those found in the SmartHub file named ResultsCopy.html located at <SmartHub_root>\CustomerCustomization\pages\ResultsCopy.html.
- Best practice to replicate the entire CustomerCustomization directory, rename as desired, and then direct SmartHub to use this new custom Results file.
- For more information about using custom files, see How to Customize Your SmartHub User Interface.
After you edit your custom Results HTML file or similar file, make a backup copy of it, or of its entire directory.
If your custom Results HTML page does not load, restore your backup file to restore SmartHub to normal operation.
Refiner Locations
Refiners can be shown in two places:
- Left column
- Center column
Left Column
Left column refiners are shown in the graphic below.
In your Results HTML file (or your custom Results HTML file), the left column refiners are defined around line 72, under the text <!-- Left column -->.
Refiners Shown in Left Column
- Each field in the "sidebar" <div> class (line 72 in the Results HTML file in SmartHub v5) maps to the refiners available in SmartHub.
See the graphics below and above.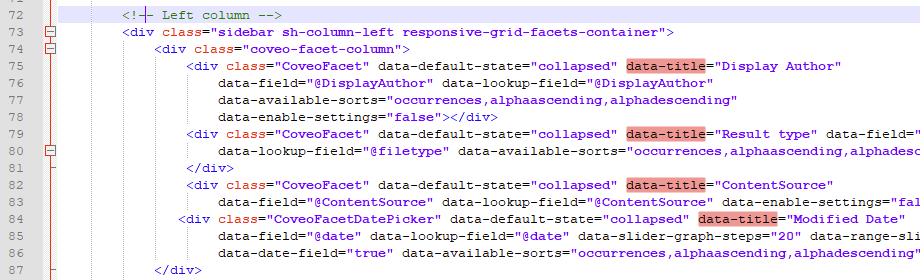
Center Column
Center column refiners are defined around line 96.
These refiners include settings for Content-by-Search components.

Refiner Settings
Facet settings are controlled by their respective classes and properties, described below.
- Properties: Below are common properties.
- data-title:
- This name is displayed on your SmartHub Results page.
- data-facet-search-delay:
- This property delays the search call when searching within refiners.
- This is useful when using slow backends, such as NetDocs.
- Specify a value in milliseconds
- Applies to only string-type facets.
- data-number-of-values:
- Specifies the maximum number of field values fetched before clicking on the Show More button.
- data-page-size:
- Specifies the number of additional results to fetch when clicking theShow Morebutton
- data-field:
- Maps to your managed property (metadata).
- In SharePoint, this is managed property
- In Elastic, it is metadata
- You need to know the name exactly as it appears in your search schema
- Always prefixed with an '@'
- data-default-state:
- Presents field as collapsed or expanded
- data-preload-values:
- Default value "false".
- Setting this option on true will make it so that the refiner values are requested when a new query is done.
- data-always-show-more:
- Default value "false".
- Setting this option on true will force the refiner to display the show more button.
- data-is-dynamic-facet:
- Default value "false".
- Setting this option on true will force the refiner to trigger a new query whenever there is a combination of different filters applied.
- The scope is to properly refresh refiner values and counts with respect to the new query context
- Example: If I apply
filetype:pdfsome displayauthor values are now invalid and should not be shown - Important Note: This affects the load on the search service because there will be one additional query for each refiner that has at least one value applied.
- Example: If I apply
- data-show-info-message:
- Default value ""
- Setting this option in order to display a message in Facet Header.
- Example: data-show-info-message="When you select a node all documents that match the node's children will be automatically returned"
- data-title:
- <div> classes:
- These classes control the layout of your refiner.
- Each and every refiner has a <div> class.
- Note the following <div> classes, two of which are used above.
- CoveoFacet - The standard <div> class. Can be set as collapsed or expanded.
- data-enable-toggling-operator
- Specifies whether to allow the user to toggle between the
ORandANDmodes in the facet. - Setting this option to
truedisplays an icon in the top right corner of the facet. - The user can click this icon to toggle between the two modes.
- Specifies whether to allow the user to toggle between the
- data-available-sorts
- Specifies the sort criteria options to display in the facet Settings menu.
score
Sort by score.
Score is computed from the number of occurrences of a field value, as well as from the position where results having this field value appear in the ranked result set.
When using this sort criterion, a field value with 100 occurrences might appear after one with only 10 occurrences, if the occurrences of the latter tend to appear sooner in the ranked result set.
occurrences
Sort by number of occurrences, with values having the highest number of occurrences appearing first.
alphaascending / alphadescending
Sort alphabetically on the field values.
computedfieldascending / computedfielddescending
Sort on the values of the first computed field for each Group By value.
chisquare
Sort based on the relative frequency of values in the result set compared to the frequency in the entire index.
This means that a value that does not often appear in the index but does often appear in the result set will tend to appear first.
nosort
Do not sort the Group By values.
When using this sort criterion, the index returns the Group By values in a random order.
- Specifies the sort criteria options to display in the facet Settings menu.
- data-searchbox-position
- Specifies the position of the search-within box of a refiner.
- Posible values are:
- top
- The searchbox will apear above the refiner values.
- bottom
- The searchbox will apear beneath the refiner values.
- If the data-searchbox-position is not set, the default "bottom" will be used.
- top
data-show-count-value - Shows or hide the refinement count value. Default value is "true".
- data-enable-toggling-operator
- CoveoFacetSlider - Sets the available data into range using a slide bar. Great for narrowing or expanding numerical ranges.
- data-range-slider
- Specifies whether you want a slider with two buttons instead of a slider with a single button.
- data-date-field
- Specifies whether the field for which you are requesting a range is a date field.
- data-start / data-end - auto:
- Specifies whether you want a data range based on current query.
- Specifies whether the field for which you are requesting a range is a date field.
- data-slider-graph-steps
- Specifies whether to display a small graph on top of the slider.
- steps (data-graph-steps):
- Number
- Specifies the number of steps/columns to display in your graph.
- Minimum value is 2.
- Specifies whether to display a small graph on top of the slider.
- data-decimal-field
- Specifies whether the field for which you are requesting a range is a decimal field.
- data-range-slider
- CoveoHierarchicalFacet - Sets the data into a top-down, tree-style layout.
- data-delimiting-character
- The character that enables you to specify the hierarchical dependency.
- data-number-of-values
- Maximum number of values returned.
- This can improve backend performance.
- There can be 1,000 returns, but if set to 50, users will only have 50 values available.
- data-number-of-values-to-show
- Optional
- Property not included by default
- Enumerates the maximum number of values to be returned from the server
- Default: 10
- This property controls how many children to the parent metadata are visible by default.
- Clicking "show more" under the branch expands by the same number (by default: 10), while "show less" would return the initial number displayed.
- Example:
See the following example code snippet:<div class="CoveoHierarchicalFacet" data-number-of-values='5000' data-default-state="collapsed" data-available-sorts="alphaascending " data-title="Entity Type Associations" data-field="@ESC_COOCCURRENCES" data-lookup-field="@ESC_COOCCURRENCES" data-delimiting-character="~" data-enable-settings="false" data-enable-toggling-operator="false"></div>
- data-searchbox-position
- Specifies the position of the search-within box of a refiner.
- Posible values are:
- top
- The searchbox will apear above the refiner values.
- bottom
- The searchbox will apear beneath the refiner values.
- If the data-searchbox-position is not set, the default "bottom" will be used.
- top
- data-use-single-select
- Usefull especially when documents are tagged with a node and all the nodes ancestors.
- Only applies the selected node(s) as a refinement. Because the content is tagged will all ancestors, documents matching on the selected node's children will be returned too. This can be clarified to the end-users by using the data-show-info-message setting
- If data-use-single-select=true is used on a property which doesn't tag all ancestors (i.e. documents are tagged only with the leafs) then the parent nodes which do not have documents associated will not be selectable (checkbox will not appear)
- data-delimiting-character
Add a Refiner Directly in Results.html
To use a custom Results.html file, see:
For advanced help in modifying your SmartHub refiners, contact BA Insight Support.
Use the following procedure to modify your custom Results.html file:
Before you edit your custom Results HTML file make a backup of it, so that in the event your Results HTML page does not load, you can restore your backup file and thus restore SmartHub to normal operation.
- Make a backup of your custom Results HTML file if you have not done so already.
- Open your custom Results HTML file in a program such as Notepad++ with administrative rights, if necessary.
- Locate a refiner or "facet" and copy/paste it onto the next line.
- Modify the refiner attributes as you see fit, including changing the refiner
data-titleanddata-field, and save this page.
- Launch SmartHub and confirm the refiner appears in the list of available refiners.
Example of Adding a Refiner Directly in Results.html
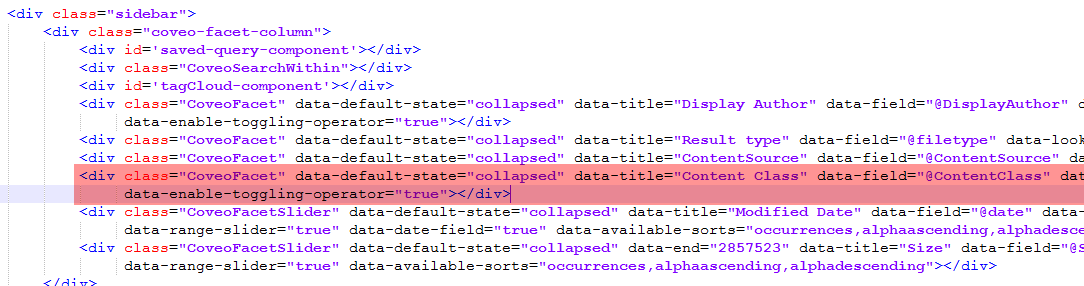
Use the following procedure to modify your custom Results HTML file to incline a refiner named "ContentClass":
- Make a backup of your custom Results HTML file if you have not done so already.
- Open the custom Results HTML file in a program such as Notepad++ with administrative rights, if necessary.
- Locate a refiner or "facet" such as "ContentSource" around line 100 in the graphic below and copy/paste it onto the next line.
- Launch SmartHub and perform a query.
- Content Class appears in the list of refiners in the left-side navigation (refresh and/or clear your internet cache if it does not).
Clicking the icon displays a menu which provides additional options.
-
Clicking the field expands it. You can narrow your search by selecting from the options listed.
-
Clicking the
 icon adds the "AND" operator, enabling you to select more than one additional content class.
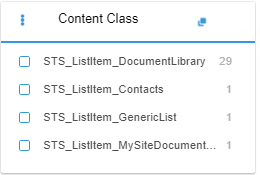
How to Use a Custom Settings File to Modify Your Search Results
If you do not wish to edit the file Results.html directly, use the following instructions.
In the following steps you complete three major actions:
- Create a new, custom Results HTML file (CustomResults.html) from the native Results.html file. This file is stored at the root level of your SmartHub Installation directory.
- You also create a custom setting file for this HTML file to use named CustomResultsSettings.js. This file is later modified.
- Direct CustomResults.html to use CustomResultsSettings.js.
- Create a new custom setting file for Index.html to use, called "CustomIndexSettings.js." Direct Index.html to use this file.
- Direct Index.html to use the new, custom Results file, "CustomResults.html."
- Before starting, create a new directory within your SmartHub installation directory.
- Name the new directory whatever you wish.
- BA Insights suggests "<YourCompanyName>CustomFolder."
- The directory used in this topic and in the example topic below is called YourCustomFolder. Its path is C:\<SmartHubInstallationDirectory>\YourCustomFolder.
Create Your Custom Results HTML File
- Navigate to the root level of your SmartHub installation directory.
- Make a copy of Results.html.
- Name the copy "CustomResults.html".
Create Your Custom Settings Files
- Create your custom settings files.
- Navigate to the path C:\<SmartHub installation directory>\modules\SmartHubResourceLoader.
- Copy the file CustomSettingsTemplate.js and paste it into your custom folder twice.
- Name one copy of the file "CustomIndexSettings.js".
- Name one copy of the file "CustomResultsSettings.js".
Redirect Index.html to Use CustomResults.html Instead of Results.html
- Next, you need a setting from the file Index.html located in the root of your SmartHub installation directory. (Make a copy of the file Index.html for backup purposes).
Open IndexPageSettings.js in an editor such as Notepad++.
Any time you want to override a setting in Index.html DO NOT modify Index.html, but rather make a custom settings file (such as "CustomIndexSettings.js"), and modify that file.
You must also direct Index.html to use the custom settings file (by default Index.html takes its settings from IndexPageSettings.js).
- Copy Lines 119 to 125 from IndexPageSettings.js.

- Paste the code into line 11 of the file CustomIndexSettings.js. Modify line 15 to point to the file "CustomResults.html":
"data-redirect-uri": "/CustomResults.html"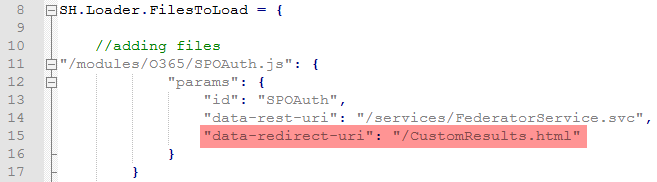
Direct Index.html to Use the Custom Index Settings File
Ensure you make a backup of Index.html before proceeding.
- Open Index.html and modify
CustomIndexSettingsPathon line 18 to point to your new custom index settings file at the location: <YourCustomFolder>/CustomIndexSettings.js.- For example, line 18 appears as:
const customSettingsFile = "/YourCustomFolder/CustomIndexSettings.js"
- For example, line 18 appears as:
Direct CustomResults.html to Use the Custom Results Settings File
- Open the file CustomResults.html in an editor such as Notepad++.
- Modify the
customSettingsFilepath on line 18 to point to your new custom results settings file at the location <YourCustomFolder>/CustomResultsSettings.js.- For example, line 18 will change to:
const customSettingsFile = "/YourCustomFolder/CustomResultsSettings.js"
- For example, line 18 will change to:
Test Your Settings Files
- Clear your browser cache if SmartHub is open. If SmartHub is not open, launch it.
- Check the URL in your browser.
- The file name "CustomResults.html" appears in the URL if it is actively being used.
- If it does not appear in the URL, check that your file paths have all been entered correctly in the files described in the above steps.

Add a New Refiner to CustomResults.html
- Navigate to your custom folder and open file CustomResults.html.
- Open the CustsomResults.html file in a program such as Notepad++ with administrative rights, if necessary.
- From line 93 to 105 is the refiner (facet) area.
- From line 93 to 105 is the refiner (facet) area.
- Locate a refiner or "facet" and copy/paste it onto the next line.
- Modify the refiner attributes as you see fit, including changing the refiner
data-titleanddata-field,and save this page.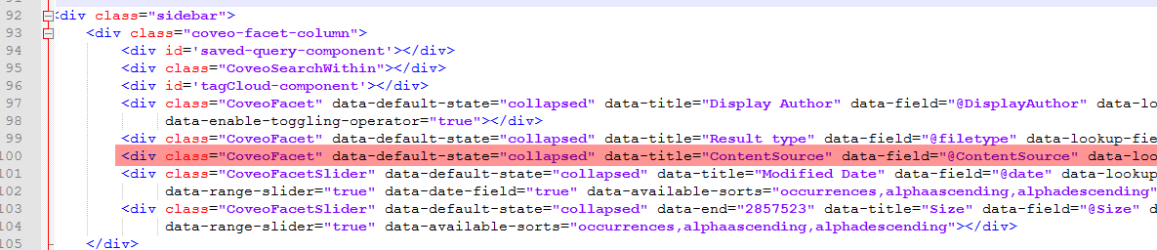
- Go back to your browser and reload the page to test your new refiner.