How to Enable Editing in the Search Results Display Template
About
To add edit and trigger functionality to your results template you have 2 options:
Single Field Triggers
- Typically added to the action bar of the search results
- Can be displayed anywhere in the search result
- Vary from typical form integration: a single field is displayed and the call to the integration is performed as soon as a value is accepted for the field
How to Add a Single Field Trigger
To add a single field trigger you need to:
- Add a container element to house the single-field form.
- Add a span in the container to behave as both a form and a trigger.
- Edit the attributes of the span to configure the edit capability.
This typically involves attributes such as:- data-edit
- data-type
data-integration-mapTo
Available attributes:
See here a list of all the parameters that can be specified for the element and what part of the integration functionality they control.
- Update the attributes of the span element to configure the trigger capability.
This typically involves attributes such as:- data-integration-url
- data-integration-type
- Update the attributes of the span element to add the click action to call SH.utils.makeEditableControl(this)
onclick="SH.utils.makeEditableControl(this)"
- Add the content of the span that represents the button displayed on the page
- For the action bar this usually involves 2 elements:
An <i> element that represents the icon of the action and has the classes sh-icon-button fas and whatever FontAwesome icon you want for your button, such as fa-globe
FontAwesome icons:
You can check here a list of icons that are available. SmartHub has access to the free icons only and typically relies on the solid ones (fas-*)
A <span> element that represents the text of the action
- For the action bar this usually involves 2 elements:
- Add any additional read-only fields that you want to be sent with the API request.
This typically involves attributes such as:- data-integration-mapTo
Example
The example below defines an action that you can put in a display template that shows a single button form that enables you to choose a document and then call an integration that receives the document binary (base64 format) and the title parameter
Sample Single Field Trigger
<div class="sh-float-right">
    <span data-integration-mapTo="title" class="hidden"><%= raw.title %></span>
    <span onclick="SH.utils.makeEditableControl(this)" data-integration-type="POST" data-type="file" data-base64="true" data-integration-url="api/some/request/to/system" data-integration-mapTo="fileContent" data-edit="true">
        <i class="sh-icon-button fas fa-file"></i>
        <span>Attach document</span>
    </span>
</div>
The end result would look similar to the screenshot below

Show Edit Form as Modal Dialog
Actions buttons from the search results action bar can also be used to open modal dialogs that display information about the current result.
To add the capability to edit forms to each result, use the following steps:
- Add a trigger button in the action bar.
- Define a modal dialog that displays result information.
- Update the trigger button to open the dialog.
- Update the modal dialog to add data editing attributes.
- Update the trigger button to convert the modal dialog to an edit form.
Add a Trigger Button in the Action Bar
- Edit the HTML page and find the script that defines the display template of the result
-
Add the following snippet to add a custom action named "Edit record"
Copy<span class="sh-float-right">
<i class="sh-icon-button fas fa-edit"></i>
<span>Edit record</span>
</span>Custom action button
-
The end result looks similar to this graphic:

Define a Modal Dialog that Displays Result Information
A modal dialog in SmartHub is defined by a DIV container that has the following attributes:
- data-role="modal"
-
class="sh-modal sh-fade"
Note: You can add additional classes to the modal dialog in order to control style.
Modal Dialog Structure Pattern
The structure of a modal dialog typically follows the pattern:
- Modal content container with class "sh-modal-content"
- Header content container with class "sh-modal-header"
- Heading element that represents the title of the modal with class "sh-modal-title sh-float-left"
- Button that closes the modal with attribute data-dismiss="modal"
- Body content container with class "sh-modal-body"
- Footer content container with class "sh-modal-footer"
- Header content container with class "sh-modal-header"
Modal Template
<div data-role="modal" class="sh-modal sh-fade">
    <div class="sh-modal-dialog sh-modal-centered">
        <div class="sh-modal-content">
            <div class="sh-modal-header">
                <h5 class="sh-modal-title sh-float-left resultTitle">Sample title</h5>
                <button type="button" class="sh-icon-button sh-float-right" data-dismiss="modal">
                    <i class="sh-modal-btn-close fas fa-times"></i>
                </button>
            </div>
            <div class="sh-modal-body">
                ...
            </div>
            <div class="sh-modal-footer">
                ...
            </div>
        </div>
    </div>
</div>
Assuming a search result with the following properties:
- title
- case status
- case priority
- case number
- customer name
- assigned to
...we can define an Edit recordmodal as shown here:
Edit record modal sample
<div data-role="modal" class="resultModal sh-modal sh-fade">
    <div class="sh-modal-dialog sh-modal-centered">
        <div class="sh-modal-content">
            <div class="sh-modal-header">
                <h5 class="sh-modal-title sh-float-left resultTitle">Edit record: <%= raw.caseNumber %></h5>
                <button type="button" class="sh-icon-button sh-float-right" data-dismiss="modal">
                    <i class="sh-modal-btn-close fas fa-times"></i>
                </button>
            </div>
            <div class="sh-modal-body">
                <div class="metaContainer metaContainerInline">
                    <div class="sh-form-group">
                        <label class="sh-form-control-label">Case Number:</label>
                        <span class="sh-form-control"><%= raw.caseNumber || "N/A" %></span>
                    </div>
                    <div class="sh-form-group">
                        <label class="sh-form-control-label">Title</label>
                        <span class="sh-form-control"><%= raw.title || "N/A" %></span>
                    </div>
                    <div class="sh-form-group">
                        <label class="sh-form-control-label">Customer Name:</label>
                        <span class="sh-form-control"><%= raw.customerName || "N/A" %></span>
                    </div>
                </div>
                <div class="metaContainer metaContainerInline">
                    <div class="sh-form-group">
                        <label class="sh-form-control-label">Case Priority:</label>
                        <span class="sh-form-control"></span>
                    </div>
                    <div class="sh-form-group">
                        <label class="sh-form-control-label">Case Status:</label>
                        <span class="sh-form-control"></span>
                    </div>
                    <div class="sh-form-group">
                        <label class="sh-form-control-label">Assigned To:</label>
                        <span class="sh-form-control"><%= raw.assignedTo || "Unassigned" %></span>
                    </div>
                </div>
            </div>
            <div class="sh-modal-footer">

            </div>
        </div>
    </div>
</div>- This must be defined as a sibling of the button so that both the button and the modal dialog have the same parent container:
HTML Structure
<div class="sh-float-right">
    <span>
        <i class="sh-icon-button fas fa-file"></i>
        <span>Edit record</span>
        </span>
        <div data-role="modal" class="resultModal sh-modal sh-fade">
        ...
        </div>
</div>
Update the Trigger Button to Open the Dialog
Edit the SPAN trigger button that contains the icon and the label of the trigger and add the onclick functionality that opens the modal dialog.
Trigger Open Modal
<span onclick="if(event.currentTarget !== this) return; SH.$(this).siblings('.resultModal').SHModal('show')">
    <i class="sh-icon-button fas fa-file"></i>
    <span>Edit record</span>
</span>
When testing the search and the new trigger action you now see the modal dialog open when clicking the Edit record button.
Update the Modal Dialog to Add Data Editing Attributes
We leverage the integration API attributes to control which fields are editable in the modal dialog and how you edit them.
We assume the following editing capability:
- Title
- Editable text input; sent as parameter title to the API
- Case Priority
- Editable dropdown with possible values - High/Medium/Low
- Sent as parameter priority to the API
- Case Status
- Editable dropdown with possible values Open/Closed
- Sent as parameter status to the API
- Customer Name
- Read-only
- Sent as parameter caseNumber to the API
- Save button
- Trigger button that calls api/supportSystem/updateCase with all the parameters above and shows a message to the end-user once the action is finished
Attributes to be Added
Add the following attributes to the spans marked with class sh-form-control, which represent our fields:
data-edit=truefor all the editable fieldsdata-integration-mapto=[parameter name]: Added to the fields to be sent to the APIdata-type="select", data-sourceanddata-valuefor the fields that are drop-down menus.
We add the following attributes to the button used to save the changes:
data-integration-urlis the URL that to call at save time- The parameters are picked up automatically
data-dismiss="modal"to close the modal as soon as the "Save" button is clicked (doesn't wait for the API call to finish)data-descriptionis the message to show in the notification box along with the result of the API call (Success/Failure)
In order to reset the fields after an submit is made, you have to add this attribute onclick="SH.$('[data-edit=true]').editable('setValue')"to save button element.
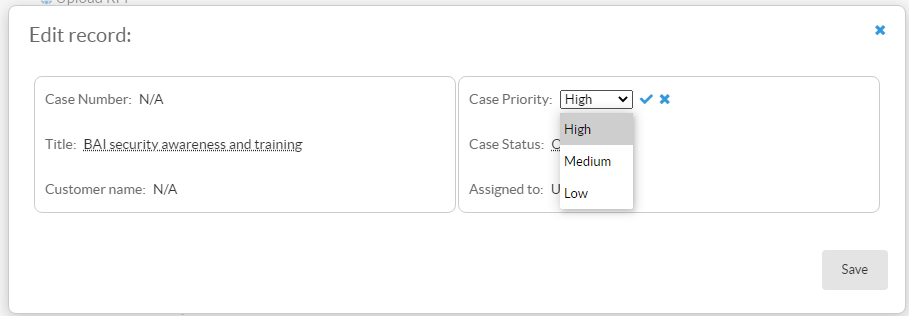
Results
The result is a similar modal dialog:
Editable form
<div data-role="modal" class="resultModal sh-modal sh-fade">
    <div class="sh-modal-dialog sh-modal-centered">
        <div class="sh-modal-content">
            <div class="sh-modal-header">
                <h5 class="sh-modal-title sh-float-left resultTitle">Edit record: <%= raw.caseNumber %></h5>
                <button type="button" class="sh-icon-button sh-float-right" data-dismiss="modal">
                    <i class="sh-modal-btn-close fas fa-times"></i>
                </button>
            </div>
            <div class="sh-modal-body">
                <div class="metaContainer metaContainerInline">
                    <div class="sh-form-group">
                        <label class="sh-form-control-label">Case Number:</label>
                        <span class="sh-form-control" data-integration-mapTo="caseNumber"><%= raw.caseNumber || "N/A" %></span>
                    </div>
                    <div class="sh-form-group">
                        <label class="sh-form-control-label">Title:</label>
                        <span class="sh-form-control" data-edit="true" data-integration-mapTo="title"><%= raw.title || "N/A" %></span>
                    </div>
                    <div class="sh-form-group">
                        <label class="sh-form-control-label">Customer name:</label>
                        <span class="sh-form-control"><%= raw.customerName || "N/A" %></span>
                    </div>
                </div>
                <div class="metaContainer metaContainerInline">
                    <div class="sh-form-group">
                        <label class="sh-form-control-label">Case Priority:</label>
                        <span class="sh-form-control" data-integration-mapTo="casePrority" data-edit="true" data-type="select" data-value="<%= raw.casePriority || 1 %>" data-source="[{value:1,text:'High'},{value:2,text:'Medium'},{value:3,text:'Low'}]"></span>
                    </div>
                    <div class="sh-form-group">
                        <label class="sh-form-control-label">Case Status:</label>
                        <span class="sh-form-control" data-edit="true" data-integration-mapTo="caseStatus" data-type="select" data-value="<%= raw.caseStatus || 1 %>" data-source="[{value:0,text:'Closed'},{value:1,text:'Open'}]"></span>
                    </div>
                    <div class="sh-form-group">
                        <label class="sh-form-control-label">Assigned to:</label>
                        <span class="sh-form-control"><%= raw.assignedTo || "Unassigned" %></span>
                    </div>
                </div>
            </div>
            <div class="sh-modal-footer">
                <button class="sh-button" data-dismiss="modal" data-description="saving changes for '<%= raw.caseNumber %>'" data-integration-url="api/supportSystem/updateCase">Save</button>
            </div>
        </div>
    </div>
</div>
Update the Trigger Button to Convert the Modal Dialog to an Edit Form
Once you have the annotated editable modal dialog, you can do the following:
- Update the click action of the button to:
- Open the modal dialog
- Make it editable
- This enables you to change the values before triggering the call
To do this edit the onclick attribute and set the value to call SH.utils.makeEditableForm
Trigger edit form
<span onclick="if(event.currentTarget !== this) return; SH.$(this).siblings('.resultModal').SHModal('show');SH.utils.makeEditableForm(SH.$(this).siblings('.resultModal'))">
    <i class="sh-icon-button fas fa-file"></i>
    <span>Edit record</span>
</span>
The end result when clicking the button again is an editable modal dialog: