How to Create Redacted Documents
About
The feature performs document anonymization using the Redacted.ai Docuvision API and stores anonymized copies of your documents in file share you specify.
How to Add the DocuVision Stage to AutoClassifier
- Navigate to the AutoClassifier Pipelines component page.
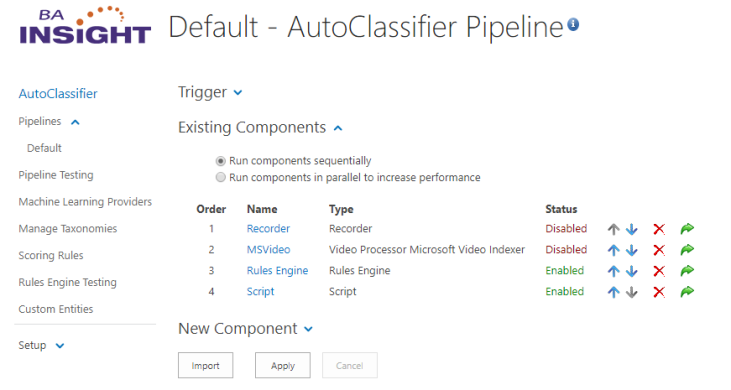
- Click New Component and select DocuVision from the component list:
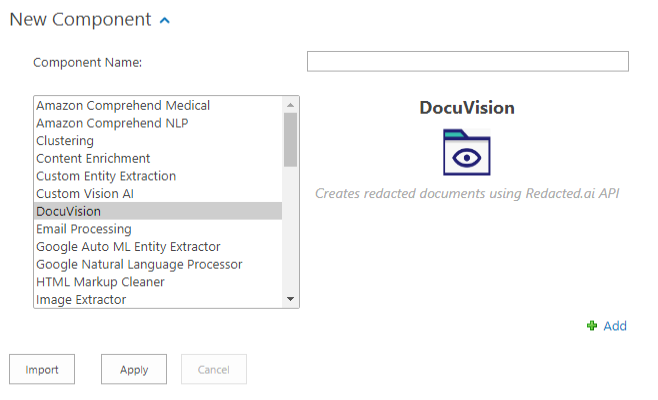
- Name your new component and click Add:

- Click Apply to save your changes.
- Ensure your new DocuVision component is displays in the list of existing pipeline stages.
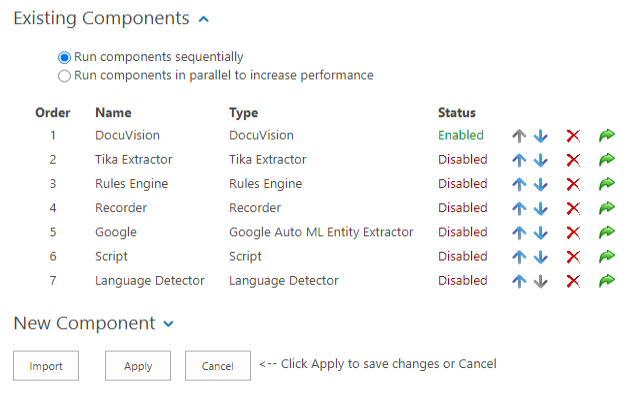
Note: When you perform document redaction using the Docuvision component, BA Insight recommendeds that this stage be the first in your processing pipeline, so that all other stages use the redacted document and not the original one. For example, Tika Text Extraction, NLP, etc.
How to Configure the DocuVision Component
In AutoClassifier, navigate to your list of components and open your DocuVision component.
-
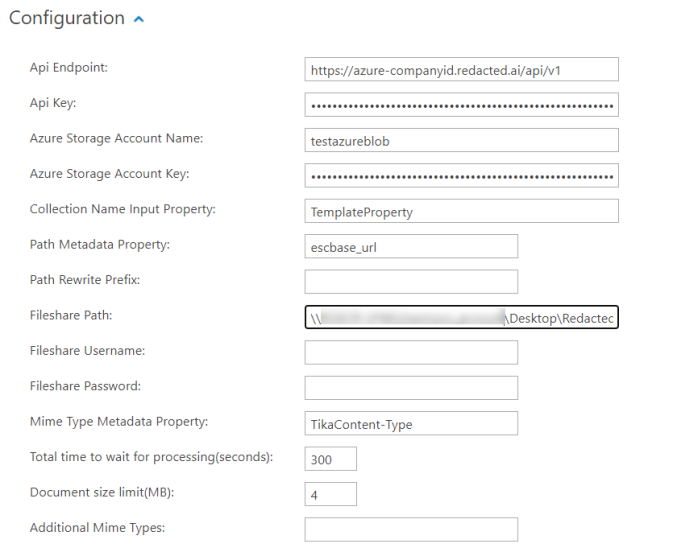
Complete the following entries with valid values.
-
Use the graphics shown for contextual examples.
-
Click "Apply" when done.
- Api Endpoint
- Enter the API endpoint.
- Example: https://azure-companyid.redacted.ai/api/v1
- Api Key
- Enter the DocuVision API key.
- Azure Storage Account Name
- Name of Microsoft Storage Account name used to store temp data
- Azure Storage Account Key
- The secret key of the Microsoft Storage Account used to store temp data
- Path Metadata Property
- Enter a path metadata property of the input item that will be process.
- This metadata property will be overwritten with the redacted file path.
- Note: The file name is extracted from this metadata property and used in processing.
- Example: OriginalPath (file://location/filename.txt)
- Path Rewrite Prefix
- Enter a path prefix used for the website address to files here.
- To be able to access the file content from a search engine results page, the URL will be reformatted as: http://someSiteUrl/Folder/Subfolder/filename.pdf
- Example: http://someSiteUrl/
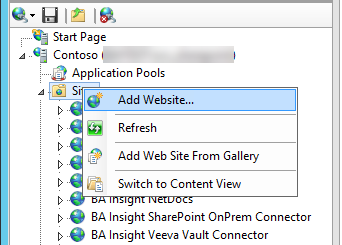
- Open Internet Information Services (IIS) Manager:
- In the Connections pane, expand the server name, and press right click on "Sites"
- Select Add Website...
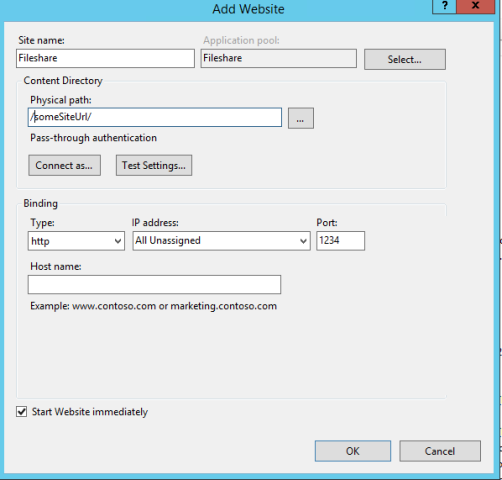
-
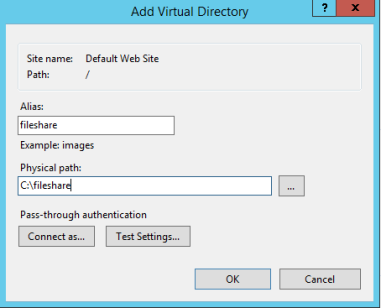
- Right-click the web site created above, and click Add Virtual Directory...
- In the "Add Virtual Directory" dialog box, complete the fields:
- Alias:
- Physical path:
- Click OK.
- Fileshare Path
- Enter a file share address, such as \\<YourDirectory>\fileshare , where redacted documents are to be saved
- Example: See the path in the graphic below for an example
- Fileshare Username
- Enter a username if writing to a file share must be done with a specific user account.
- Use the format domain\user.
- Fileshare Password
- Enter the password for user account used for writing to the file share.
- Mime Type Metadata Property
- Enter the input property that returns mime type from documents.
- Example: ESCBASE_MIMETYPE
- Supported properties: "application/pdf" "image/jpeg" "image/png" "image/tiff" "text/plain" "text/html" "application/json" "application/msword" "application/vnd.openxmlformats-officedocument.wordprocessingml.document" "application/excel" "application/vnd.ms-excel" "application/vnd.ms-outlook" "message/rfc822"
- Enter the input property that returns mime type from documents.
- Total time to wait for processing (seconds)
- Enter the total time to wait for document to be redacted.
- Document size limit(MB):
- Enter the limit for document size.
- Additional Mime Type:
- Enter additional mime types using ';' (semicolon) as separator.
- Enter additional mime types using ';' (semicolon) as separator.
- Click Apply.
|
Output Property |
Description |
|---|---|
| WasRedacted (boolean) |
Specifies if the document was redacted via Docuvision API |
Note: This output property ("WasRedacted") is useful to validate the Docuvision component is working as expected before running a full index for larger content.
This output property can be looked-up in AutoClassifier Pipeline Testing page on retrieved in Connectivity Hub test bench as a boolean metadata.
Also, while indexing is running, you can use search to check how many of the documents were redacted using this metadata property as a filter / property restriction.
Note: For advanced configuration, if you want to modify the status check interval, search for TimeIntervalToWaitInSeconds in the file web.config.
Default time interval = 5 seconds.