Cluster Processing Service
The Cluster Processing Service performs two functions:
- Monitoring the SeedTerm queue
- Processing SeedTerms to generate clusters
How to Install the Cluster Processing Service
- Navigate to the following directory: <SharePoint Hive>\bin\SmartPipeline\ClusteringService.
- Copy the content of the folder to a new folder location. This step is optional.
- Open Windows PowerShell as an Administrator.
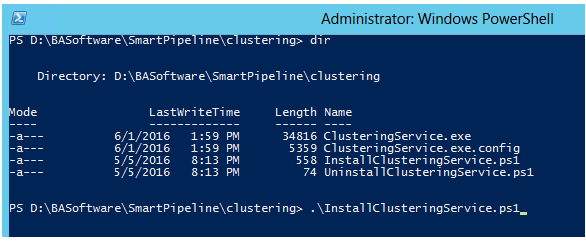
- Navigate to the Clustering directory.
- For example, D:\BASoftware\SmartPipeline\Clustering
- For example, D:\BASoftware\SmartPipeline\Clustering
- Run the following command.
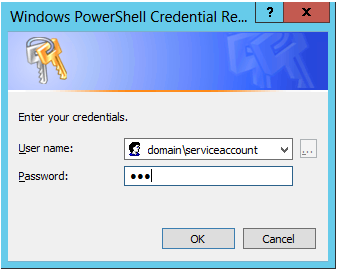
- When you are prompted, enter a valid Domain account with permission to log-in as a Service.
Configuring the Cluster Processing Service
Configuration options can be specified in the file ClusteringService.exe.config.
The required options to configure include: SearchCenterUrl, LogLocation, and ConectionString.
All configuration options are listed here:
-
- ClusterDocumentSummaryLength
Default: 5000 - ClusterNumberOfDocuments
Default: 200 - ClusterDepth
Default: 5 - ClusterMinimumScore
Default: 25 - EnableClustering
Default: True - ClusterThreadCount
Default: 2 - SearchCenterUrl
Enter: Search Center Url to retrieve Document Corpus - LogLocation
Enter: Location local server. When running on SharePoint Server with SmartPipeline. Default location set in SmartPipeline Configuration and this location is overridden. - ConnectionString
Enter: Connection String information to SmartPipeline Database created upon SmartPipeline install. - SeedQueueProcessingInterval
Default: 10 minutes - EnableSeedQueueProcessing
Default: True - ClusteringStartTime
Default: 00:00:00 - ClusteringEndTime
Default: 23:59:00
- ClusterDocumentSummaryLength
How to Start the Cluster Processing Service
- Launch the Windows services application.
- Start the SmartPipeline Clustering Service from the list of available Windows services.


