How to Capture Metadata
Metadata Values Capture Component
This pipeline stage captures values for the configured metadata during item processing with the scope of obtaining visibility on metadata values frequency and using this information as Machine Learning training data.
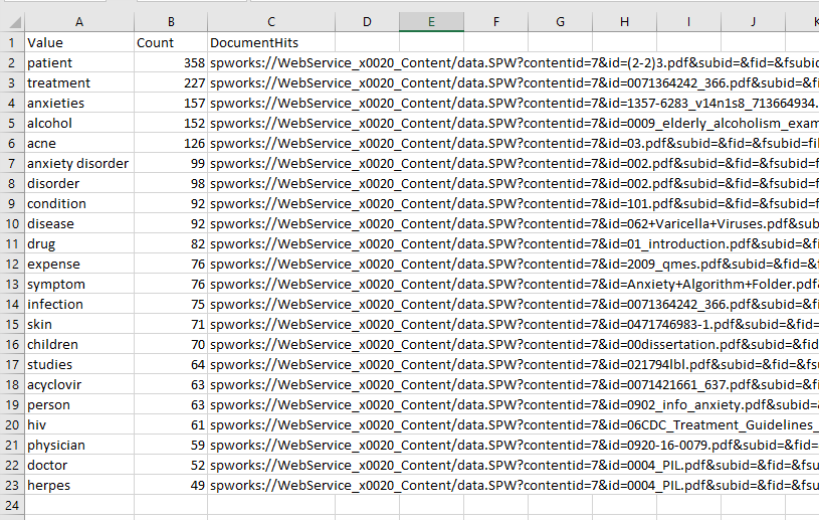
- The metadata values are sorted by number of occurrences.
- Stemming is considered when comparing values.
- Below, see a sample of captured information containing the most frequently met metadata values along with the documents they were found in.
- After exporting captured data as CSV, there is the recommendation of manual cleanup / intervention.
- Later you can use the cleaned up for sorting new items by metadata values and end up with Machine Learning training data sets.

How to Add the Metadata Values Component
- Navigate to the AutoClassifier Pipelines component page.
- Click New Component and select Metadata Values Capture from the component list:
- Name your new component, and click the Add button the in lower right corner.
- Click Apply to save your changes.
- The Metadata Values Capture component is added to the list of your Existing Components list.
How to Configure the Metadata Values Capture Component
To configure your Metadata Values Capture component, click the name of the component in the list of existing components and complete the following fields:
- Captured Property Name: Enter the name of the metadata value to be captured.
- Unique Identifier Name: Enter the property (name) that stores the unique identifier of the item. For example, escbase_crawlurl if you want to capture metadata while crawling with Connectivity Hub.
- Language Property Name: Enter the property (name) that holds the item language.
- No. of metadata captured per item: Enter the number of metadata values to be captured for each item.
- Number of items to export to .csv:
- The number of items are exported to a .csv file when clicking "Download Captured Data" (all captured metadata will be exported if this field is left blank).
- The number of items are exported to a .csv file when clicking "Download Captured Data" (all captured metadata will be exported if this field is left blank).
- Download Captured Data: This button will export the captured metadata to a .csv file under the format CapturedPropertyName_GUID.csv.
- Each row of the .csv will contain:
- Captured metadata value
- Number of occurrences of this metadata
- Items that contain this metadata value
- The file is ordered from highest to lowest by number of hits
- Each row of the .csv will contain:
- Delete Property Captured Data: This button clears all captured metadata values for a specific property (specified in Captured Property Name).
- Delete All Captured Data: This button deletes all captured metadata.
Item Sorter
This pipeline stage saves on disk items or metadata of items sorted according to their metadata and the CSV values file.
- This information is captured using the Metadata Capturer stage during item processing, with the scope of obtaining groups of similar documents or metadata values (for example document Summaries), that can be used as Machine Learning Training Data.
- The advantage is that the Machine Learning Models are trained based on current set of data and metadata values, tags, etc.
- It basically helps the machine learning model to learn from what customers already have and use for new incoming data.
- You can decide not to use entire document as data capturer but an alternate metadata value of it that can be more relevant, such as Summaries
How to Add the Item Sorter Component
- Navigate to the AutoClassifier Pipelines component page.
- Click New Componentand select Item Sorter from the components list.
- Name your new component, and click the Add button the in lower right corner.
- Click Apply to save your changes.
- The Item Sorter component will be added to your Existing Components list.
How to Configure the Item Sorter Component
This component saves on disk files sorted according to their metadata and the .csv file captured using the Metadata Capturing Stage. To configure your Item Sorter component, click the name of the component in the list of existing components and complete the following fields:
- Captured Property Name: Enter The name of the metadata value that was captured using the Metadata Values Capturer stage.
- Accepted Values CSV File Path: Enter the path to the .csv file exported from the Metadata Values Capturer stage.
- Captured Files Storage Location: Enter the location where Item Sorter will create the new folders and files.
- File Name Property Name: Enter the property (name) that holds the item name.
- Language Property Name: Enter the property (name) that holds the item language.
- Alternate Metadata Used For Capture: Enter the property (name) that holds other relevant metadata (for example the DocumentSummary property).
- Free disk space limit (GB): If the available disk space is lower than the limit specified in this field, Item Sorter will no longer write files to the disk.
Example of Disk Output
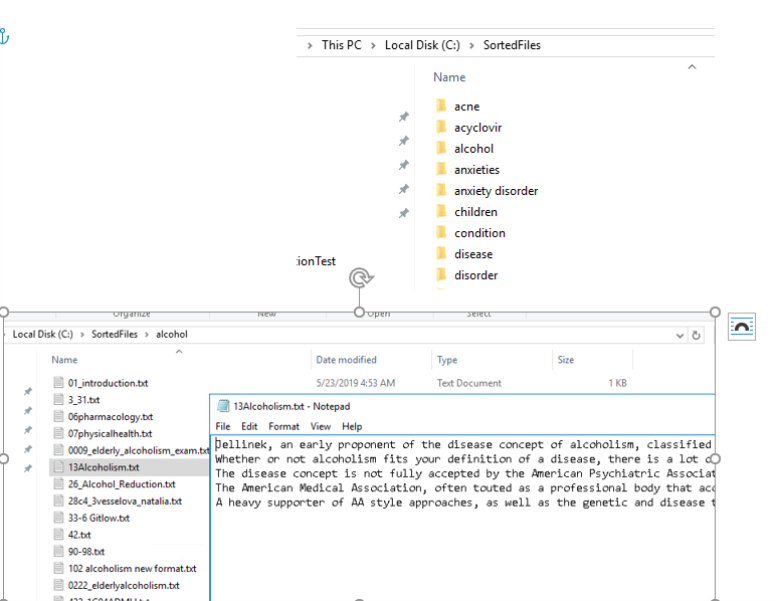
In the following example, you will see the following in the disk output as a result of the Item Sorter component:
- Sub-folders with metadata value name.
- In each sub-folder, you will find relevant summaries for the metadata values that were captured.
