How to Extract Section Information from Documents
About
The document Section Information component is an AutoClassifier pipeline that extracts information from partially structured documents.
-
For example, documents such as contracts, or any document that respect a specific structure can be targeted for use with this component.
These documents can include sections such as:
- Articles
- Declarations
- Clauses
- Line item requirements
Structured Document Example: Contract
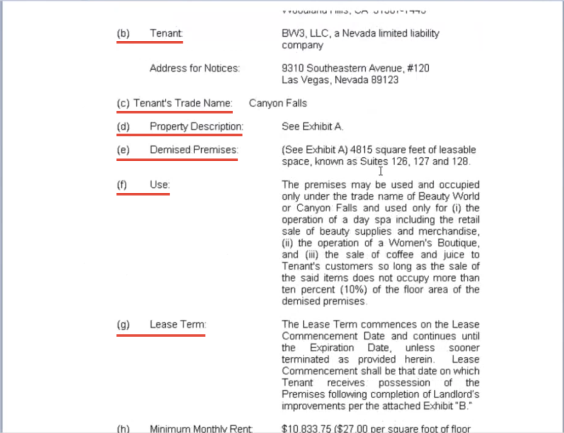
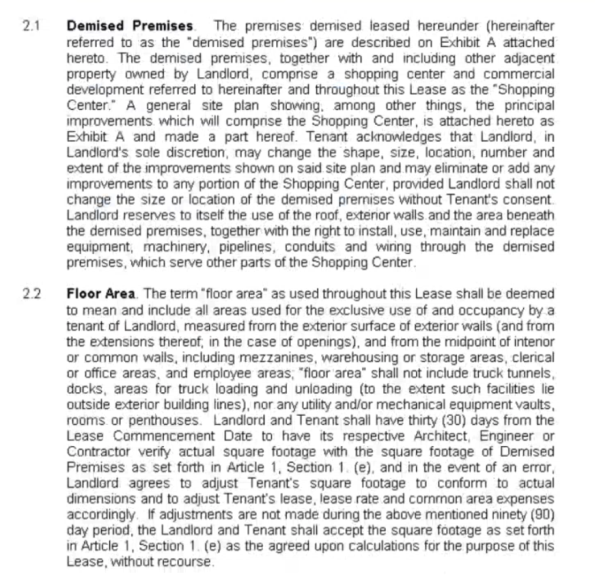
Note: Document structure is not required for this component to be used.
- Specific parts of the document can be captured as metadata
- This enables you to capture the document as specific sections and sub-sections.
- Information extraction is can be performed as a later, secondary step, using natural language processing (NLP).
Pipeline Order
Before continuing note that the order of your pipelines is important.
The order of your pipelines affects their operation.
The Section Information Extractor pipeline stage requires the following order:
- Tika: The Tika pipeline must be before all stages that need
document bodyto be extracted and used for processing, including the Section Information Extractor stage.- Note: "Ignore white space" setting in Tika Component configuration must be disabled.
- NLP stage: For Section Information, one of the NLP stages, such as Microsoft, Google, or Amazon, is after Tika.
- Section Information Extractor
How to Configure Section Information
Use the following instructions to configure the document Section Information component.
- Add the Section Information Extractor Component.
- Existing Components: Click the name for this component to see the Configuration section. Specify the following fields
- Input Property: Specify the input properties, such as body, Heading, etc., that are used to extract sections and information from.
The default value for this field is "body".
- NLP Input properties: Specify the NLP input properties. Input from earlier pipeline stage which provides NLP information to be used. Separate each property with comma. For example, MSSerializedEntitiesJson, AmazonRawResponse.
- Section Max Characters Length: Specify the maximum amount of characters in a document section. For example, if set to 2500, a document clause that is captured that includes more than 2500 characters, is cropped down to 2500 characters.
- Import from CSV: Click the Select button to upload a CSV file that outlines the information used in the Section patterns field. This function imports section names and header patterns extracted by the Sections Headers Extractor pipeline stage.
This is an optional, but recommended, way to discover which section headers exist across your data.
See the example imported CSV file below - note, there is no NLP data in the example.
The NLP data extraction must be configured after section patterns are imported via CSV file.
Sample of CSV file generated by Sections Headers Extractor:
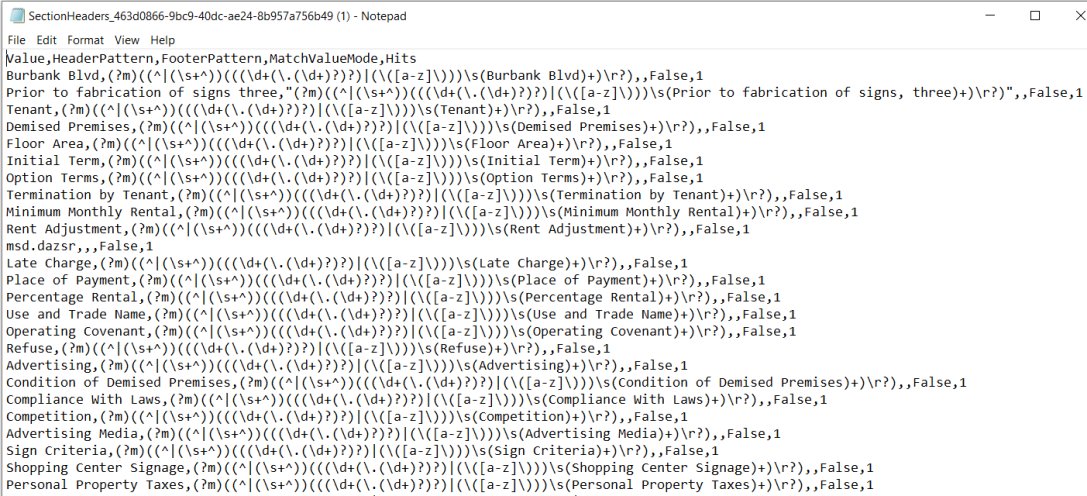
Special characters in Regex Pattern
When editing the .csv file in Notepad or a similar text editor if your Regex pattern contains commas (,) make sure the entire pattern is in quotation marks otherwise the Regex will not be parsed properly.
(See line 3, 'Prior to fabrication...' line in the sample csv image above as an example)Note that for the CSV file FooterPattern and Hits are optional.
Sample Imported CSV File.
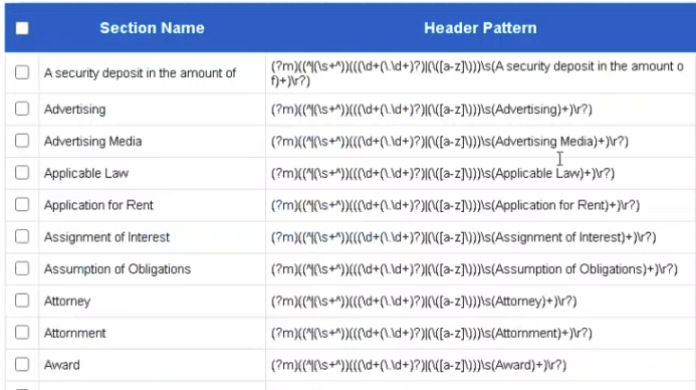
- Section Patterns: This table defines the structure of the properties within documents that your pipeline will capture. Click Add New Item and specify the following:
- Section Name: Enter the name of section to capture. For example, "MinimumMonthlyRent.".
- Header Pattern: Enter the regex pattern representing a match of the start of the section, as it matches in the document. For example "Minimum Monthly Rent", "(Minimum Monthly Rent)(?-i)".
- Footer Pattern (optional): enter the regex pattern representing a match of the end of the section that starts at the match of the pattern from Header Pattern, above. This denotes where the Section determined by Name/Header Pattern topic ends.
- Match Value Mode (optional): When this is checked, the section content extracted is the actual Regex Match Value defined at the Header Patterns section.
- For example, if you want to extract a URL as a section, and you use a URL matching Regex pattern, like: https?:\/\/(www\.)?[-a-zA-Z01,256}\.[a-zA-Z0-9()]{1,6}\b([-a-zA-Z0-9()@:%_\+.~#?&//=]*),.The section returned for this math will be the actual URL found in the document.
- Example 2: Regex Extractor to capture specific keywords, expressions, and the succeeding X number of tokens, as in the following example (matches Landlord and the succeeding 20 tokens): (LANDLORD\s+/?)(?:\w+\W+?){0,20}
- Output property: Specify the output properties that are expected in the web service response.Only one output property can be added per row. Use "Add NLP Data" to add more output properties
- Type: Select an output property type from the dropdown list. For examples, Unknown, Number, Date, Location.
- Edit: click this to edit the Section Name and the Header/Footer Patterns
- Delete Click this to delete the entire section pattern row
- Add NLP Data: Click this button to add a new Output Property Row.
- Input Property: Specify the input properties, such as body, Heading, etc., that are used to extract sections and information from.
The default value for this field is "body".
You can capture the document body extracted by Tika stage via Pipeline Testing and use this body in the online regex builder for testing.
Section Pattern Example
In the example below, the "Minimum Monthly Rent" article from the sample contract above is defined.
-
The metadata output will be Section_MinimumMonthlyRent.
-
This metadata will be the actual document text between the text "Minimum Monthly Rent:" and "Rent Commencement Date" occurrences.

- When finished click Apply.
- Your section is configured.
- Configure more sections as you desire.
Note: Configuring Output Properties is done separately from configuring Section information.

- Update: Change the output property name or the type and save.
- Delete: Delete the current output property and Type
Test Your Section Info Extract Pipeline Stage
To test your new pipeline stage, use the following steps:
- Select Pipeline Testing from the left-side menu.
- Select Test the whole configuration.
- Enter your data by using one of the following methods:
- Select prerecorded data using the drop-down menu.
- Drag-and-drop files into the "Or Paste Raw Text Data" box.
- Paste the text to test into the "Or Paste Raw Text Data" box.
- Set the Log Level and click Start Test.
Test Results
Tests are shown directly underneath the "Start Test" button and provide the following information:
- Input Properties
- Output Properties
- Any available Log information
When processing is complete, section name metadata prepended with "Section_" is shown on the first line under "Output Properties."
In the example below, the section name is "MinimumMonthlyRent" as defined in the Section Patterns table example above.
- Section name metadata text is shown next to the output property.
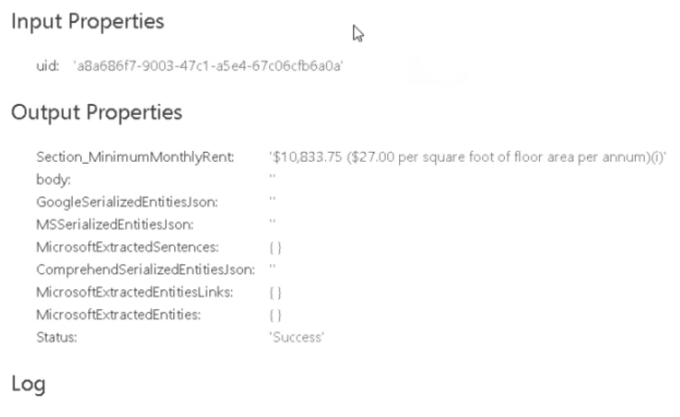
- ExtractedSections is also an output property that section information extractor component returns.
- It is a multi-valued text metadata containing all the section names for the sections that were detected and extracted from the document.
NLP Pipeline Stage: Text Analytics
Natural Language Processing is available from such services as Microsoft Azure. See the example below.
You can use an AutoClassifier NLP pipeline stage to extract named entities such as currency from the text in the example below.
- Your NLP pipeline stage must come before the Section Info Extract pipeline stage in component order.
For example: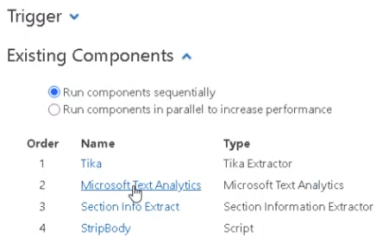
- Back in the "Section Info Extract" pipeline page:
- Your NLP provider output property must be entered into the "NLP Input Property" field.
- For example, for Microsoft Text Analytics NLP: MSSerializedEntitiesJson
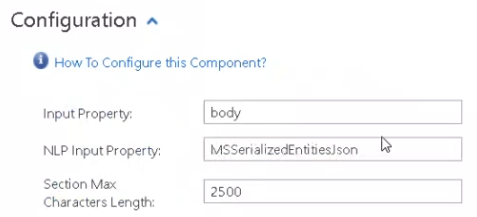
- Specify your Output Property and Type in the "Section Patters" table.
For example:
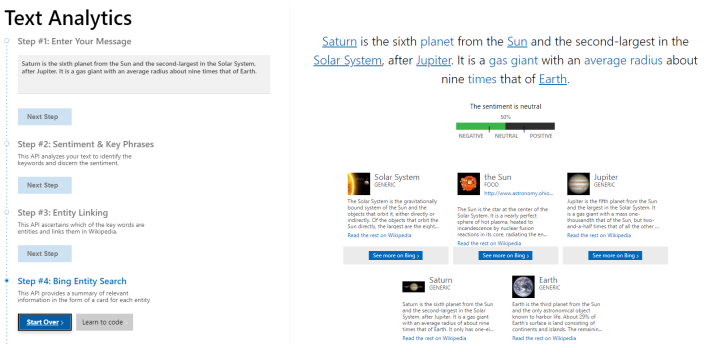
- In the "Pipeline Testing" page, clicking the Start Test button runs the last document entered (dragged-and-dropped), and would produce the result below using our example values from above:

Microsoft Azure NLP Example (you can check directly in Microsoft Text Analytics Demo Portal what extracted entities to expect)
Capture Custom Document Sections Using Regex Patterns
To capture custom portions of a document, you can use a regex pattern.
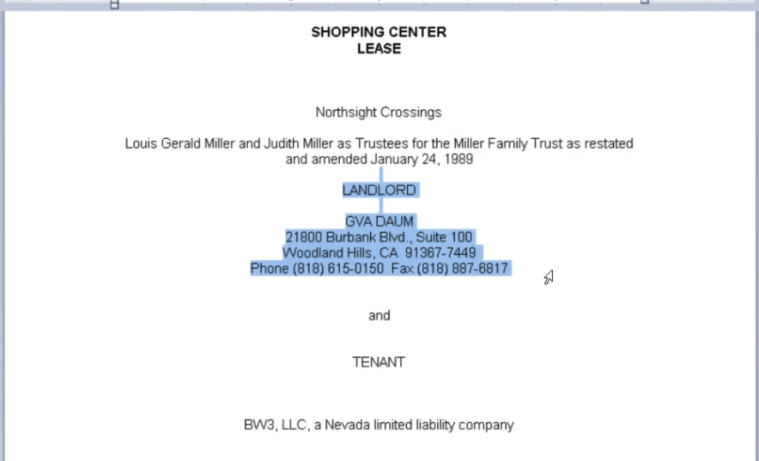
For example, to capture a word (LANDLORD) with two lines above the word and two lines below the word, with a maximum of 20 words after "LANDLORD":
((\n){2}LANDLORD(\n){2})(?:\w+\W+){0,20}
This line of code declares:
- 2 blank lines are expected...
- Then the term "LANDLORD" is found...
- Then another two blank lines are expected...
- Then any word is expected, with a limitation that...
- No more than a maximum of 20 tokens (words) are expected.
The code is entered into the Section Patterns table on the AutoClassifier "Section Info Extract" pipeline Configuration page.
Note: If you want to extract the regex pattern actual match value, as in this example, you must enable "Match Value Mode" check box:
Section Patterns table

The pipeline, once run, returns the following output:

Detailed Section Information Extraction
-
To extract even more detailed information from the document, add NLP data to the Section Patterns table.
-
You must specify the data you want to extract under "Output Property" as well as the respective "Type" of metadata for each property.
Note: Property types, as shown in the example below under the "Type" column are pulled from the NLP service, such as Microsoft Azure or Google.
- Simply click the "+" icon under the table column "Add NLP Data" from the "Section Patterns" table.
- Click the Apply button when you are done.
See the example below, detailing the Properties:
- PhoneNumber
- LandlordAddress
Note: The PhoneNumber and Landlord Address properties in the table below return the phone number and landlord address for ONLY the section "LandlordDetails" in the document, because the properties are entered on the same row as the Section Name "LandlordDetails".
