Machine Learning Classification Providers
About Machine Learning Classification Providers
Machine Learning Providers are trainable models, which can classify your content in the following ways:
- Automatically, without rules
- With a combination of ML tagging and rules
Machine learning classification providers can be found by selecting the Machine Learning Providers left side navigation panel. See the graphic below. From this screen, you can manage your Machine Learning Providers. For each Machine Learning Provider, you can map ONE taxonomy, as AutoClassifier only supports a 1-to-1 mapping of taxonomies and Machine Learning Providers.
Existing Machine Learning Provider Information
| Field | Description |
|---|---|
| Name | ML Provider name |
| Type |
Type of ML Provider: |
| Status |
Available values:
|
| Documents | Number of documents uploaded for the purpose of data training. |
| Last Trained | Execution date or time of last completed training session. |
| Last Training Duration | Duration of last training session in format hh:mm:ss |
| Usage |
Mapped taxonomy.
|
| Enabled |
Values are:
|
| Delete | Click to delete an ML Provider. |
| Export |
Click to export a Machine Learning Provider as an XML configuration file for later import into another environment. Note: You import an XML configuration file (containing your settings) using the Import button under the box that contains Machine Learning types.
After import, you must retrain your Machine learning component. |
How to Add a New Machine Learning Provider
Two types of Machine Learning providers are supported:
- To add a new Machine Learning Provider, navigate to the Machine Learning Provider page and expand the section New Provider.
- Select your ML provider type.
- Enter your component name in the Component Name: field.
- Note that spaces and special characters are both NOT supported in component names.
- Your component name may have a maximum 24 alphanumerical characters
How to Configure Your Machine Learning Provider
Use the following instructions to configure your machine learning providers:
- Click the name of your Machine Learning provider from the Name column in the table at the top of the page.
- The Settings screen opens.
- Enter the Component name. Note: Once set, your component name cannot be changed later!
- In the Configuration section, complete the following fields (all settings are required):
- Wrapper Service Address: Enter the windows service address created from python wrapper script. By default, this value is set to http://localhost:1989
- Resource Group Name: Enter the name of the resource group the Azure Machine Learning workspace belongs to.
- Workspace Name: Enter the name of your Azure Machine Learning Service Workspace. This can be found in your Azure portal. For more about Azure Workspaces, click here
- Subscription ID: Enter the subscription ID from the resource group.
- Tenant ID: Enter the tenant Id from the App you created for authentication in the Prerequisites.
- Service Principal ID: Enter the application Id from the App you created for authentication in the Prerequisites
- Service Principal Password: Enter the client secret from App created for authentication in the Prerequisites.
- Storage Account Name: Enter the name of your Azure storage account where your temporary files (data) are stored. Files are stored for retraining, as well as containing a key for authentication.
- Storage Account Key: Enter the Storage Account Key of your Azure storage account
- Aml Compute Cluster Name: Enter the name of compute cluster created in the Prerequisites.
- Instance Nodes Number: Specify the number of iterations that are allowed to run in parallel during training. In other words, how many nodes are allowed to consume from the compute cluster in parallel.
- Web Service Allocated Cores: Enter the number of CPU cores to allocate for the Webservice endpoint used for classification.
- Web Service Allocated Memory: Enter the number of GB allocated for the Webservice endpoint used for classification.
- Tag score threshold: Specify a setting (floor) of confidence. A threshold of confidence (probability) is required for tags to be returned by your ML provider. For example, a tag with a threshold of 0.2 will not be returned if your threshold score is set to 0.3 or higher. Applicable values for this field are 0.0-1.0.
- Max Concurrent Calls: This should only be changed if you get an error during training that the max concurrent calls value is too high. This depends on your Azure ML Workspace Location, but in general, a value of 200 is used.
- Training Status Refresh Interval In Minutes: Enter the amount of time, in minutes, between re-polling the API of the ML provider for ready state. The more data you have, the greater this value should be. There is no maximum value for this field.
- Request Timeout in Hours: Specify the timeout limit for the trainer to run.
- When finished, click Apply.
- Click Machine Learning Providers from the left-side navigation.
- Your newly created Machine Learning Provider appears in the list of Existing Machine Learning Providers.
How to Map Your Untrained ML Provider to a Taxonomy
- You can map your untrained Machine Learning Provider to a new or existing taxonomy.
- Click "Manage Taxonomies" from the left-side navigation.
- Select a taxonomy. Enter a new taxonomy in the Enter new taxonomy name text box and click Create and then select the new taxonomy from the list shown or select an existing taxonomy from the list shown.
- The Rules page opens.
- To add a term (node), right-click your Taxonomy at the top of the right pane and select Add term from the sub-menu that appears. Enter all the terms you have training data for.
- In the following example, the Taxonomy "SentimentDetect" has two terms defined:
- Positive
- Negative
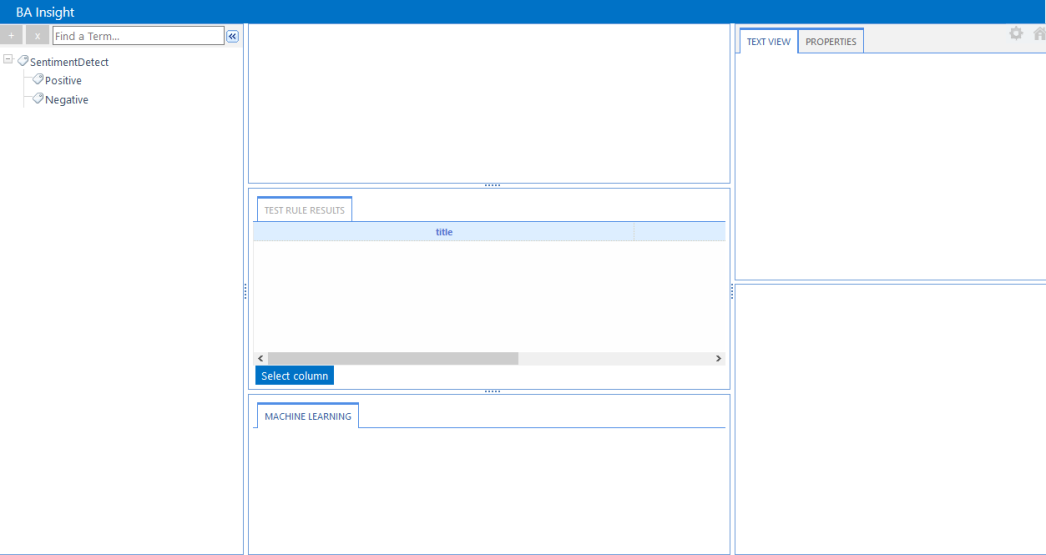
These terms are detected by the machine learning algorithm in conversation or text that it processes.
- Select your Taxonomy, then select the (available) ML provider for the taxonomy from the drop-down menu in the MACHINELEARNING tab. The setting is automatically saved.
- Now set the training data for your terms or "nodes." Select the node you want to add training data for
- In the example below, we select the Positive node.
Note: Training data can not be set for the root ("SentimentDetect," in the example below).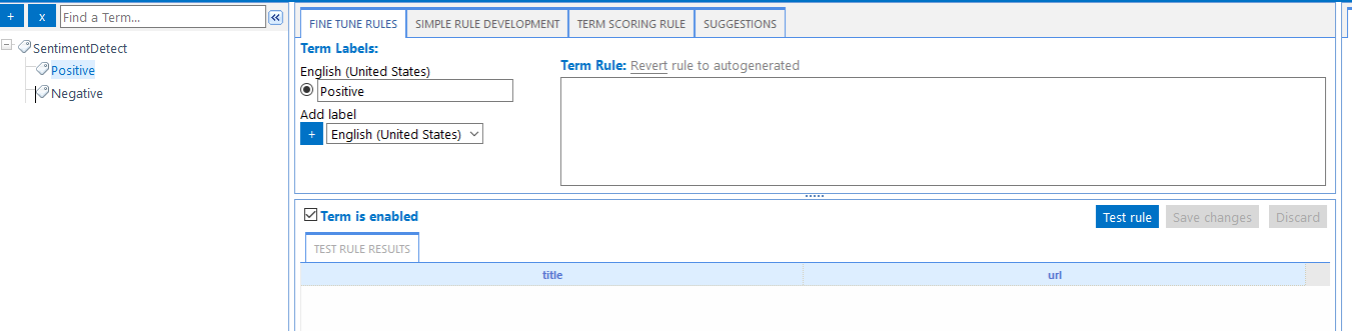
-
Drag-and-drop or click the icon at the bottom of the MACHINE LEARNING tab to add the documents that contain training data. See the example below (the documents added contain "positive" and "negative" language).
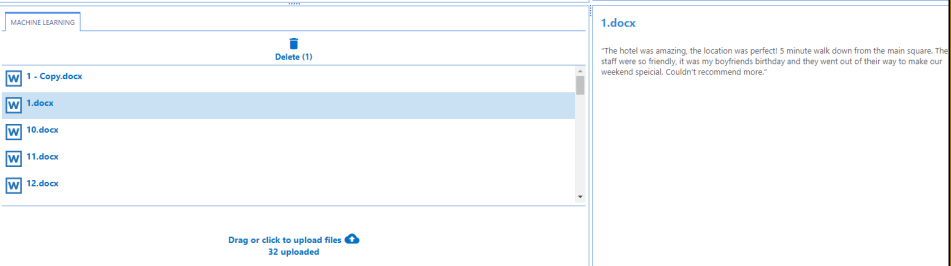
- Selecting the document in the left-side pane reveals the document contents on the right side.
- Add training documents for all nodes.
Set Rules for Your Terms (Nodes)
Term rules support the following rules:
-
RegEx
-
Kusto Query Language (KQL)
For each term or "node" the ML rule used when processing training documents is shown in the Term Rule dialog box.You can set the Term Rule for each term (or node) as follows:
- No rule
- Default (auto-generated) rule
- Combination of complex (RegEx/KQL) rules and ML rules
If the term or ML rules find a match in a training document, the tag is applied.
- In the Fine Tune Rules tab, enter the term rule for each term in your taxonomy.
- Click Save changes after each rule is entered.

To clear the training data for a Machine Learning Provider, use the Clear All Training Data button next to the Train button discussed in the following section. If you change the taxonomy a Machine Learning provider is configured for, you must clear the training data before using the Machine Learning Provider with another taxonomy. This way, old training data is dropped.
Train Your Machine Learning Provider
Once the procedures above are complete, you are ready to train your Machine Learning Provider.
- If you are still on the Rules page, click back in your web browser.
- Select Machine Learning Providers from the left side navigation.
- The available ML providers appear.
- Note: The Status of your ML provider will be "Needs Training."
- Note: The Status of your ML provider will be "Needs Training."
- Select your Machine Learning Provider by clicking its name.
-
Click the Train button at the bottom of the screen.
Note: Machine learning training is not Incremental, it is Full.
If you add documents to your ML provider, a full training process must be run to incorporate all data.
- Depending on how much data you provide your ML provider, and how many items, the training process can take 3-6 hours or more.
- Proceed to set up your Rules Engine Pipeline stage next (below), the tagging engine which applies the ML provider taxonomy.
How to Retrain Your ML Provider with New Documents (Data)
- Re-open your ML provider and add more documents, using the steps in the procedure above.
- The Status of the ML provider under "Existing Machine Learning Providers" changes from "Trained" to "Needs Retraining" as it contains new data that has not been processed.
- Repeat steps 2-5 in Train Your Machine Learning Provider to retrain your ML provider and incorporate the new data.
Rules Engine Pipeline Stage
-
For ML providers to tag, you must add the Rules Engine pipeline stage.
How to Test Your ML Provider Taxonomy
To see a sample of which tags you receive based on ML classification, go to the Pipeline Testing page.
- Select Pre-Recorded data from the drop-down menu, or else enter in raw data taken from one of your training documents.
- For insight into ML tagging, check the Show Raw Rules Engine Tags check box to view which tags are generated from each output property.
- Set your Log Level using the drop-down menu.
- Click the Start Test button at the bottom of the screen.
- The test runs.
Standard Output
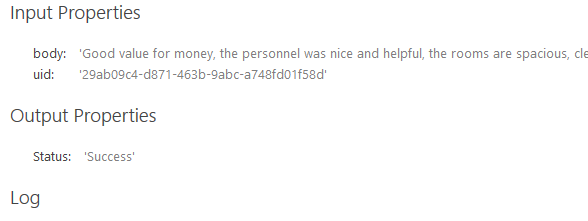
The following is returned if the Show Raw Rules Engine Tags check box is NOT checked:
- Input Properties
- body: Raw Text Data value
- uid: Unique Identification Number
- Output Properties
- Classification Tags: Tags generated by your Taxonomy
- Status: Test status
Expanded Output
The following is returned if the Show Raw Rules Engine Tags check box is checked:
- Input Properties
- body: Raw Text Data value.
- uid: Unique Identification Number.
- Output Properties
- RulesEngine: Tags generated from rules.
- [ML Provider]: Tags generated by your Taxonomy.
- Status:
- Test status.
- Values are "Success" or "Failure".
- To debug test failures, set your log level to "debug" using the drop-down menu above the message.
