Configuring the SharePoint Online Add-In
SharePoint Online Add-in Network Requirements
External Communication
-
HTTPS access to the AutoClassifier O365 Add-in service
-
Must be accessible from a location external to the network
-
Must have a valid SSL certificate
-
-
SharePoint Online
-
The RemoteEventReceiver.svc endpoint is required for SharePoint O365 in-place tagging (annotation)
-
From SharePoint O365 credential and payload information in the form of a JSON token is passed to the AutoClassifier add-in
AutoClassifier must validate the JSON token for communication between AutoClassifier and SharePoint O365 to be successful
For more information, see Microsoft's documentation: When is OAuth used?
Launch the Add-in Site for Configuration
Info
When using HTTP on a server such as Azure and the server is not attached to a domain, you may need to enable Anonymous access to the site under the Authentication feature.
- Launch the Add-In website by using the browser.
- Example: https://addin.yourdomain.local
- Alternatively, you can browse the website from IIS.
See the graphic below: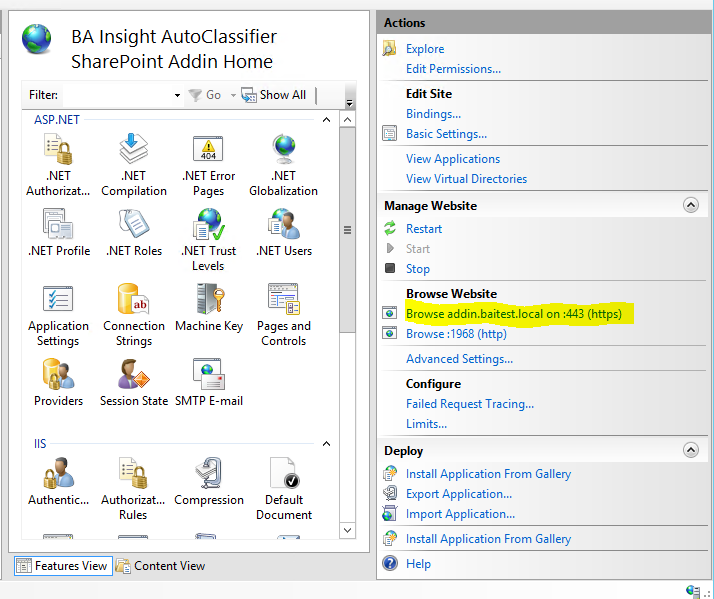
- The Add-In Site automatically opens to the Configuration page.
- Continue to the next step.
Limitations
Note the following limitations with the SharePoint add-in:
-
When creating lookup columns on a list or library, Microsoft limits you to a maximum of 12 lookup columns. If the lookup column count exceeds 12 columns, annotating the columns will fail with the following error: "Something went wrong. The query cannot be completed because the number of lookup columns it contains exceeds the lookup column threshold".
-
If any SharePoint list or library has more than 12 lookup columns, you must choose the columns to be annotated. To specify the columns to be annotated, do the following:
-
Open the web.config file of the SharePoint Add-in in a text editor.
-
Add the column names that you wish to annotate to the <add key="SharePointFieldsToAnnotate" value="" /> app setting. The column names must be the internal names of the fields and must be delimited by a semi colon. For example, <add key="SharePointFieldsToAnnotate" value="Prop1;prop2;prop3" />.
-
If the value parameter is empty, SharePoint will attempt to annotate all the columns.
-
-