How to Deploy or Upgrade a Multi-Server Configuration
Multi-Server Configuration
For a multi-server environment, you need to install Connectivity Hub on each server in the farm you wish to use.
Note the following key points:
- All servers connect to the same Connectivity Hub SQL database.
- Use the instructions below to connect each server to the current Connectivity Hub SQL database.
- If you need to upgrade Connectivity Hub on multiple servers, use the "Multi-Server Upgrade" steps below.
Multi-Server Upgrade
For multi-server upgrades, use the following steps:
- Uninstall the old version of Connectivity Hub from each server in the farm of a multi-server environment.
- Install the new version of Connectivity Hub on all servers.
- Use the instructions below to connect Connectivity Hub to your existing database.
- Navigate to one of the servers connected to your SQL database in your multi-server environment.
- Open Connectivity Hub.
- Select Tools>Configuration.
- On the Configuration Database tab, click the “Upgrade” button to upgrade the database schema.
- Connect all other servers to the upgraded SQL database (use the instructions below).
Note: Newly added Connectivity Hub servers can only be used by crawls that are started after the servers are added to your farm.
Only the servers that are running when the crawl was originally started may be used.
How to Connect Connectivity Hub to an Existing Database
During a multi-server deployment or when upgrading, you must connect to an existing database.
Use the following steps to create a new configuration database or to connect to an existing configuration database by using the Connectivity Hub Administration program.
The configuration database contains your database settings and is required by the BA Insight Connectivity Hub.
- Launch the Connectivity Hub Administration program by clicking Start > Connectivity Hub Administration.
- The site opens in your web browser.
- Select Tools > Configuration.
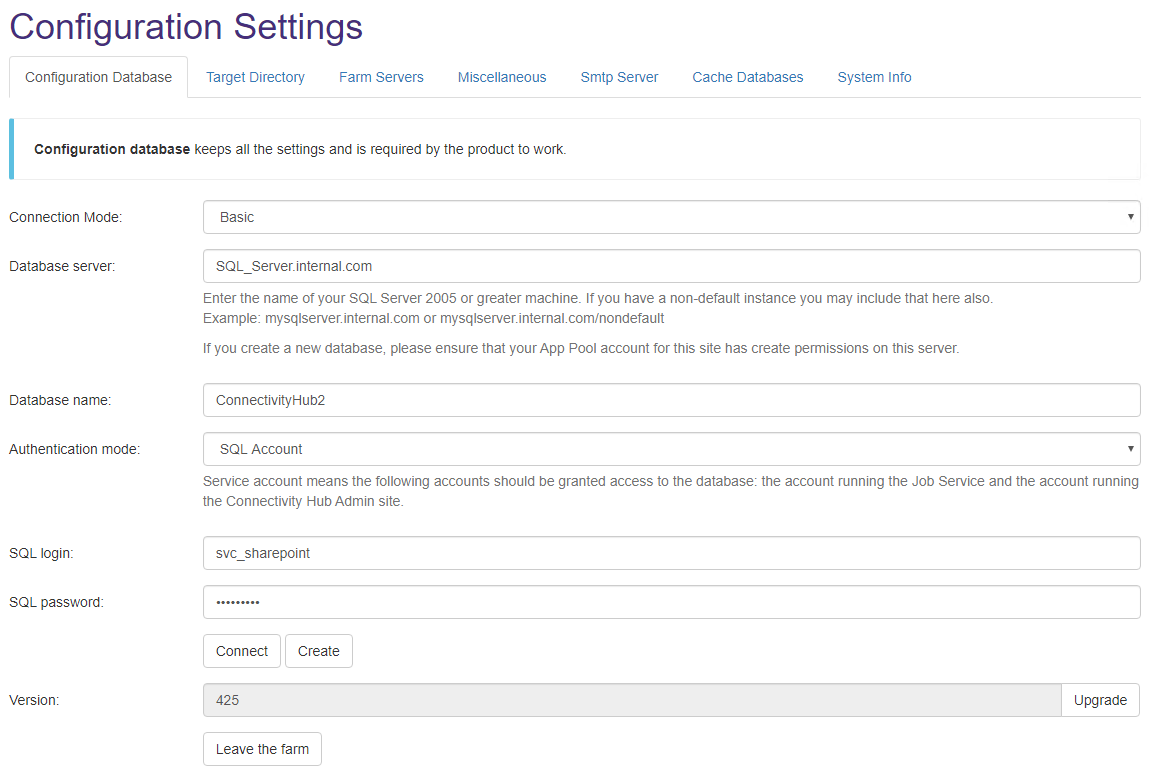
- The Configuration Settings page opens and the Configuration Database tab is shown. See the graphic below.
- The fields shown contain the settings that are required by the Connectivity Hub to function.
- Enter the appropriate values in the fields for your database.
- Enter the appropriate values in the fields for your database.
- Connection mode:
- Basic: Displays basic settings (shown below).
- Advanced: Displays a Connection String field that enables you to enter your SQL connection information in SQL string syntax.Due to a vulnerability fix on the SQL Client, the default encryption flag for SQL Connections has been changed to true. As a result, if you do not support encryption in your database, you must use an advanced connection and specify Encrypt=false in your connection string. For example,
Server=myServerAddress;Database=myDataBase;User Id=myUsername;Password=myPassword;Encrypt=false;
- Basic: Displays basic settings (shown below).
- Authentication mode:
- Service Account:
- Uses the service account, either local machine or network, depending on your configuration.
- "Service account" means the following accounts must be granted access to the Connectivity Hub database:
- The account the Job Service is running under
- The account the Connectivity Hub Admin site is running under.
- SQL Account: Requires your SQL account login and password.

- The account the Job Service is running under
- Service Account:
- Create/Connect to the database:
- If this is a new installation, click the Create button to create a new database.
- If this is an upgrade or if you are adding an additional server within an existing deployment, click the Connect button.