How to Set Access and User Authentication
Selecting Authentication
There are 4 different types of authentication you can select in SmartHub, including None (No Authentication).
Select one of four available authentication types:
Option 1: Azure Active Directory Authentication
If you're using SharePoint On-Premise 2013/16/19/SPSE for search and Azure AD for authentication, you must complete the steps on this page before proceeding.
Before you can set Azure Active Directory for SmartHub authentication, you must:
- Register your app for SharePoint Online O365 in Azure
- Grant permissions to the app
- Enter your Azure Authentication information in SmartHub under "Security Settings"
Use the following topics to register your app for SharePoint Online O365 in Azure and grant the app permissions.
If you do not update your list of Trusted Sites in Microsoft IE, you may not be able to log-in to SmartHub.
See the topic "Update Trusted Sites list (only Internet Explorer)" at the bottom of this page.
Register the App for SharePoint Online in Azure
Create the App Registration in Azure
The following procedure registers your Smart Hub application for SharePoint Online in Azure.
This is required to use SharePoint Online as a results backend The search engine your SmartHub instance uses to perform queries. SmartHub can be configured to use more than one search engine. in SmartHub.
- Login to your Azure portal as an administrator:http://portal.azure.com
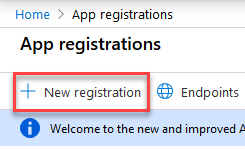
- Click App registrations>New registration.
- Enter the new application details:
- Name: Smart Hub App for SharePoint Online
- Supported account types: Sets the API access by account.
- Redirect URI:
- Select Singe-page application (SPA)
- Enter Your SmartHub URL home address (for example, https://search.company.com)
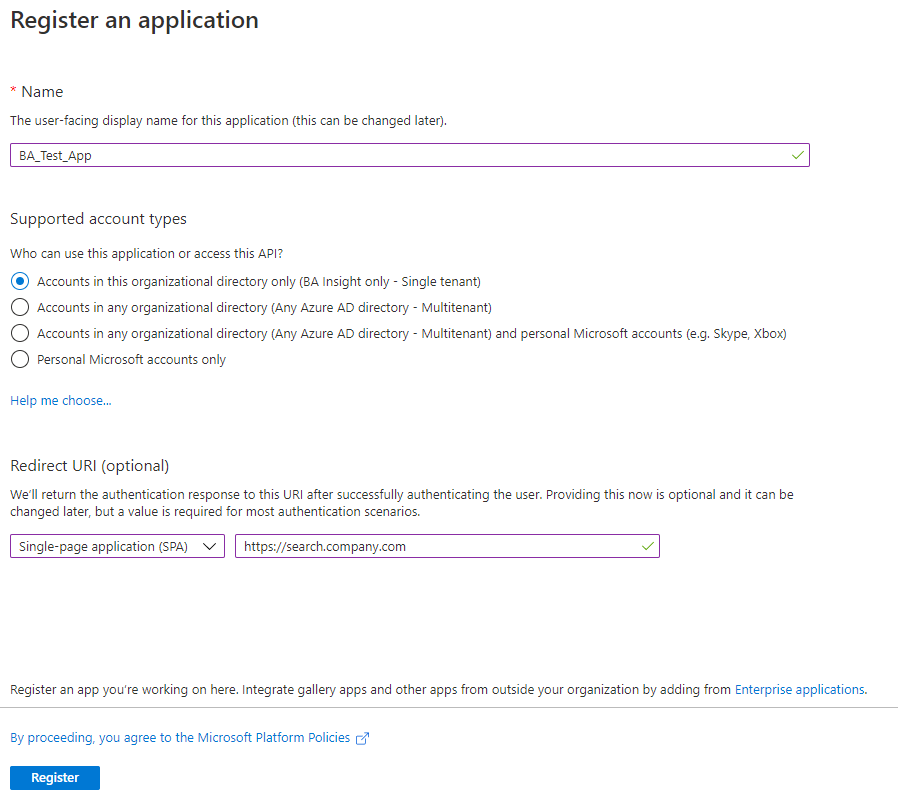
- Click the Register button at the bottom of the screen.
- Create the App ID URI.
- Click Expose an API section on the left side navigation menu.
- To manually set your App ID URI, click Set at the top of the page.
- To set your App ID URI automatically, continue to add a scope, below.
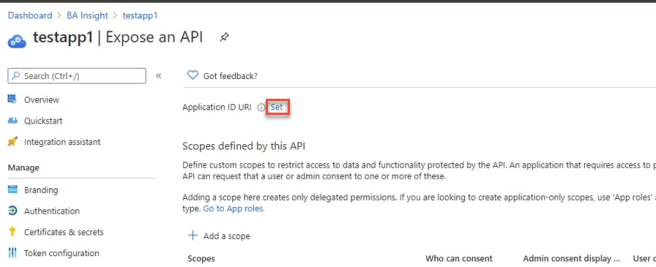
- Click the Add a Scope button.
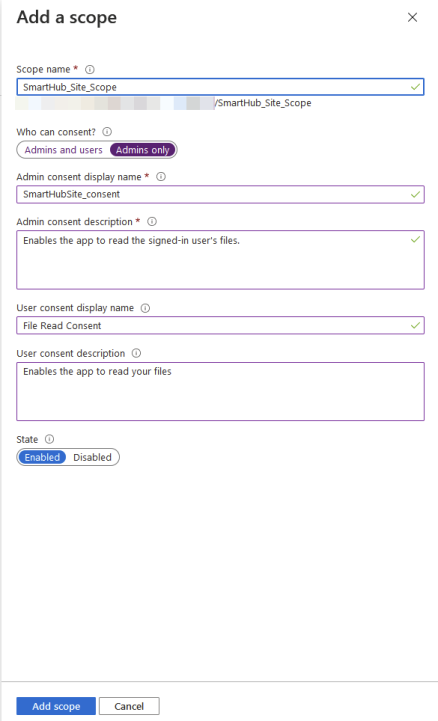
- In the window that appears, note the Application ID URI is shown below the "Scope name" field (with the field empty).
Configure a scope to be used by SmartHub to provide permissions-based access to its resources.Scope name: Enter a scope name
Who can consent: See here for more information.
- Admins and users - Every user can themselves consent; they will see the message to “SmartHub wants to sign in as you”.
- Admins only - Admin consent serves as pre-consent for all users.
Admin consent display name: Enter a consent display name.
Admin consent description: Enter a description for the Admin consent.
User consent display name: Enter a name for the user consent.
- User consent description: Enter a description for users consenting to the API.
- State: Enable or Disable the scope. This can be changed as needed.
- When done, click Add scope.
- Click Expose an API section on the left side navigation menu.
Grant the App Permissions
Granting your app permissions is a two-step process.
First you add the desired permissions to your app, and then you grant the permissions with a single mouse-click.
Add Permissions
Add permissions for the application:
- Click API permissions>Add a permission.
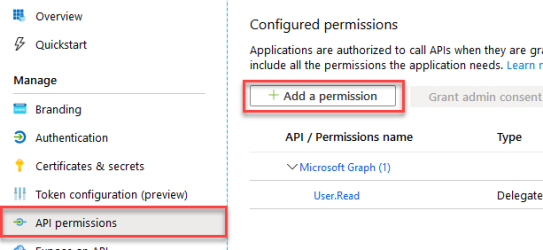
- If not already present add the Microsoft Graph user read permission.
- Click Select an API>Microsoft Graph>Delegated>User.Read.
- Add the following permissions by selecting API>SharePoint>Delegated.
(Select "APIs my organization uses" as a shortcut, if you desire).
Note: These are delegated permissions. SmartHub access is limited to the sites the user has access to. These options do not grant access to all sites in the tenancy, but all sites the user can access.- User.Read.All
- Read user profiles
- Sites.Search.All (Required only for the SharePoint Online backend)
- Run search queries as a user
- TermStore.Read.All (Required only for the SharePoint Online backend)
- Read managed metadata
- Click Add permissions when done.
- User.Read.All
Grant Permissions
- To apply the permissions you just added to your app, click the Grant Admin consent button under the Configured permissions heading.
Redirect URIs
Enter app Redirect URIs (previously called Reply URLs).
- Click Authentication from the left-side navigation.
- Click Add URI under Single-page application in the middle of the screen.
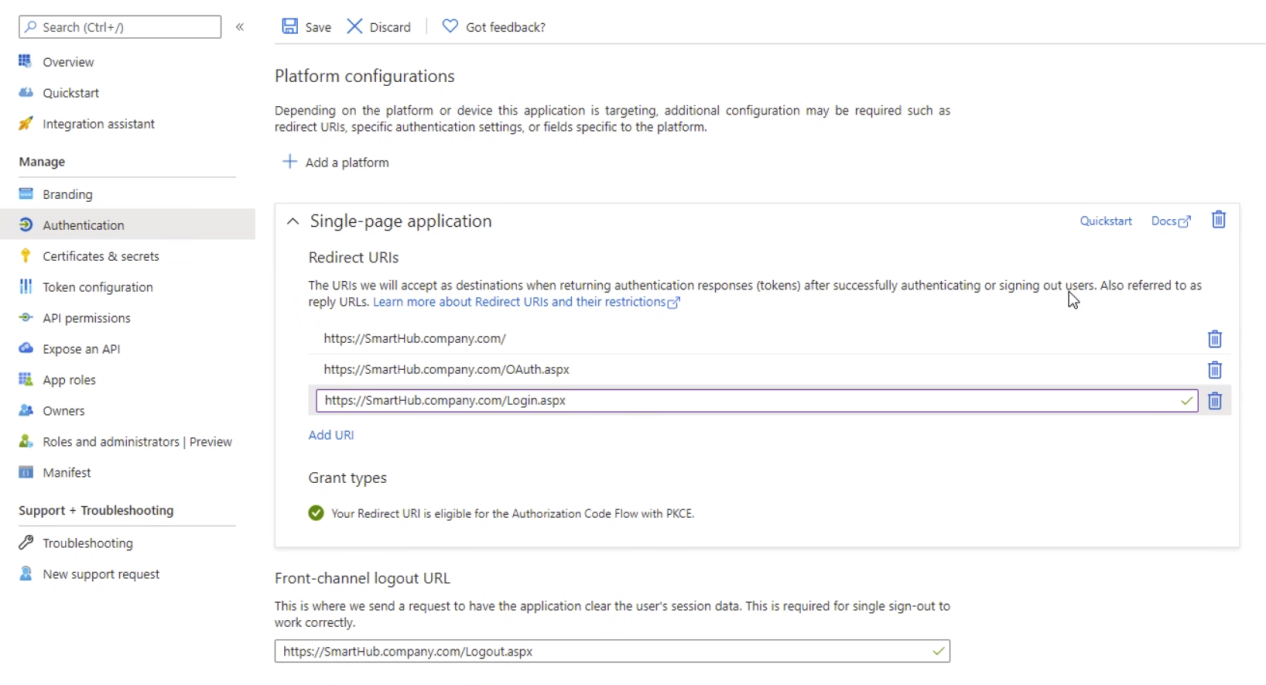
- Enter <your app Redirect URIs> in the format: https://search.company.com/(OAuth/Login).aspx
- These addresses must start with https
- These addresses are case-sensitive.
- You must enter both Login and OAuth URIs.
- Logout URL: Enter the log-out URL in the format: http://search.company.com/Logout.aspx
NOTE: If you have existing Redirect URIs, recreate them anew instead of migrating them to the single-page application (SPA) platform configuration. - Click Save at the top of the page.
Implicit Grant
If you use a SharePoint Online backend enable Implicit Grant for ID tokens:
- Click Authentication from the left-side navigation.
- Scroll down to Implicit grant and hybrid flows.
- Ensure that the ID tokens option is enabled.

Generate a Client Secret Key for Your App
You need the client secret if:
- You use your Azure AD as the user profile provider in SmartHub
or - You have a SharePoint Online backend configured.
- Click Certificates & secrets>New client secret to generate a client secret key for the app.
- In the window that appears (shown below) enter the following information.
- Description: Enter a name for the client secret. (Note: The name is your client secret).
- Expires: Select Never expires.
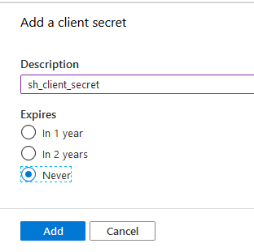
- A Value is generated after you click Add.
- Copy the new client secret value. You cannot retrieve the secret value after you perform another operation or leave this page.

- Click <YourApp>Overview and make a note of:
- Application ID
- This is the "Client ID" that needs to be configured in the SmartHub Admin page
- Tenant ID
- Optional
- The Tenant name or ID is entered in the SmartHub Admin page.
Token Configuration
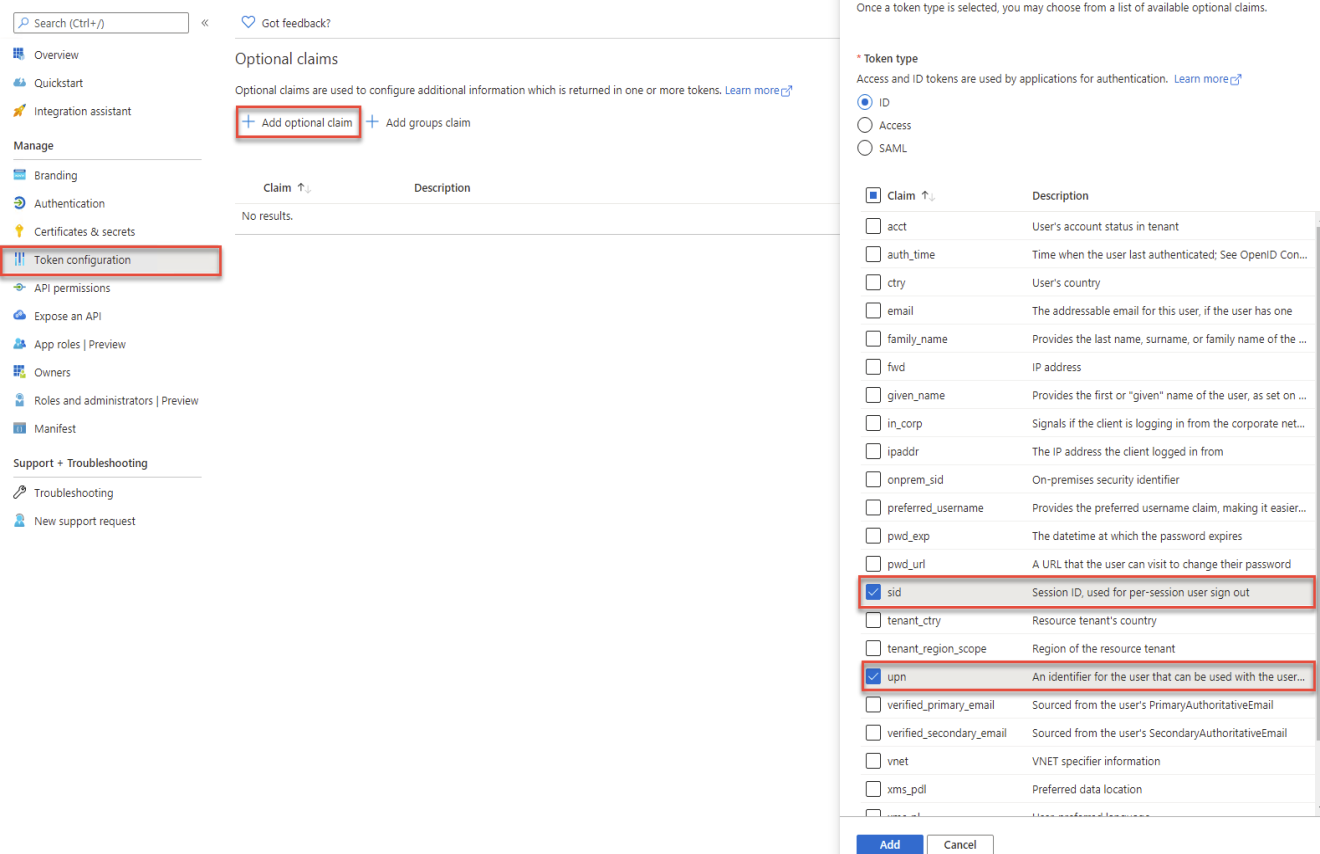
- Select Token configuration from the left-side navigation.
- Click Add optional claim.
- Select ID as *Token type.
- Select upn and sid under Claim.
- Click Add.
Enter Your Authentication Settings (Azure AD) in SmartHub
- Navigate back to the SmartHub Administration page by going to the
_ADMINfolder and navigating to the SmartHub admin User interface (UI).
Alternatively, enter:
http(s)://[web-app-url]/_admin - Select Security Settings.
- Authentication mode: Select Azure Active Directory.
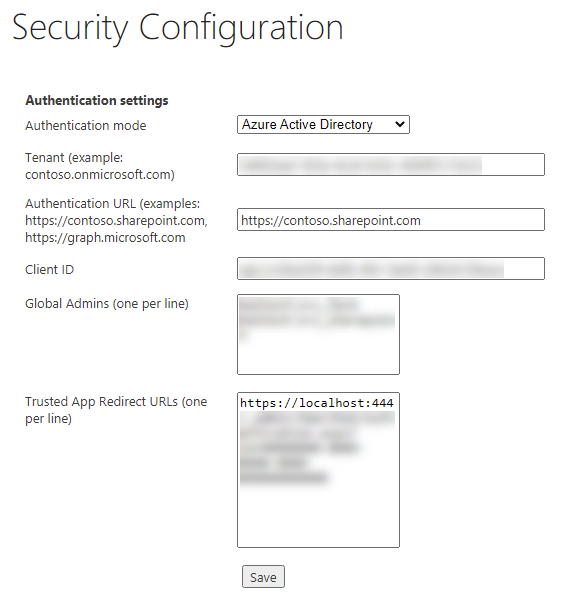
Tenant name or ID
Required
Specify your Azure tenancy name in this format:
contoso.onmicrosoft.com
orEnter your tenant ID
- Client ID (required): The "Application ID" as shown in the Azure Portal App Registration page for your application.
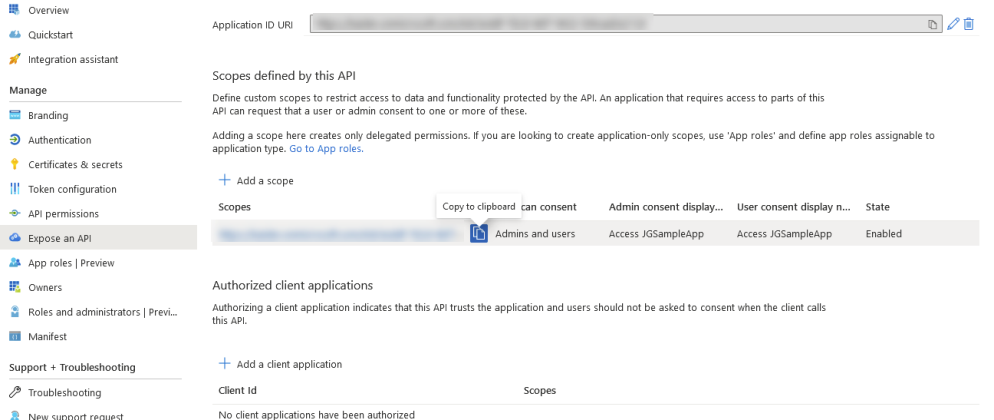
- Enter permission scopes for Azure App separated by comma: Paste in the custom scope defined in your Azure App from the "Expose an API" section. See the screenshot below.
- Client secret of Azure App: Enter a client secret if you have configured a Sharepoint Online backend.
- Admins users (one per line): The local administrator account(s) email address (username@domain.com). Enter one user account email address per line.
- Trusted App Redirect URLs: List of application URLs that use SmartHub to validate the user's credentials.
- This also includes custom DNS The system that converts website domain names (hostnames) into numerical values (IP address) so they can be found and loaded into your web browser. names used for the server hosting SmartHub.
- All BA Insight applications integrated with SmartHub are listed here.
- For example, see the following application URLs (some optional):
SmartHub site URL: The SmartHub site address, as accessed by users.
Note: You must list any registered DNS names that access your SmartHub server. Otherwise, users will not be able to authenticate with SmartHub.Smart Previews site URL: Optional. The Smart Previews site address, as accessed by users.
ConnectivityHub site URL: Optional. The ConnectivityHub site address, as accessed by users.
Custom apps: Optional. The URLs of custom applications that are integrated with SmartHub.
- Click Save to return to General Settings to see the "Security settings: Secured" message.
-
Check the binding settings in the file web.config located at the SmartHub root level.
-
Ensure the line
<security mode="Transport">is uncommented, as shown below.
-
Optional: Update Trusted Sites list (Internet Explorer only)
If you do not update your list of Trusted Sites in Microsoft IE, you may not be able to log in to SmartHub.
Use the following steps to update your list of Trusted Sites in Microsoft IE:
- Navigate to Internet Options > Security > Trusted Sites > Sites.
- Add the following sites:
- https://login.microsoftonline.com/
- https://mydomain.com/
Optional: How to Extend the Lifetime of Your Azure Active Directory Token
This optional procedure extends the lifetime your Azure AD token in SmartHub.
- Open a Windows PowerShell with Administrative privileges.
- Install the AzureAdPreviewModule with the command
Install-Module -Name AzureADPreviewas shown below:
- Enter "
[A] Yes to All". - The package installs.

- Connect to Azure AD with the command
Connect-AzureAD -Confirmas shown here:
- Get your app object ID.
You need your SmartHub app ID from portal.azure.com.
See the example (with example app ID) below:
$app= Get-AzureADApplication-Filter"AppId eq 'cc95a12d-9923-4426-83ed-113293693d47'"Fetch the object ID of the app using the following command:
$appobjectid=$app.ObjectId
- Make a new token lifetime policy (set to 20 hours in the example below):
80 days and 30 minutes is represented as
80.00:30:00
Copy$policy = New-AzureADPolicy -Definition
@('{"TokenLifetimePolicy":{"Version":1,"AccessTokenLifetime":"20:00:00"}}') -DisplayName
"MyTokenPolicy" -IsOrganizationDefault $false -Type "TokenLifetimePolicy" -
Get the policy's ObjectId by running the following command:
Copy$policyobjectid = Get-AzureADPolicy -Id $policy.Id -
Add the policy using the command below:
CopyAdd-AzureADApplicationPolicy -Id $appobjectid -RefObjectId $policyobjectid.id - Procedure complete.
- See the bonus commands below.
- Bonus commands:
- Retrieve the policy assigned to an app:
Get-AzureADApplicationPolicy -Id <ObjectId of Application> - Update the existing policy:
Set-AzureADPolicy -Id <ObjectId of Policy> -DisplayName <string>
- Retrieve the policy assigned to an app:
- Bonus commands:
Optional: Restrict Access to SmartHub from Azure
Active Directory Authentication
If the option for user assignations is enabled (see here for more info), then everyone under the "Users" and "Groups" list in the App registration in Portal (portal.azure.com) has access.
- Azure Active Directory enables you to restrict your SmartHub site (app) to a set of users by following these instructions: https://docs.microsoft.com/en-us/azure/active-directory/develop/howto-restrict-your-app-to-a-set-of-users.
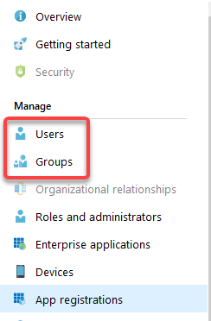
- The result is that any user not assigned to the app cannot access it.
- Users, by name, are not strictly denied.
- Any user not specifically assigned access is denied.
-
Login attempts that fail result in the user being prompted to re-login.
If a user attempts to login with an account that cannot access SmartHub, but then switches to one that can, the user must refresh their SmartHub page otherwise O365 may become stuck on the “logging you in” page.
Option 2: Federated Authentication
Use the following information to configure Federated-type user authentication in SmartHub.
About Federated Authentication
SmartHub supports Federated-type authentication, which is any authentication service that is OAuth 2.0 compliant.
Supported identity providers include:
- Microsoft ADFS
- Okta
- Auth0
- others
Your Authentication Service must be configured using OAuth 2.0 with JWT tokens.
- The JWT token generated by your authentication service needs to contain both the SID and UPN of the user.
- Decode JWT tokens at https://jwt.io/.
SAML authentication is not supported.
Configure SmartHub Federated Authentication
- Navigate to the SmartHub Administration page by going to the
_ADMINfolder and navigating to the SmartHub admin user interface (UI).
Alternatively, enter: -
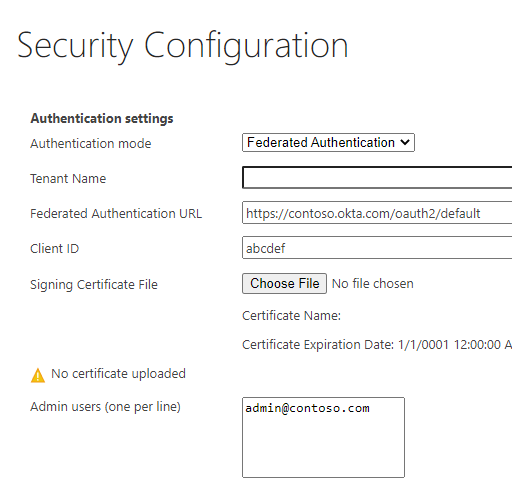
Security Settings: Click "Security Settings" and the Authentication settings page appears.
- Authentication mode: Select Federated Authentication from the drop-down menu.
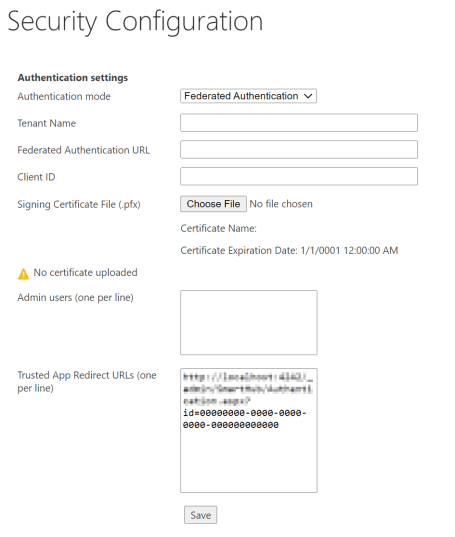
- Tenant Name (optional). Enter the name of the tenant for your Federated Authentication service.
- Federated Authentication URL (required): Specify your Federated Authentication service URL.
-
Client ID (required): Specify your app ID.
-
Trusted App Registrations: If you need to use another app between SmartHub and the App used for Authentication, you must add a Trusted App Registration.
Note: Using this option you can send us a token generated by your app, and we will do the exchange between your app and app used for authentication in SmartHub.-
Navigate to Azure APP → API Permissions → Add a permission → My APIs → Select your app used for Authentication in SmartHub → Choose Scope used in SmartHub for Authentication
-
Client ID: The "Application ID" as shown in the Azure Portal App Registration page for your application
-
Client Secret: The Client Secret generated for your app
-
-
Signing Certificate File (.pfx):
-
Click "Browse..." to upload a valid certificate (.cer ), without the private key.
-
The certificate (.cer) must be exported from your authentication provider.
-
The certificate is used to validate the tokens that your authentication provider generates.
Note: Make sure your certificate has not expired.
For more information about certificates, see: What Are Certificates?
-
-
- Admin Users: Enter the list of users who will enjoy administrative rights to your SmartHub site.
- User credentials must be entered in the format Domain\username or Username@domain.
- 'Anonymous' may be entered, but it is not recommended for security reasons.
- Groups are not supported.
- Make sure your Federated Service includes the UPN property in its claims for the user.
-
Click Save and return to General Settings to see the "Secured" message:
Example Identity Provider: Okta
The following example describes how to configure Okta as your identity provider.
Note: You must have access to your Okta application settings on the Okta website.
Tenant Name is not required.
- Authentication mode:
- Select Federated Authentication
- Federated Authentication URL
- URL of your Okta Authorization Server: the server configured with the UPN claim in the ID token for the open ID (or All) scope
- For example: https://<tenant>.okta.com/oauth2/default
- See the example screenshot below
- Client ID
- The active application Client ID. Taken from the Applications page of the Okta web site. See below.

- The active application Client ID. Taken from the Applications page of the Okta web site. See below.
- Signing Certificate File
- Global Admins (one per line)
- List of users to enjoy administrative rights to your SmartHub site. See Step 8, above.
- Trusted App Redirect URLs
- Click the link to the right of the field to add the current address.
- Click Save when complete.
Option 3: Windows Authentication
Use the following instructions to authenticate your SmartHub users using Microsoft Windows authentication.
Windows Authentication requires HTTPS and a URL with a fully qualified DNS name.
Set Your Authentication Mode in SmartHub
- Navigate to the SmartHub Administration page by going to the _ADMIN folder and navigating to the SmartHub admin User interface (UI).
Alternatively, enter the following URL into your browser:
http(s)://[web-app-url]/_admin
- Click Security Settings.
- The Authentication settings page appears.
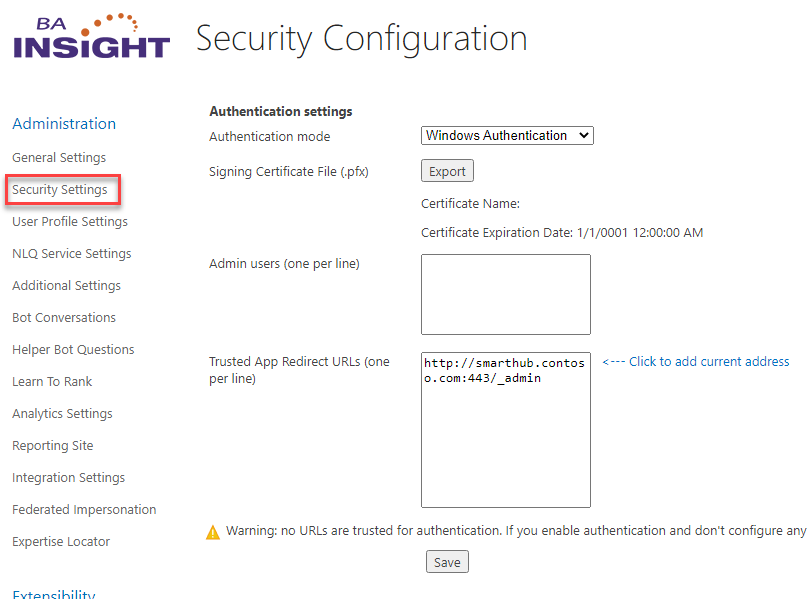
- Authentication mode:
- Select Windows Authentication
- Select Windows Authentication
- Provide Certificate Details:
A certificate is required to keep the user credentials encrypted and secure.
If a certificate is not found in the security configuration file, a new certificate will be automatically generated when clicking "Save". The newly generated certificate will be available for 100 years.- Signing Certificate File (required): The Name and Expiration date of the generated certificate (if these 2 fields are blank it means no certificate exists yet)
Export: Export the generated certificate as a .cer file

Make sure that your certificate has not expired.
For more information about certificates, go to: What Are Certificates?
- Admin Users: Enter the list of users who will enjoy administrative rights to your SmartHub site.
- User credentials must be entered in the format Domain\username or Username@domain.
- 'Anonymous' may be entered, but it is not recommended for security reasons.
- Groups are not supported.
- Trusted App Redirect: Click the "<—Click to add current address" link on the page to enter your SmartHub site URL if it isn't currently there.
- Enter your SmartHub address. Include port number.
- Default HTTPS port: 443.
- This URL must be HTTPS and include a fully qualified DNS name. See the screenshot above in step 4.
- You can also enter the address (URL) of your SmartHub Analytics site.
- Click Save to return to General Settings to see the "Secured" message.

Set Your SmartHub Site to Use Windows Authentication
- Edit your SmartHub site in IIS Manager.
- Select IIS>Authentication.
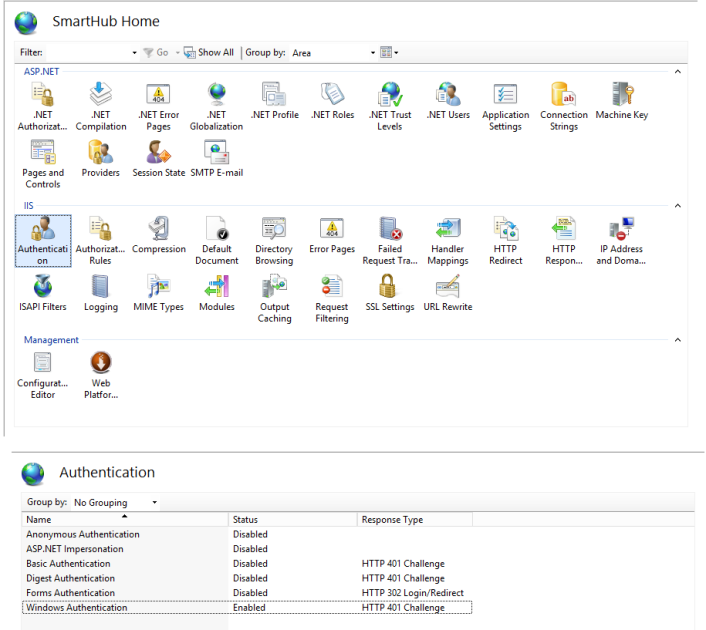
- The Authentication window appears:

- Anonymous Authentication: MUST be set to Disabled.
-
Windows Authentication: MUST be set to Enabled.
-
Everyone that is configured in IIS under “Authorization rules” has access.
-
Authorization rules are located next to "Authentication" from the IIS SmartHub site screen.
-
- Go to IIS Manager → Go to the application pool instance → Click advanced settings.
Under Process model, set Load User Profile to True.
-
Edit the web.config file in your installation directory
-
Use a text editor to edit the web.config file that is located in the root folder of your SmartHub site.
-
Uncomment BOTH
wbBindandwbsBind<security> nodes as instructed in the file.
-
- Set the InternalAuthTokenLifeTimeMinute value under AppSettings if you wish to set the expiration time of the authentication token generated (optional)

Optional: How to Authorize or Restrict User Access to SmartHub
Once Windows has been set as your authentication mode in SmartHub, and set to Enabled in your SmartHub IIS site, set the rules for authorizing users using the steps below:
- Edit your SmartHub site in IIS Manager.
- Select IIS>Authorization rules.
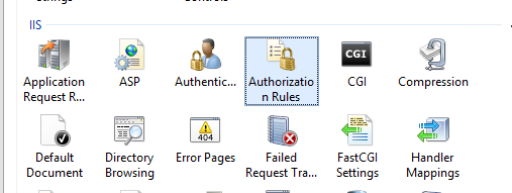
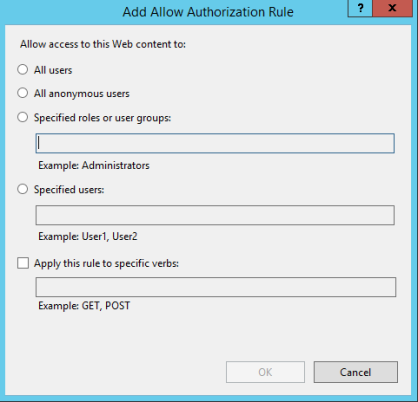
- Add an "Allow" or "Deny" rule using the links under the Actions section in the right-side pane.

- Set user access as desired, and click OK.
Option 4: None (No Authentication)
Use the following instructions to disable authentication to your SmartHub site by using the authentication mode "None."
-
If you set your SmartHub Authentication mode to "None", everyone has access to the SmartHub site.
-
BA Insight does not recommend this setting for security reasons.
- Admin users (one per line): Enter the list of users who will enjoy administrative rights to your SmartHub site.
- 'Anonymous' may be entered, but it is not recommended for security reasons.
- Groups are not supported.
- Typically, Admin users are set as the local farm account, SharePoint service account, or both.
- User credentials must be entered in the format Domain\username or Username@domain.
For example:- Domain50\User12
- UserSmith@contoso.com
- Trusted App Redirect URLs (one per line)
- Click the "<—Click to add current address" link on the page to enter your SmartHub site URL if it isn't currently there.
- You also enter the address (URL) of your SmartHub Analytics site.
- You also enter the address (URL) of your SmartHub Analytics site.
- Click the "<—Click to add current address" link on the page to enter your SmartHub site URL if it isn't currently there.
- Click Save to return to the General Settings menu to see the "Secured" message.
Additional SmartHub Security Options
How to Setup the SmartHub Administrators Security Group
Use the following procedure to specify which of your users will enjoy administrator rights to the Administrator Console.
- Navigate to the SmartHub Administration page by going to the
_ADMINfolder and navigating to the SmartHub admin User interface (UI).
Alternatively, enter:
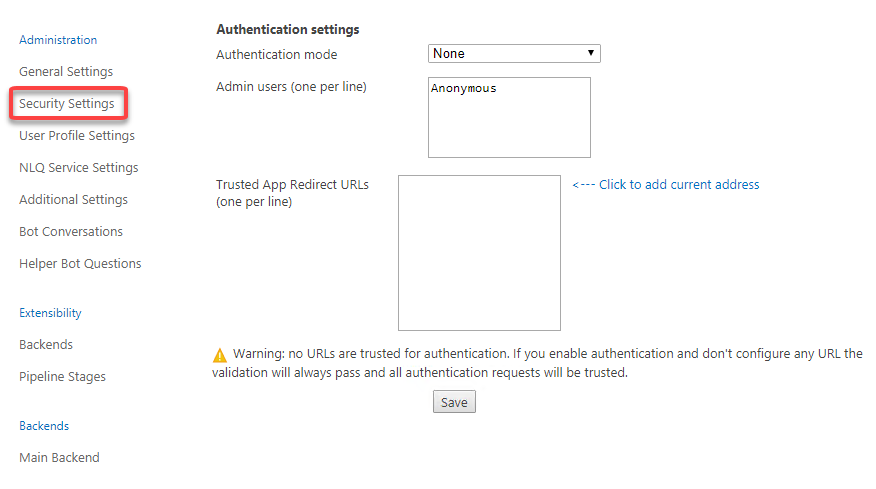
- Security Settings: Click "Security Settings" and the Authentication settings page appears.
-
Admin users:
-
This is the list of users that have access to this Admin site.
-
Enter the users who can access the Administrator console, one user per line.
-
If "Anonymous" is entered, or no admin users are selected, everyone is treated as an authorized user.
-
Enter user names in the formats:
-
domain\username
-
username@domain
-
Example: So your Admin users entry box could look like the following:
Mydomain.com\jsmith
msmith@Mydomain.com
jsmith@demoenv.onmicrosoft.com
mjones@demoinv.onmicrosoft.com
Note: If you have Analytics and/or Smart Previews installed, only this list of users can access the admin sites for these products and configure the applications.
-
-
How to Set Up Trust Relationships with Other BA Insight Applications
Use the following procedure to setup trust relationships with other BA Insight applications, such as Connectivity Hub, Smart Preview, and so on.
- Navigate to the SmartHub Administration page by going to the
_ADMINfolder and navigating to the SmartHub admin User interface (UI).
Alternatively, enter: - Security Settings: Click "Security Settings" and the Authentication settings page appears.

-
Trusted App Redirect URLs: Use this setting to restrict access.
-
If, for example, you enter the URLs for SmartHub, Analytics, and Smart Previews, only these products can communicate with each other.
-
If you enable authentication but do not configure any URL, validation requests pass and all authentication requests are trusted.
-
The URLs you enter must be the exact URLs that are making the access request.
-
- Click the Save button and return to General Settings to see the Security Settings: Secured message