How to Change Your Index and Results Page Logos
- The logo that appears on your search page (Index.html) and results page (Results.html) can be changed.
- Most users prefer to use a custom, corporate logo on their search and results pages.
- A custom logo can give your results page a polished, professional look, and assure users of your SmartHub instance that they are searching internal, corporate-approved data sources.
To change your search and results page logos, you must perform the following (high-level) actions:
- Create a CSS folder within a custom folder in SmartHub
- Create a custom CSS file detailing properties of your custom logo (location, dimensions, etc.)
- Make changes to the following files:
- Index HTML and settings (.js) files
- Results (or Custom Results) HTML and settings (.js) files
Results Page

Create Your CSS File
Note that you do not have to create your CSS file as the first step.
Note: If your logo dimensions are larger than what you set in your CSS file, the logo will not appear on your search results page.
- Create your new CSS file. For example, New>text file, and name it.
- Place the CSS file into your custom folder in the SmartHub installation root directory.
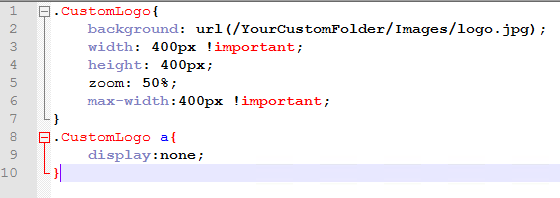
- Open the CSS file and set the properties of your logo, including its location.
- In the example below, the logo being used is named logo.jpg and it is stored in the folder /YourCustomFolder/Images/logo.jpg.
- NOTE! The first line in the CSS example file below is our class in .ClassName format: "
.CustomLogo{".
This class must match the class declared in your custom Results HTML file (or standard Results file, if not using a custom file). See the section "Modify (Custom) Results HTML File" below. - Lines 8-10, in the example below hide the current, default logo image. These lines are not necessary for you to include unless you want to hide, instead of delete the current logo image.

- Save and close the file.
Create a Custom Results Settings File and Set Path to It
Your custom Results HTML file (or standard Results.html file, if you chose not to use a custom Results settings file), like Index.html, takes its settings from a separate file: "ResultsPageSettings.js." DO NOT modify this file.
In the following steps you make and use your own custom Results settings file called CustomResultsSettings.js (name your own file as you see fit).
If you already have a custom Results settings file, skip to "Add CSS Paths to Your Custom Results HTML File" below.
- Navigate to the directory "C:\<SmartHubInstallationFolder>\modules\SmartHubResourceLoader".
- Copy the file CustomSettingsTemplate.js.
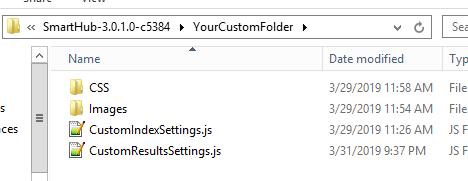
- Paste the file into your custom folder (see the graphic below).
- Rename the file as you desire. In this example the file is named "CustomResultsSettings.js."
- Open your custom Results HTML file and near the top of the file, around line 18, ensure the custom settings file path points to your new custom Results settings file. See the graphic below:

- Save and close the file.
Add CSS Paths to Your Custom Results HTML File
- Open the file CustomResultsSettings.js for modification.

- The paths shown on the commented-out lines, 13 through 20, (your lines may vary somewhat), after the //adding files comment on line 10, are for example purposes.
- Copy the line
'/modules/my-css.css': {},(line 13 or nearby) and paste the contents outside of the comments.- Delete the comma at the end of the line.
- The result is:
'/modules/my-css.css': {}
- Delete the comma at the end of the line.
-
Change the path to the location of your custom CSS file. For example, line 11 would appear as:
'/YourCustomFolder/CSS/YourCustomCSS.css': {}In the future you may add more custom files to load in this section - "
SH.Loader.FilesToLoad =".
If you add additional code below your CSS path, you must put a comma (,) at the end of your line of CSS code (line 11 in the example above). - Now your Results HTML file will load its settings file (.js), which in turn will load your custom CSS file.
- Save and close the file.
Add a Custom Class to Your (Custom) Results HTML File
Do NOT modify the native Coveo classes in your Results HTML file.
Create your own custom class, as instructed below, and modify that custom class.
- Open your custom Results HTML file (such as CustomResults.html), or else "Results.html" if you chose not to make a custom Results HTML file.
- Navigate to the logo section - roughly line 46 (see the graphic below).
- Add "CustomLogo" to the existing code there:
<div class="CoveoLogo logo-center CustomLogo"></div>
- Save and close the file.
Index Page

Create (or Modify) Your CSS File
- Open the CSS file from within your custom folder in the SmartHub installation root directory.
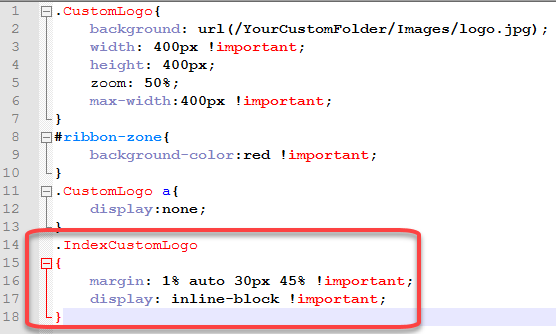
- Add the properties of your Index custom logo at the bottom of the CSS file.
- In the example below:
- The logo being used is named logo.jpg and it is stored in the folder /YourCustomFolder/Images/logo.jpg.
- On line 14, the Index custom logo is declared. Below line 14 the Index custom logo attributes are declared.
- Lines 8-10 in the example below hide the current, default logo image.
- These lines are not necessary for you to include unless you want to hide instead of delete, the current logo image.
- In the example below:

Create a Custom Index Settings File and Set Path to It
Your Index.html file takes its settings from a separate file: "IndexPageSettings.js." DO NOT modify this file.
In the following steps you make and use your own custom Index settings file called CustomIndexSettings.js (name your own file as you see fit).
If you already have a custom Index settings file, skip to "Add CSS Paths to Your Custom Results HTML File."
- Navigate to the directory "C:\<SmartHubInstallationFolder>\modules\SmartHubResourceLoader".
- Copy the file CustomSettingsTemplate.js.
- Paste the file into your custom folder (see the graphic below). Rename the file as you desire. In this example the file is named "CustomIndexSettings.js."
- Open Index.html and near the top of the file, around line 18, ensure the custom settings file path points to your new custom Index settings file. See the graphic below:

- Save and close the file.
Add CSS Paths to Your Custom Index Settings File
- Open your custom index settings file (such as CustomIndexSettings.js)for modification.

- The paths shown on the lines after the "//adding files" comment on approximately line 10, are for example purposes.
- Copy the line:
'/modules/my-css.css': {}, - Paste the contents into line 10, outside of the comments. Delete the comma at the end of the line.
The result is:'/modules/my-css.css': {} -
Change the path to the location of your custom CSS file.
For example, line 11 would appear as:'/YourCustomFolder/CSS/YourCustomCSS.css': {}In the future you may add more custom files to load in this section - "SH.Loader.FilesToLoad =".
If you add additional code below your CSS path, you must put a comma (,) at the end of your line of CSS code (in step 8 above). - Save and close the file.
Add a Custom Class to Your Index HTML File
Do NOT interfere with the native Coveo classes in your Index HTML file.
Create your own custom class, as instructed below, and modify that custom class.
- Open your Index.html file from the root of your SmartHub installation directory.
- Navigate to the logo section of the file (roughly line 46) (see the graphic below).
- Add "IndexCustomLogo" to the existing code there:
<div class="CoveoLogo logo-center IndexCustomLogo"></div>
- Save and close the file.