How to Configure the Onboarding Module
About
The Onboarding module enables SmartHub to interact with users the first time they visit the SmartHub site.
Tip: Important!
The Onboarding module is used to:
- Display "one-time" information to end users
- Collect information or feedback from users
- Trigger additional flows when a specific event happens on the SmartHub page
- Example: Show results on the SmartHub site page from a content source which requires the user to authenticate first.
Structure
- The Onboarding module acts as a mini-framework which manages sub-modules
- Sub-modules run in a predefined sequence based on specific triggers
General Options for Onboarding Module
| Option | Value | Description |
|---|---|---|
|
Enabled |
Boolean Default: false |
If set to "true" it enables the sub-modules to load and trigger flows. |
| GenericDialogTemplatePath |
String Default: SH.RootLevelURL + "/modules/Onboarding/templates/GenericDialogTemplate.html" |
Defines the path to the default template for the generic dialog. To customize the template:
|
| OnboardingModules |
Object Default: {
"SampleOnboardingModule": {} } |
This contains the definitions of all sub-modules. Out-of-the-Box sub-modules are found under this option.
|
Onboarding Sub-Modules
Sub-modules are managed by the Onboarding framework.
Each sub-module defines a flow which triggers when a specific event happens.
Federated Impersonation Sub-Module
This Onboarding module launches a configuration wizard whenever it detects that the page is attempting to show results from a Content Source (source system) which requires manual authentication.
Configuration Options
| Option | Value | Description |
|---|---|---|
| Active |
Boolean Default: true |
|
| Priority |
Number Default: 1 |
Defines the priority of the module if multiple modules are set to trigger on the same page load.
|
| Path |
String Default: SH.RootLevelURL + "/modules/Onboarding/OnboardingModules/FederatedImpersonationModule.js" |
The path to the file which contains the implementation of the sub-module.
|
| ModuleSettings |
Object Default: { TrySilentAuth: true, |
These are settings particular to each sub-module. The Federated Impersonation sub-module has the following custom settings: Backends: A single collection of all the Content Source names (backends) that require authentication:
|
How to Customize the Onboarding Module
Overview
Like any SmartHub module, the Onboarding module is found in the directory <SmartHub_root>/modules.
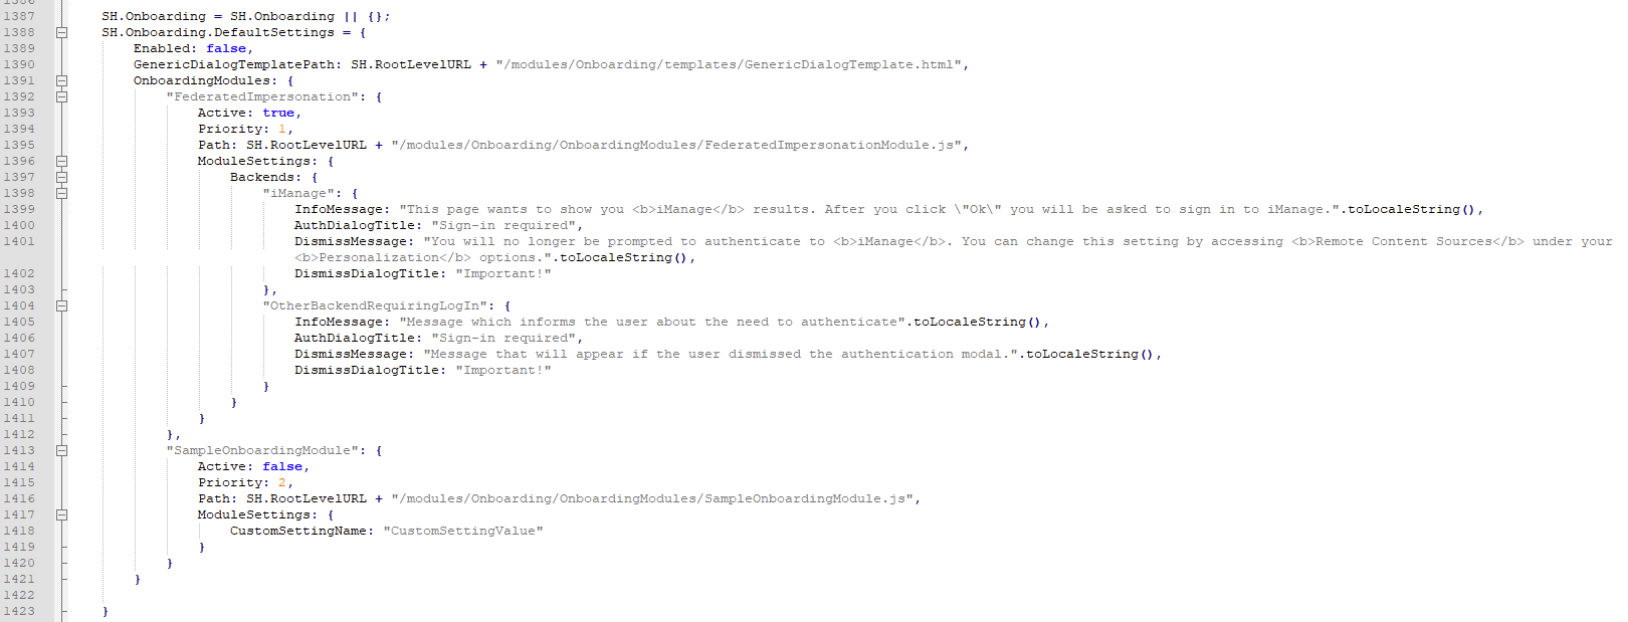
The Onboarding module configuration is stored in the file DefaultModuleSettings.js (found in the directory <SmartHub_root>/modules/SmartHubResourceLoader) around line 1387.

Customization Steps
To customize the Onboarding module use the following steps:
- Open the DefaultModuleSettings.js (found in the directory <SmartHub_root>/modules/SmartHubResourceLoader).
- Open your Custom Settings file (typically, a renamed version of the template CustomSettingTemplate.js) for editing.
- In the file DefaultModuleSettings.js,navigate to the Onboarding settings, around line 1387.
- Copy the file Onboarding settings (shown above from line 1389 to 1421).
- Paste the settings into your Custom Settings file, inside the brackets of the line: "SH.Onboarding.CustomSettings = {};".
- Uncomment the Onboarding section in your Custom Settings file to activate it.
- Save and close your custom settings file.
- Close the file DefaultModuleSettings.js.
- Ensure any page using the Onboarding module, such as the Results page, has a settings file configured to load your custom settings file.
/* uncomment next section to configure Onboarding */
/*
SH.Onboarding = SH.Onboarding || {};
SH.Onboarding.CustomSettings = {};
SH.Onboarding.PathsToExclude = [];