Salesforce Hub
Your SmartHub site must be opened in a new browser tab for the authentication to work properly.
About Salesforce Hub
To integrate SmartHub with Salesforce, install the BA Insight SmartHub package (application) into your Salesforce system.
The SmartHub package for Salesforce offers multiple integration types:
- Full Search
- SmartHub Search Center is displayed as a full page.
- Accessible from:
- BA Insight SmartHub Enterprise Search page
- A Salesforce App (for quick access)
- Local Search
- SmartHub Search Center is displayed as part of a section on the page (with the ability to interact between SmartHub and Salesforce).
- Accessible from the pages where the SmartHub Local Search component is added.
- See How to Add Local Search to Your Pages in the sections below.
- Can be added to the Salesforce Utility bar (at the bottom of the page).
- Enables the Local Search to be quickly accessible.
- Search box with Type-Ahead
- Only available in Salesforce Community Sites:
- The SmartHub Search box allows a multitude of suggestion providers.
- Only available in Salesforce Community Sites:
Prerequisites
- SmartHub must be installed and accessible via the HTTPS protocol.
- This requires a trusted, valid certificate to be configured in the IIS bindings
How to Install the SmartHub Salesforce Package
- To install the Salesforce package navigate to the SmartHub installation directory under the /integrations/sf/ directory.
- Open the file Install.txt.
- Copy the Salesforce package installation URL.
- When navigating to the URL you are prompted by Salesforce to install the package.
Full Search Integration
-
The Full Search component is a Salesforce page which displays a SmartHub Results page.
-
It can be configured to display any page that exists in your SmartHub instance.
How to Access the Full Search Page
- Navigate to your Salesforce instance and use the App launcher to open the BA Insight SmartHub Enterprise search page.
- Create an App which allows quick access to "Full Search".
- Log in to Salesforce instance and go to "Setup" .
- In the "Quick find" search for "App Manager".
- Click "New Lightning App" and go through the app creation wizard.
- In the "Navigation Items" step, select "BA Insight SmartHub Enterprise search".
- In the "Navigation Items" step, select "BA Insight SmartHub Enterprise search".
- The app now appears in App launcher.
Configure the Full Search Integration
- Navigate to your Salesforce instance and use the App launcher to open the BA Insight SmartHub Configuration page.
- On the Configuration page enter the settings that match your SmartHub installation.
Options to Configure
|
Property Name |
Usage |
Sample values |
|---|---|---|
| Address to your full page search |
|
https://smarthub.contoso.com/ |
Add the Local Search Part
Add the Local Search part to your Salesforce page for full search integration.
Configure the Local Search part:
-
Navigate to any page where you added the "Local Search" component.
- Enter edit mode by clicking in the "Edit page" button.
- Locate the "Local Search" component and click on it.
- Configure the component using the options in the table Local Search Options to Configure.
Local Search Integration
The Local Search component displays a SmartHub page in Salesforce within an iframe.
You can choose:
- Size of iframe
- The context property to be used as the search query text
Add Local Search to Your Pages
Note: The developer service must be published and have a custom domain to set the Local Search component.
-
The Local Search component can be added to any Salesforce page where it is required.
-
Use the following steps to add the component to pages:
- Navigate to the page (for example Accounts).
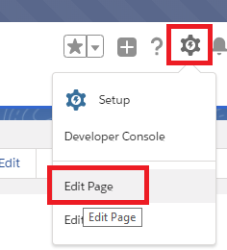
- Enter edit mode by using the gear button at the top. Edit Page mode begins.
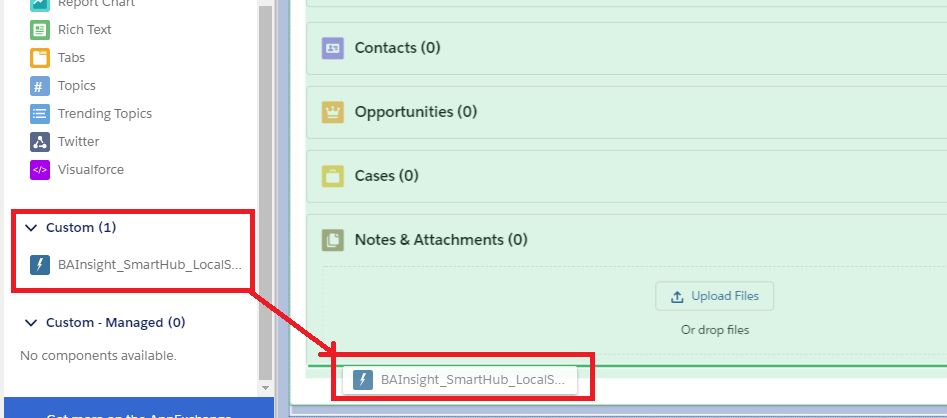
- Next, insert the SmartHub Local Search component in any section you desire.
This component reads the width and height from the configuration options of the SmartHub package.
- Click Save at the top left to save any changes made to the page.
Note: If you use the Local Search component in a Community site then you are asked to add the SmartHub address to the Salesforce CSP Trusted Sites:
- Click "New trusted site."
- Provide the SmartHub URL and a name.
- From "Context" select "Experience Builder Sites."
- Select all directives.
- Save.
Configure the Local Search Integration
- Navigate to any page where you added the "Local Search" component.
- Add the Local Search component:
- Enter edit mode by clicking in the "Edit page" button.
- Locate the "Local Search" component and click on it.
- Configure the component using the options in the "Local Search Options to Configure" in the table below.
- Enter edit mode by clicking in the "Edit page" button.
- Save your changes.
Local Search Options to Configure
|
Property Name |
Usage |
Sample Values |
|---|---|---|
| SmartHub Page URL |
This is the SmartHub HTTPS address of the page that should be opened by the Local Search component.
|
https://smarthub.contoso.com/index.html#pn=salesforce&ribbon=false |
| Container Height | This is the CSS height of the Local Search component iframe. | 800px |
| Container Width | This is the CSS width of the Local Search component iframe. | 100% or 800px |
| Frame Id | This is the ID of the Local Search component iframe. If you use multiple components on the same page then you must provide different IDs for each component. | smartHubFrame |
| Query Field |
To find the required object and field use these steps:
Important! If you add the Local Search in a Community Site which uses the SmartHub Search Box component then set this to {searchboxquery}. This ensures the current page query text is used.
|
Account.name
|
Search Box with Type-Ahead Integration
-
This component is a Salesforce "Search Interface" which can be used in Salesforce Community sites.
-
This component replaces the default "Global Search Box".
How to Add Search Box to Your Salesforce Community Site
Add the Search Box component to your site following the next steps:
- Go to your Community site.
- Enter edit mode by going to Experience Builder (click on your User Name to expand the account menu)
- Click "Settings" in the controls group (left side - cog icon).
- Go to "Security & Privacy"
- Content Security Policy
- Switch to "Relaxed CSP: Permit Access to Inline Scripts and Allowed Hosts"
- Lightning Locker
- Turn off
- Trusted sites for scripts
- Add your SmartHub URL here
- Add your SmartHub URL here
- Content Security Policy
- Go to "Security & Privacy"
- Go to SmartHub install location and locate the file web.config.
- Open the file for editing.
- Uncomment the section related to cross domain requests.
- Specify the Salesforce site address in the parameter
Access-Control-Allow-Origin
- If your SmartHub instance is secured then you must create a custom Login page:
- From the "Pages" menu click "+ New Page"
- Select Standard Page, Flexible Layout
- Name the page "shlogin" or choose a custom name
- Click Create
- Go to "Page Properties" (gear-icon near the page name) and select "Override the default theme layout for this page" and select "Login"
- From the "Components" section add the "BAInsight_SmartHub_Login" component
- Sample value: https://smarthub.contoso.com
- Specify the SmartHub address (No trailing '/') in the "BAInsight_SmartHub_Login" component options.
Publish the newly created page.
Note: If SmartHub is secured with Azure AD authentication then you must add the log-in page URL to the "allowed Redirect URIs" for the SmartHub App Registration
- Navigate back to your Community Site and open Experience Builder.
- Click "Theme" in the controls group (left side - brush icon).
- Go to "Theme Settings".
- Go to "Theme Settings".
- Under "Search Component" select "BAInsight SmartHub Search Box".
- Configure the "BAInsight SmartHub Search Box" component according to the settings table below.
Add the Local Search Component
Add the Local Search component to your Salesforce page for Type-Ahead integration:
-
Navigate to the page where the search bar redirects the user to.
-
Add the "Local Search" component:
- Enter edit mode by clicking in the "Edit page" button.
- Locate the "Local Search" component and click on it. Refer to Add Local Search to Your Pages.
- Configure the component using the options in the table below.
- Enter edit mode by clicking in the "Edit page" button.
- Save your changes.
Options to Configure
|
Property Name |
Usage |
Sample values |
|---|---|---|
| Search Page |
|
/global-search/ |
| SmartHub Address |
|
https://smarthub.contoso.com |
| Search Box Settings File |
This is the address of the file which contains your custom settings for the SearchBox TypeAhead.
|
https://smarthub.contoso.com/customer/SalesforceIntegration/SearchBoxCustomSettings.js |
| SmartHub Login Page |
Important! If your SmartHub instance is secured then the login page must be created prior to adding the search box component on the page.
|
/mysite/s/shlogin |
Note: If your SmartHub address is secured then you must add "https://login.microsoftonline.com" to the list of CSP Trusted Sites in Salesforce.
Note: If the Search Box uses the People provider then you must include the address from where the pictures are loaded
-
Example: https://contoso-my.sharepoint.com) to the list of CSP Trusted Sites in Salesforce.
How to Upgrade the Salesforce Plug-in
From within Salesforce, perform the following steps to upgrade the Salesforce plug-in.
First, you uninstall the individual package components from within Salesforce, and then you install the new Salesforce application.
- From the Setup menu, enter the Installed Packages in the "Quick Find" box, and then select "Installed Packages." See the graphic below.
- Click the Uninstall button next to the package that you want to remove. See the graphic below.
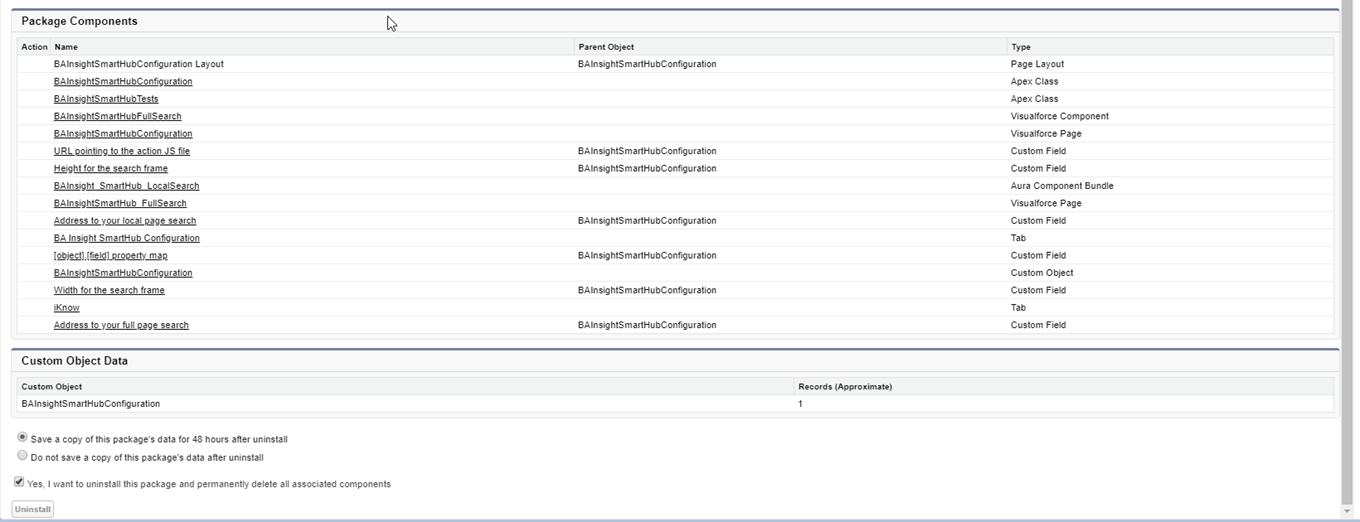
- Scroll down and select the check-box “Yes, I want to uninstall this package and permanently delete all associated components”. See the graphic above.
- As you remove the components from each page you receive the following errors.

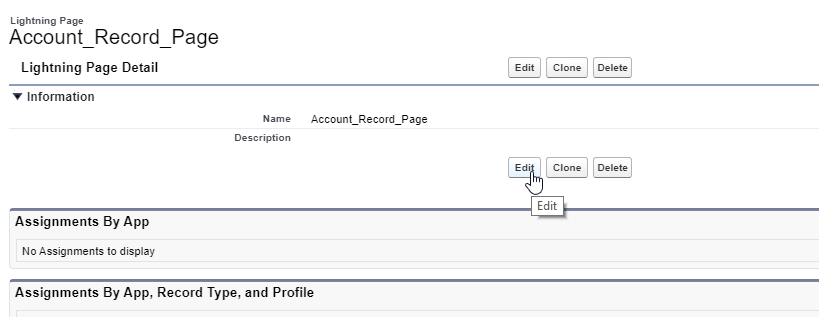
- Click one of the links on the page, the Account_Record_Page.

- Click Edit.
- Select the section.
- Click Delete, Save, and Activation in the top right corner of the page.
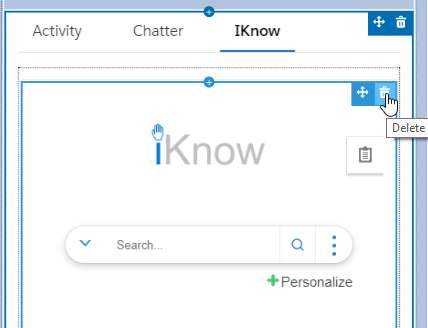
- A pop-up appears to confirm that you have successfully deleted the component.
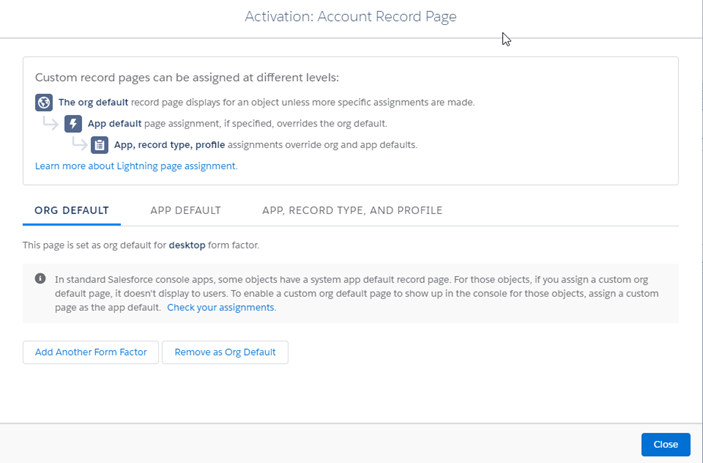
- Close the pop-up and continue to remove components from the rest of your pages.

- Now follow the installation process for the new version of the Salesforce plug-in.
How to Update the Salesforce Plug-In
- To update the plug-in, first uninstall the plug-in completely.
- Perform a new installation of the plug-in.
How to Uninstall the Salesforce Plug-in
Local Search Component
To uninstall the SmartHub local search component plug-in, use these steps:
- First, go through each page where a SmartHub local search component is set up as described above in the topic "How to Upgrade the Salesforce Plug-in."
- Remove the search component.
Login/Search bar Component
If you have set up the integration on a community site you must uninstall the SmartHub login component/search bar, use these steps:
-
The SmartHub login component/search bar are removed the same way you remove any Salesforce components.
-
See Salesforce documentation about how to remove Salesforce components.
-
Results Page
Uninstall the SmartHub Results page, use these steps:
-
The SmartHub Results page is removed the same way you remove any Salesforce component.
-
See Salesforce documentation about how to remove Salesforce components.
-
Community Site
If you have integrated SmartHub with a community site, uninstall the Community site plug-in with the following steps:
- Uninstall Community site plug-in.
- Remove the search component.