Setup Both SmartHub SearchBox and Results UI in the Same Site
Scope
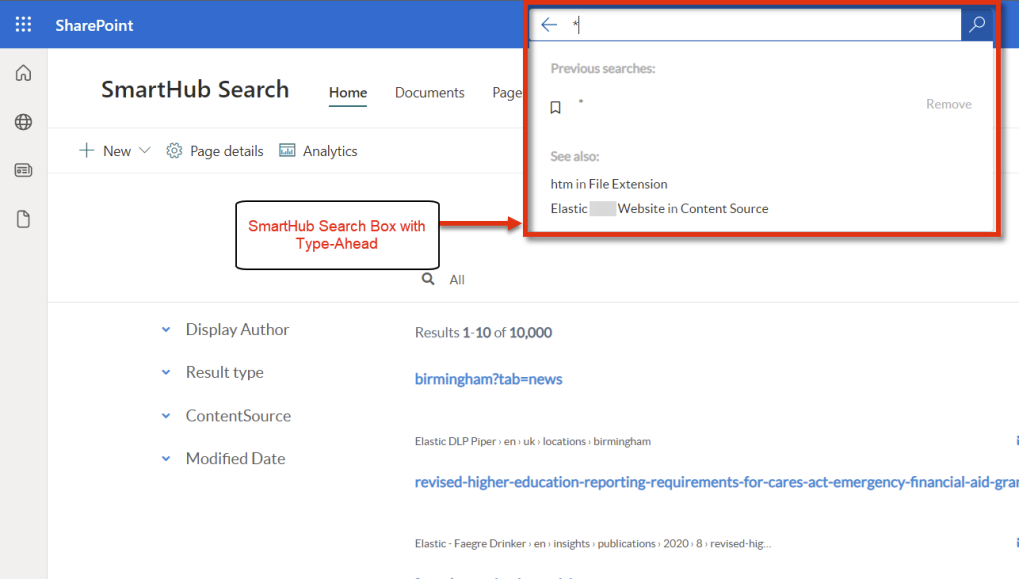
This page describes how to configure both of the following (see screenshot below):
- SmartHub SearchBox
- SmartHub Results UI (within SharePoint)
Note: You do not need to follow these steps if you install only one of the integrations or if the integrations never end up loading on the same site.
For example:
- If you install the SearchBox on site A and the SmartHub Results UI on site B where the SearchBox doesn't exist then you do not need to follow these steps.
- If however, there is a common site where you install/enable both integration follow the procedure below to ensure proper configuration.
SmartHub Results UI in SharePoint with SmartHub SearchBox

Requirements
Ensure the two integrations are installed by following the requirements and procedures outlined here:
- Replace the Default SharePoint SearchBox with a SmartHub SearchBox with Type-Ahead
- How to Display SmartHub Results in a SharePoint Page
When the installations are confirmed, continue with the procedure below.
Procedure
As the SmartHub SearchBox integration already comes with a Type-Ahead capability, note the following:
- The search box that is part of the SmartHub Results UI integration is disabled.
When installing both integrations into the same SharePoint site, only one use case is supported:
- SmartHub SearchBox with Type-Ahead as part of the SharePoint Suite Top Bar with a SmartHub Results UI integration that does not display a search box.
When both integrations are installed the SmartHub Results UI settings take priority so any customizations you make to the Type-Ahead function that is part of the SmartHub SearchBox integration must be made to both settings files - the Results page custom settings and the /custom/newCustomSettings.js file.
| Configuration | Settings File Used (Where you customize the features) | Description |
|---|---|---|
| A page/site where only SmartHub SearchBox integration loads | /custom/newCustomSettingsFile.js |
The file you configured during the installation is the one being used. The only one that loads on the page |
| A page where SmartHub Results UI integration loads | the custom page settings file | The file you configure your SmartHub Results HTML page to use is the only one that loads |
| A page with both integrations in place | the custom page settings file |
When you have both integrations, two settings files load:
The page settings file has priority and overrides any conflicting settings in the Search box settings file (newCustomSettingsFile.js). That is why you have to place and customizations in the custom page settings file as well |
Next steps:
- Edit the page that you configured for the BA Insight Content Editor as part of the SmartHub Results UI integration.
- Locate the
<div>class "CoveoSearchbox".- Add a style attribute to it with the value: display: none.
See below.
- Add a style attribute to it with the value: display: none.
-
In the custom settings file add the following code to the SH.Loader.FilesToLoad section.
Log in SnippetCopy"https://smarthub.contoso.com/integrations/SHSearchbox/SHSearchboxModern.css" : {}, - Edit the page settings used by this page and copy over all the TypeAhead custom settings that are part of the SmartHub SearchBox integration procedure:
- Edit your /custom/newCustomSettingsTemplate.js file
- Find and copy the section around SH.TypeAhead.CustomSettings
- Paste the copied section into the custom settings of the embedded page -
- Ensure you replace any existing SH.TypeAhead.CustomSettings section that may already exist since they can override each other
- In the section just pasted, replace SH.SmartHubAddress with SH.RootLevelURL
- Copy the section related to SH.SPOSearchBoxIntegration.RedirectUri to set the address where the searches should be redirected to
- Save the changes and reload the "SmartHub results page" that is hosted in SharePoint.
- You will see the following:
- The SmartHub Results UI does not display a SearchBox
- The SmartHub SearchBox in the SharePoint Suite Bar works and displays type-ahead as configured in the page's custom settings file