How to Configure Your Elasticsearch Backend
Use the following procedure to configure the Elasticsearch backend The search engine your SmartHub instance uses to perform queries. SmartHub can be configured to use more than one search engine..
Prerequisites
- Elasticsearch v7.x must be installed.
- If Elasticsearch is not installed, download Elasticsearch and install it.
Limitations
Note the following limitations when using an Elasticsearch search engine The search engine your SmartHub instance uses to perform queries. SmartHub can be configured to use more than one search engine. in your SmartHub environment:
-
Elasticsearch does not guarantee consistent ordering for documents with identical sort values (including nulls or empty values), unless a secondary sorting criterion is specified. This means that when multiple documents share the same sort value, and you do not define a secondary sort criterion, the order of their appearance in the search results may vary between query executions, leading to inconsistencies in pagination. For more details, see Paginate search results in the Elasticsearch documentation.
-
To ensure a consistent sort order, Upland BA Insight recommends that you include another field, such as a unique identifier, as a tie-breaker. In SmartHub, this can be achieved by adding a new Query Scripting Processor tuning stage with the following code:
CopyQuery.SortList.Add(
SortType.SortByProperty,
"escbase_title.keyword", // this is an example of a property that can be used
typeof(System.String),
SortDirection.Ascending
); -
Once configured, this stage must be placed before the Elastic Translator Stage in the User experience tuning section.
-
Connect SmartHub to an Elastic Cloud or Self-hosted Elasticsearch On-Premise Instance
Make sure that you have the following information and access for the backend(s) that you are configuring:
- Elastic Cloud URL
- Access to Elasticsearch On-Premise
Add an Elastic Backend
- Navigate to the SmartHub Administration page at http(s)://[web-app-url]/_admin.
- For example: http://smarthub.azurewebsites.net/_admin.
- For example: http://smarthub.azurewebsites.net/_admin.
- From the General Settings page click the "Add New Backend" link to add your new Elasticsearch backend.
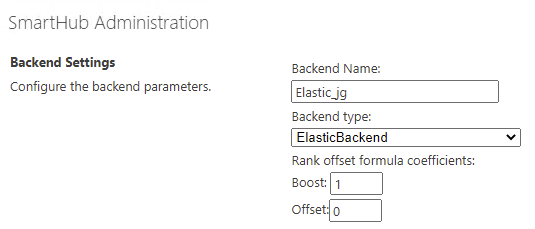
- Next, enter the Backend Name and corresponding information in the appropriate fields. See the following graphic.

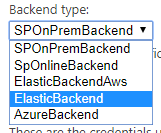
- Backend type: Select ElasticBackend or ElastcBackendAws (for AWS hosted Elastic Search service) from the drop-down list.

-
Rank offset formula coefficients
-
Optional.
-
Enter these values only if you selected the Rank Based mixing algorithm that is set in the Properties for SSA page:
-
BOOST: Enter the boost factor.
-
OFFSET: Enter the rank offset.
-
-
Authentication Mode
These are the credentials that are used to access the Elasticsearch service.
Select the authentication mode for your environment's Elasticsearch type, detailed below.
Available authentication modes:
- None
- Basic
- Token

AWS-hosted Elastic
-
AWS Access Key:
-
Enter your access key
-
-
AWS Secret Key:
-
Enter your secret key
-
- Authenticate via AWS Profiles:
- Store profiles in a share AWS credentials file and use to access AWS Elastic Backend content.
- Note: The file must be saved with an .ini extension:
- Example: credentials.ini
- AWS Profile name:
- Enter AWS profile name.
- Example: basic_profile
- AWS Credentials file location:
- Enter the location of AWS Credential file.
- Example: C:\\Users\sdkuser\customCredentialsFile.ini
[{profile_name}]
aws_access_key_id = {accessKey}
aws_secret_access_key = {secretKey}
All On-Premise Cloud Elasticsearch Instances
For any on-premise instance of Cloud Elastic Search service (not AWS-hosted elastic):
Authentication mode
- Basic
- Account: Enter your account name.
- Password: Enter your password.
- Token Based
- How to configure Token-Based Authentication can be found here.
-
Modify the Backend configuration by entering your configuration settings into the Parameters field.
See the following example code:Backend Configuration Example
Copy<configuration>
<settings>
<setting Name='ElasticServerAddress' Value='http://localhost:9200' />
<setting Name='Indices' Value='index1, index2' />
<setting Name='Timeout' Value='30' />
<setting Name='SourceMappings' Value='00000000-0000-0000-0000-000000000000#index1,index2;' />
</settings>
</configuration>-
Use the following table to specify this code:
Parameter Required/Optional Description Default Value ElasticServerAddress
Required -
The URL of your Elastic Cloud service instance.
-
Obtain this URL from your Elastic Could provider.
http://localhost:9200 Indices
Required Specify one or more comma (,) separated indices to be used for search.
index1,index2 Timeout
Optional Specify the configurable timeout of the search.
Note: If the search takes longer than 30 seconds, the search is cancelled.30 SourceMappings
Optional -
A mapping between
SearchQuery.SourceIdand Elasticsearch indices. -
A Search Query with a matching Source ID is executed against the specified indices.
-
This option is used for performance tweaks when you have multiple backends.
00000000-0000-0000-0000-000000000000#index1,index2 -
-
Pipeline Stages
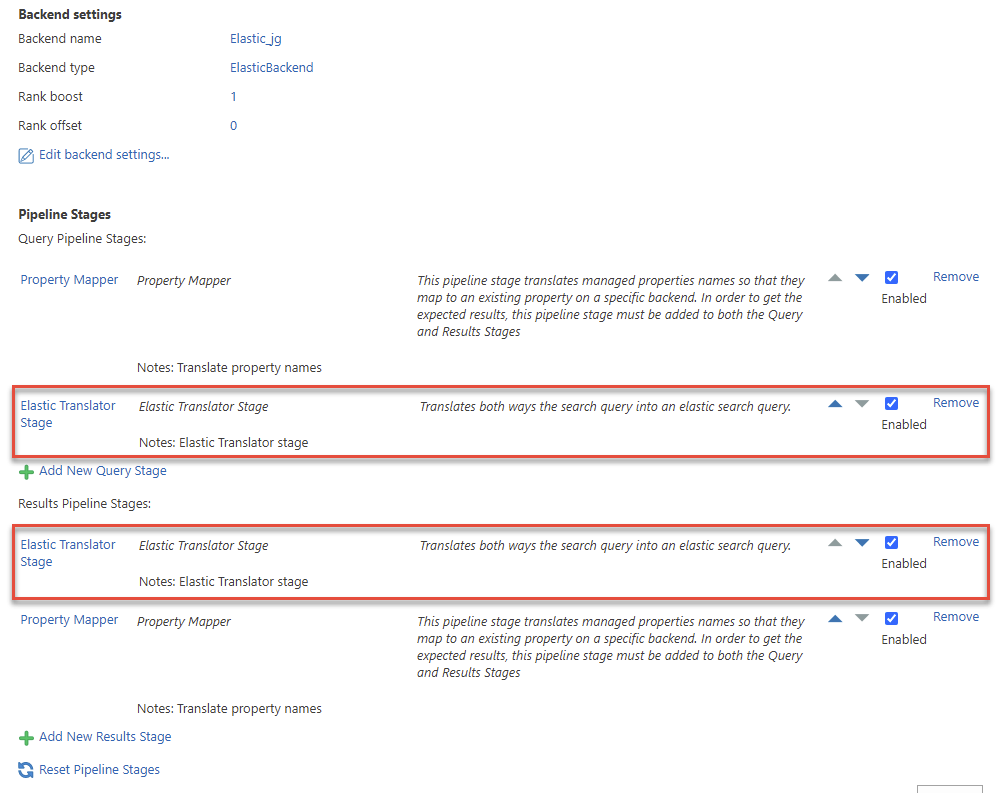
After creating the Backend, two "Elastic translator" pipeline stages are automatically added to the pipeline categories:
-
Result Pipeline Stage
Make the modifications

- These are backend-specific pipeline stages and do not apply to any other backends you have configured.
Perform the following steps for both the Query Pipeline and Results Pipeline Elastic Translator stages:
- Click the stage name.
-
Modify the Stage Configuration by entering your configuration settings into the Parameters field.
See the following example code.Stage Configuration Example
Copy<configuration>
<settings>
<setting Name='Indices' Value='index1,index2' />
<setting Name='RefinablePropertiesSuffix' Value='' />
<setting Name='Timeout' Value='30' />
<setting Name='EnableFuzziness' Value='true' />
<setting Name='TextQueryType' Value='best_fields' />
<setting Name='DateProperties' Value='ElasticLastUpdate' />
<setting Name='NumericProperties' Value='FileSize' />
<setting Name='SourceMappings' Value='00000000-0000-0000-0000-000000000000#index1,index2;' />
<setting Name='FieldBoost' Value='' />
<setting Name='ShowAccurateResultCount' Value='false' />
<setting Name='BodyField' Value='FileContent' />
</settings>
</configuration>-
Use the following table to specify this code:
-
| Parameter | Description | Default Value |
|---|---|---|
| AdditionalUrlQueryParameters |
|
|
| BodyField |
Note that if the setting is missing the default value will be used. |
FileContent |
|
DateProperties |
|
ElasticLastUpdate |
| ElasticMappingTimeoutInHours |
|
|
|
EnableFuzziness |
|
false |
| FieldBoost |
Note that the field names should be taken from elastic, not from the property mapper.
|
|
| HttpWebRequest |
|
|
|
Indices |
|
index1,index2 |
|
NumericProperties |
|
FileSize |
| QueryOperator |
|
|
|
RefinablePropertiesSuffix |
|
|
| ShowAccurateResultCount |
|
false |
|
SourceMappings |
|
00000000-0000-0000-0000-000000000000#index1,index2 |
|
TextQueryType |
|
best_fields |
|
Timeout |
Note: if the search takes longer than 30 seconds, the search is cancelled.
|
30 |
Logs
-
By default, logs appear in the directory <SmartHub_Install_Directory>\Logging.
Elastic Backend supports operator NEAR.
Supported syntax:
- (A OR B) NEAR(5) C => "A C"~5 OR "B C"~5
- (A OR B) NEAR(5) (C OR D) => "A C"~5 OR "B C"~5 OR "A D"~5 OR "B D"~5
- (A OR "B C") NEAR(5) D => "A D"~5 OR ("B C D"~5 AND "B C")
- (A AND B AND C) NEAR(5) (D AND E) =>"A B C D E"~5