Install SmartHub with Elasticsearch
Any issues experienced by BA Insight clients during installation are typically traced to a failure to meet the required prerequisites.
You must satisfy all of the requirements listed in the Prerequisites topic for your search engine.
To be guided through installing BA Insight SmartHub v5, see the following video ![]() How to Install and Configure SmartHub v5).
How to Install and Configure SmartHub v5).
- Extract SmartHub Files to a Local Directory
- Give Read/Write Permissions to System User Running Application Pool
- Create the SmartHub Web Site in IIS
Use the following procedure to install SmartHub.
Extract SmartHub Files to a Local Directory
- In Windows Explorer navigate to the location where you downloaded the SmartHub installation package.
- Extract the archive to a directory of your choice, such as C:\Program Files\BA Insight\SmartHub\.

Give Read/Write Permissions to System User Running Application Pool
To give permissions only to the system user running the application pool, assuming you are using IIS7, perform the following steps:
- Open IIS7.
- Select the web site for which you need to modify permissions.
- Go to Basic Settings and identify which application pool account you are using.
- For example, "SmartHub".
- By default you see ApplicationPoolIdentity When a new application pool is created, IIS creates a virtual account that has the name of the new application pool and that runs the application pool worker process under this account. This is also a least-privileged account..
- Note that most administrators change this identity to a different user account, such as <domain>\<YourSmartHubUser>.
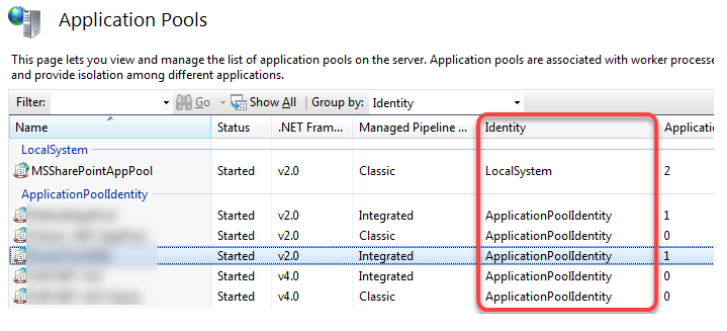
- Go to Application pools and find the application pool from the previous step.
-
Find the system account used for running this application pool (Identity column).

Info: To change the system account that is used to run your SmartHub Application Pool Defines a group of one or more worker processes, configured with common settings that serve requests to one or more applications that are assigned to that application pool., see How to Change Your Application Pool Identity Account below.
- Navigate to your SmartHub site in IIS, select it, and click Edit Permissions under the Actions pane on the right side.
Click the Security tab and add the desired permissions for only the user account identified in step 3.
For example, IIS AppPool\DefaultAppPool.
This must be set to the local machine because this is a local account.
Create the SmartHub Web Site in IIS
To secure the configuration folder for the App pool account (if the application pool account is the "auto-generated" one), see "Give Read/Write Permissions to System User running Application Pool" above.
- Open IIS manager.
- Expand <Sites>.
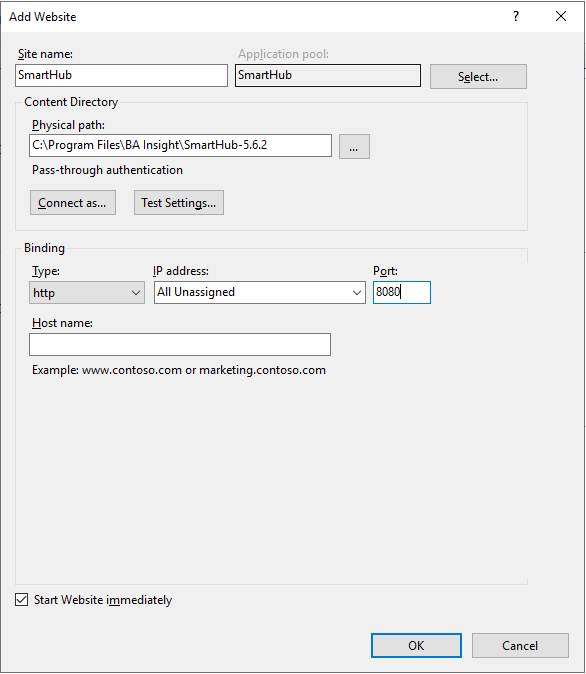
- Right-click <Sites> and select Add Website from the pop-up window that appears.
- Right-click <Sites> and select Add Website from the pop-up window that appears.
- Site name:
- Enter your site name.
- For example, enter SmartHub.
- Application pool: Select an Application pool account that has FULL permissions to your SmartHub installation directory and the files within it.
- The default AppPool account DOES NOT have the necessary permissions.
- See the topic "How to Change Your Application Pool Identity Account" below.
- Physical path: Enter the path to the unzipped SmartHub package as shown in the graphic above.

Bindings
As part of the installation process you create both HTTP and HTTPS bindings.
- Type: http or https. SmartHub must have bindings for both HTTP and HTTPS. See the graphic above.
Use the following steps to enable both bindings in your SmartHub site:
- The Site Creation Wizard in IIS allows only a single binding when first creating a site (either HTTP or HTTPS).
- After you create your SmartHub site, create a second, additional binding to the same site (either HTTP or HTTPS).
- Port:
- Enter a port that is not used by another site from IIS.
- HTTP: Port 80 or 8080 is commonly used
- HTTPS: Port 443 is commonly used
- Enter a port that is not used by another site from IIS.
- Host name
- Optional
- Enter a host name to restrict access to the host name (address your users enter into a web browser).
- The host name can be a DNS The system that converts website domain names (hostnames) into numerical values (IP address) so they can be found and loaded into your web browser. address, local machine name, localhost, and so on.
- Click Save.
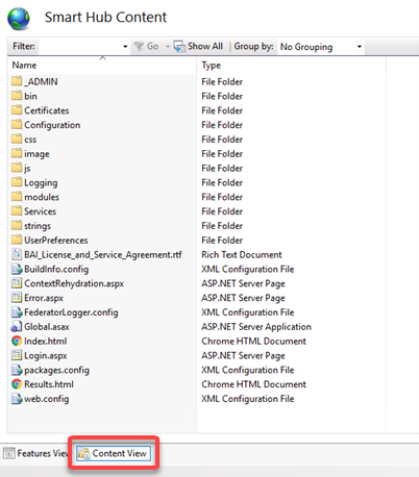
If you select Content View from the bottom of your SmartHub Content site, your folder structure should resemble the structure shown below:
Note: The "Configuration" folder does not appear until you have set your Authentication mode under the "Security Settings" category in the SmartHub Administration site.

IMPORTANT! To access the site, users must have READ access to the folder.
How to Change Your Application Pool Identity Account
The SmartHub Application Pool Identity account must be the Local Administrator account with the following permissions:
- Run a Windows Scheduled Task (required for the BA Insight Analytics Sync Tool).
- Manage the Windows Service Bus (required for the BA Insight Analytics).
To verify if the user has permission follow the next steps:- Open a Service Bus PowerShell as administrator.
- Check to see if you have created a service namespace by issuing the following PowerShell command:
Get-SBNamespace - Verify if the ManageUsers group include your account.
- Add permissions to your account using the following PowerShell command:
Set-SBNamespace -Name "YourNamespace" -Manage YourUserUse the following instructions to change your Application Pool Identity account.
- Open IIS manager if it is not already open.
- Click Application Pools from the left-side Connections pane.
- Select the Application Pool you wish to change. Note that you can sort your Application Pools by categories such as Name, Status, Identity, Applications, and so on.
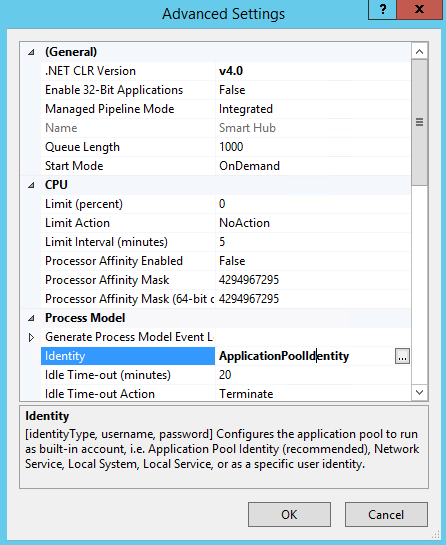
Right-click the Application Pools whose identity you wish to change and select the "..." button.
- Select the built-in account you wish to use from the drop-down menu or else click the Custom account radio button and click the Set button.
Enter the credentials of the Application Pool Identity account you wish to use. Be sure to enter the account user name in the format
<domain>\<name>.