Connect SmartHub to the SharePoint Online Backend
Use the following procedure to connect SmartHub to your SharePoint Online search engine The search engine your SmartHub instance uses to perform queries. SmartHub can be configured to use more than one search engine..
How to Configure the SharePoint Online Backend
- Navigate to the SmartHub Administration page at:
http(s)://[web-app-url]/_admin
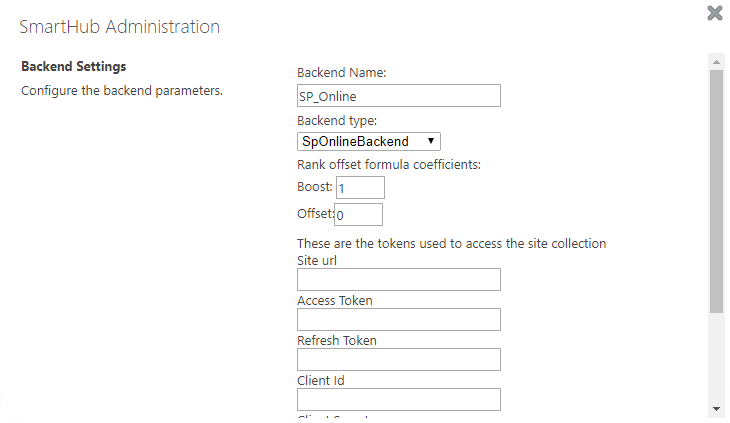
- Click Main Backend The search engine your SmartHub instance uses to perform queries. SmartHub can be configured to use more than one search engine. > Edit backend settings to see the Backend Settings pop-up window:

- Backend Name (required):
- Enter a unique name for your backend.
- This name cannot be duplicated and can contain only letters, digits, or any of the following characters:
' ', '-', '_', '.', '(', ')', '[', ']'
- Backend type: Select SpOnlineBackend.
- Rank offset formula coefficients (optional):
- These values are used only if you selected the Rank Based mixing algorithm that is set in the Properties for SmartHub SSA page.
For more information, see Specify the Mixing Algorithm.- BOOST: Enter the boost factor.
- OFFSET: Enter the rank offset.
- These values are used only if you selected the Rank Based mixing algorithm that is set in the Properties for SmartHub SSA page.
- Enter the information used to access the site collection:
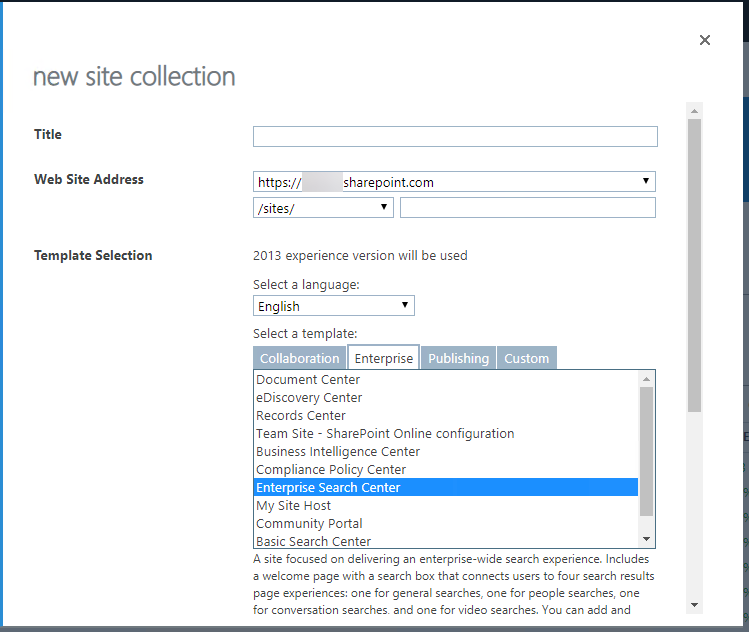
- Site url: Enter the URL for your SharePoint Online Search Center, which is a site collection created with a SharePoint "Enterprise Search Center" template.
- You may receive an error when performing a query if you do not use a Search Center URL in this field.

- You may receive an error when performing a query if you do not use a Search Center URL in this field.
- Access Token: Enter the access token from SmartHub's OAuth page.
- Refresh Token: Enter the refresh token from SmartHub's OAuth page.
- Client Id: Enter the Application ID from Azure App Registrations.
- Client Secret: Enter the Key's value from Azure App Registrations.
- Microsoft Login Endpoint: Default value: https://login.microsoftonline.com
- Company Signature (Optional):
- Enter the company signature. This is used to avoid getting throttled by SharePoint O365.
- Example: NONISV|Contoso|GovernanceCheck/1.0
- See here for more details on required format.
- Enter the company signature. This is used to avoid getting throttled by SharePoint O365.
- Impersonate: Click to let SmartHub assume the identity of the specified account when retrieving data.
- If impersonation is checked you don't need to fill the rest of fields.
- Note: Azure Active Directory has to be configured in Security Settings
- Site url: Enter the URL for your SharePoint Online Search Center, which is a site collection created with a SharePoint "Enterprise Search Center" template.
- After completing Site URL, Client ID and Client Secret, click Authorize and a new tab will open to login.
- After logging in, you are redirected to SmartHub's OAuth page where you can find the access token and refresh token. See How to register an app in Azure and configure it.
- Click OK to add this backend.
How to Register an App in Azure and Configure It
SmartHub with SharePoint Online requires Azure Active Directory authentication.
Register an app in Azure as described in the sub-topic "Azure Active Directory" in Set Access and User Authentication for SmartHub with SharePoint Online.
How to Show Personal OneDrive Documents
To request personal OneDrive documents the property ContentSetting must be configured.
- OneDrive documents are not visible, but can be found in the attribute query result ResultBlocks.
- Enabling ContentSetting is done via a Query Scripting Processor stage and manipulating the OneDrive documents is done via a Results Scripting Processor stage.
Examples
Example of how the Query Scripting Processor used to enable the ContentSetting can look like:
if(Query.QueryText.Contains("ContentSettingFlag"))
{
    Query.QueryText = Query.QueryText.Replace(" ContentSettingFlag","");
    Query.AdditionalPropertiesFromBag = new Dictionary<string,object>();
    Query.AdditionalPropertiesFromBag["ContentSetting"] = 3;
}
In the example, only when the "ContentSettingFlag" keyword is passed to the query text is the ContentSetting property enabled.
- This is done so that the property is enabled only for a specific query. ContentSettingFlag is used only as an example and the query can be identified in other ways too.
- For example, SourceID.
The ContentSettingFlag was passed to the query text via a ContentBySearch:
<div class="CoveoContentBySearch cbs-tab-container" id="top-results" data-query-text='* FederatorBackends:"*" ContentSettingFlag' data-source-id="b29924a9-ec32-4c10-8892-a544b69ee121" data-results-per-page='3' data-hide-until-first-query="false">Example of how the Results Scripting Processor is used to manipulate the OneDrive personal documents can look like:
if(Results.ResultBlocks.Count > 0)
{
    Results.RelevantResults.Clear();
    foreach(var resultBlock in Results.ResultBlocks)
    {
        Results.RelevantResults.AddRange(resultBlock.BlockResults);
    }
}
In this example the original results will be replaced with the results from the ResultBlock that contains the OneDrive personal documents.
Note: The three results per page is a SharePoint limitation.
While showing more than three results at a time is not possible, the Pager component can be used to show multiple pages.
If the OneDrive documents are shown in a ContentBySearch component the Pager component must also be added to the Content-by-Search.
The Pager component markup:
<div class="CoveoPager"></div>