How to Install and Configure Haystack
Prerequisites
- An Elastic Index is required
Elastic version: 7.7-7.11 (Download here v7.10.0)
-
Microsoft Visual C++ 2015-2019 installed via Visual Building Tools 2019
-
Windows 10 SDK
-
MSVC - VS 2019 C++
-
-
Python v3.7.9
- Torch v1.10.2 - see "Install Torch v1.10.2" below
- XPDFReader
- Git
- Haystack v1.9
Microsoft Visual C++ 2015-2019 using Visual Building Tools 2019
Procedure:
-
Download Build Tools for Visual Studio 2019
-
Double click the executable file downloaded.
-
Wait until the Build Tools is loaded.
-
Choose Desktop development with C++.
-
Choose MSVC v.142 – VS 2019 C++ x64/x86 build tools.
-
Windows 10 SDK
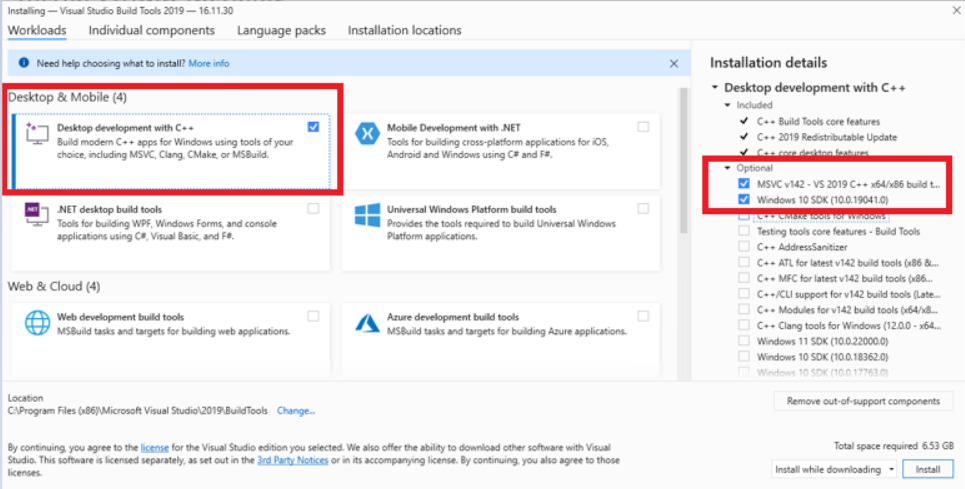
-
-
Click Install
-
Restart the server if a pop-up message is displayed for this.
Install Python v3.7.9
Procedure:
-
Download Python v3.7.9 from here: https://www.python.org/downloads/release/python-379/
-
Right-click and select Properties. Unblock the file.
-
Double-click the executable file downloaded
-
In Python installation windows, select the check-box “Add Python 3.7 to PATH“
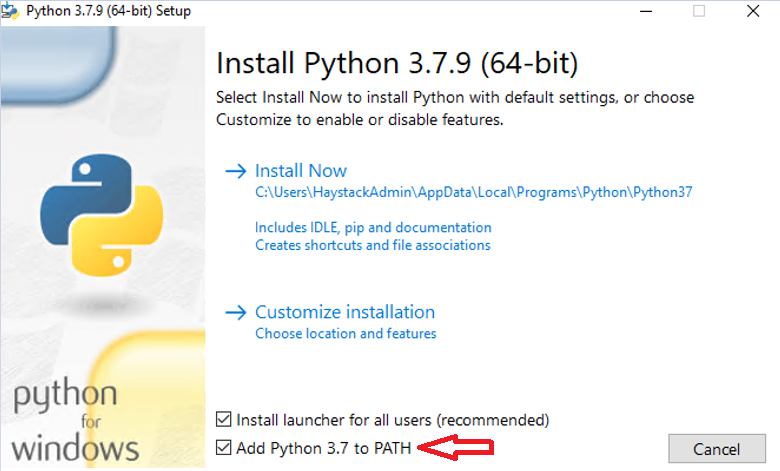
-
Click Install Now
Install Python Torch v1.10.2
- Open a web browser.
- Download Torch
- "torch-1.10.2+cpu-cp37-cp37m-win_amd64" from here.
- Ensure the version of Torch matches your processor architecture – typically, win_amd64.
If your processor architecture is different, search and download from here: https://download.pytorch.org/whl/torch_stable.html
Right-click and select Properties. Unblock the file.
Note where the file is stored.
- "torch-1.10.2+cpu-cp37-cp37m-win_amd64" from here.
- Open a command prompt with Admin privileges if it is not already open.
-
Run the following command (alter the file name and path, as necessary):
Copypip install " C:\Users\admin_account\Downloads\torch-1.10.2+cpu-cp37-cp37m-win_amd64.whl"
Install XPdfReader
Procedure:
-
Download XpdfReader from here.
-
Select the version for your operating system (example: Windows 64-bit).
-
After the executable file is downloaded, double click downloaded file.
-
Press Next.
-
Agree the license agreement.
-
Choose install location and click Install.
Install Git
If you do not have Git installed, use the following procedure to install it.
Procedure:
-
Download Git from here.
-
Double-click on the downloaded executable (Example: Git-2.42.0.2-64-bit.exe)
-
Press Next until you receive the window where you have this message: “Configuring the terminal emulator to use with Git Bash“
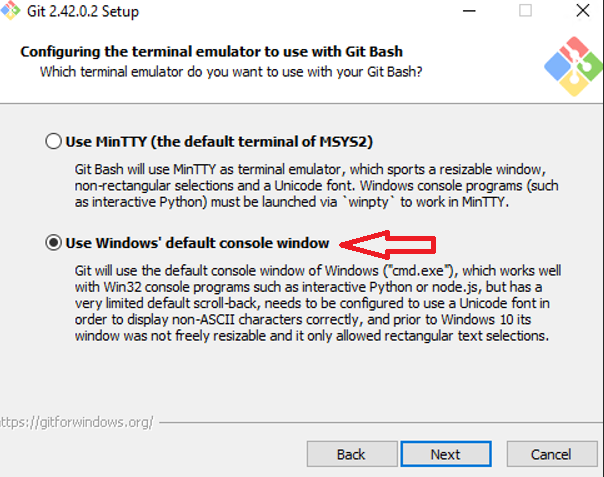
-
Choose “Use Windows default console window“ and continue to click Next until you have the Installation option
-
Click Install
-
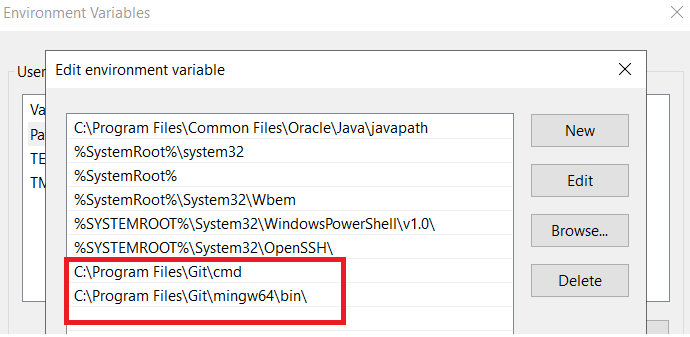
After the installation is done, you need to configure the system variable.
-
Right-click on "This PC"
-
Select Advanced system settings > Environment Variables...
-
Under System variables, select the "Path" row, click Edit, New, and add two paths:
-
Path to /bin folder from installation location (default: C:\Program Files\Git\mingw64\bin\)
-
Path to the Git command tool
-
-
In Environment variable you should have these 2 variables saved.
Install Haystack v1.9.0
Installation steps:
- Download Haystack from GIT. Scroll down the page and download the Source Code zip file.
- Right-click and select Properties. Unblock the file.
-
Create a new Haystack folder somewhere in your environment.
- Extract the contents of the .zip file to your Haystack folder.
- Using the cd command, navigate to the Haystack directory and into the root
- For example, cd "C:\Haystack\haystack-1.9.0"
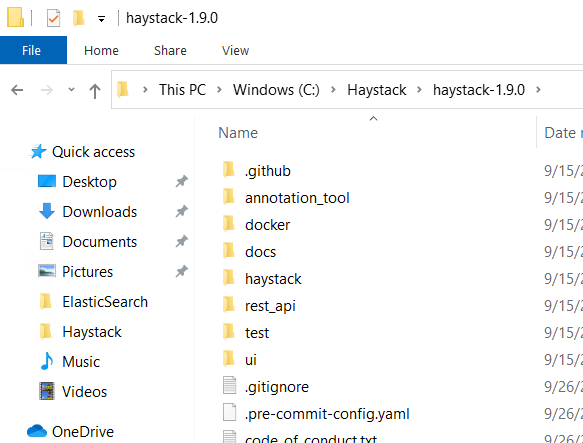
- For example, cd "C:\Haystack\haystack-1.9.0"
-
Using a text editor, create a text file and copy the content below inside that file:
 requirements.txt
alembic==1.4.1
altair==5.0.1
annotated-types==0.5.0
anyio==3.7.1
asgiref==3.7.2
astor==0.8.1
attrs==23.1.0
azure-ai-formrecognizer==3.3.0
azure-common==1.1.28
azure-core==1.29.4
azure-storage-blob==12.18.1
backoff==2.2.1
backports.zoneinfo==0.2.1
base58==2.1.1
blinker==1.6.2
cachetools==5.3.1
certifi==2023.7.22
cffi==1.15.1
charset-normalizer==3.2.0
click==8.0.4
cloudpickle==2.2.1
colorama==0.4.6
cryptography==41.0.3
databricks-cli==0.17.7
decorator==5.1.1
dill==0.3.7
docker==6.1.3
docopt==0.6.2
ecs-logging==2.1.0
elastic-apm==6.18.0
elasticsearch==7.10.1
entrypoints==0.4
exceptiongroup==1.1.3
farm-haystack==1.9.0
fastapi==0.103.1
filelock==3.12.2
Flask==2.2.5
fsspec==2023.1.0
gitdb==4.0.10
GitPython==3.1.36
greenlet==2.0.2
gunicorn==20.1.0
h11==0.14.0
htbuilder==0.6.2
huggingface-hub==0.16.4
idna==3.4
importlib-metadata==6.7.0
importlib-resources==5.12.0
inflect==5.4.0
isodate==0.6.1
itsdangerous==2.1.2
jarowinkler==1.2.3
Jinja2==3.1.2
joblib==1.3.2
jsonschema==4.17.3
langdetect==1.0.9
lxml==4.9.3
Mako==1.2.4
Markdown==3.4.4
markdown-it-py==2.2.0
MarkupSafe==2.1.3
mdurl==0.1.2
mlflow==1.13.1
mmh3==4.0.1
monotonic==1.6
more-itertools==9.1.0
msrest==0.7.1
networkx==2.6.3
nltk==3.8.1
num2words==0.5.12
numpy==1.21.6
oauthlib==3.2.2
packaging==21.3
pandas==1.3.5
pdf2image==1.14.0
Pillow==9.5.0
pkgutil-resolve-name==1.3.10
posthog==3.0.2
prometheus-client==0.17.1
prometheus-flask-exporter==0.22.4
protobuf==3.17.3
psutil==5.9.5
pyarrow==12.0.1
pycparser==2.21
pydantic==1.9.2
pydantic-core==2.6.3
pydeck==0.8.1b0
Pygments==2.16.1
PyJWT==2.8.0
Pympler==1.0.1
pynvml==11.5.0
pyparsing==3.1.1
pyrsistent==0.19.3
pytesseract==0.3.7
python-dateutil==2.8.2
python-docx==0.8.11
python-editor==1.0.4
python-multipart==0.0.6
pytz==2023.3.post1
pytz-deprecation-shim==0.1.0.post0
pywin32==306
PyYAML==6.0.1
quantulum3==0.9.0
querystring-parser==1.2.4
rapidfuzz==2.7.0
regex==2023.8.8
requests==2.31.0
requests-oauthlib==1.3.1
rich==13.5.2
scikit-learn==1.0.2
scipy==1.7.3
semver==3.0.1
sentence-transformers==2.2.2
sentencepiece==0.1.99
seqeval==1.2.2
six==1.16.0
smmap==5.0.0
sniffio==1.3.0
SQLAlchemy==1.4.49
sqlparse==0.4.4
st-annotated-text==2.0.0
starlette==0.27.0
streamlit==1.9.0
tabulate==0.9.0
tenacity==8.2.3
threadpoolctl==3.1.0
tika==2.6.0
tokenizers==0.12.1
toml==0.10.2
toolz==0.12.0
torchvision==0.11.3
tornado==6.2
tqdm==4.66.1
transformers==4.21.2
typing-extensions==4.7.1
tzdata==2023.3
tzlocal==4.3.1
urllib3==1.26.7
uvicorn==0.22.0
validators==0.20.0
waitress==2.1.2
watchdog==3.0.0
websocket-client==1.6.1
Werkzeug==2.2.3
wrapt==1.15.0
zipp==3.15.0
-
Save the file with the name requirements.txt and copy the text file to root folder from Haystack folder (step 5)
-
Open a command prompt with Admin privileges if it is not already open
-
Using command “cd“, navigate to the Haystack installation directory (step 5).
-
Run the following command:
Copypip install -r requirements.txt -
Wait until all the requirements are installed.
-
From the same command prompt window run this command (do not remove the “/“):
Copypip install rest_api/ -
Wait until the installation is done.
-
From the same command prompt window run this command (do not remove the “/“):
Copypip install ui/ -
Wait until the installation is done.
Run Haystack
Once all prerequisites are satisfied and all required programs are installed, use the following steps to run Haystack:
- Open a command prompt with Admin privileges if it is not already open.
-
Using “cd“ command, navigate to the Haystack installation directory (where you extracted the .zip file).
-
Example: cd “C:\Haystack\haystack-1.9.0“
-
- Run the command: Copy
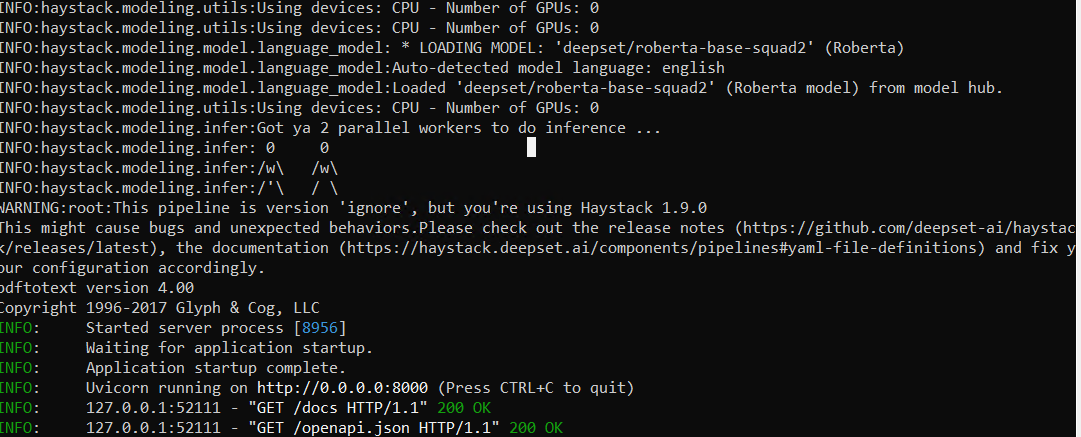
uvicorn rest_api.application:app --host 0.0.0.0 - If everything is running correctly your command prompt should show something similar to this:
Verify Haystack is Running
To verify Haystack is running, use the following steps:
- Open the URL: http://localhost:8000/docs
- The Swagger API documentation for Haystack is displayed.
- This verifies Haystack is running.
- If the Swagger API documentation for Haystack is not displayed:
- Verify the command prompt running Haystack is open.
- If the command prompt running Haystack is not open, follow the steps in "How to Run Haystack" above.
How to Restart Haystack
- Close the current command prompt where Haystack is running and follow the steps in "How to Run Haystack" above.
Possible Errors and Fixes
Error
-
ERROR: Could not find a version that satisfies the requirement canals (from farm-haystack) (from versions: none)
-
ERROR: No matching distribution found for canals (from farm-haystack)
Solution
-
Check the Python version and Pip version.
-
Correct versions:
-
Python v3.7.9
-
Pip version 20.1.1
-
Error
-
Failed loading pipeline component 'PDF File Converter'.
Solution
-
XpdfReader is not installed.
-
Environment variables for Git are not configured
Error
-
error: Microsoft Visual C++ 14.0 or greater is required. Get it with "Microsoft C++ Build Tools"
Solution
-
Install Microsoft Visual C++ using Build Tools
Error
-
Could not build wheels for mmh3 which use PEP 517 and cannot be installed directly
Solution
-
Install Windows 10 SDK.
Error
-
RuntimeError: InitVar is not supported in Python 3.7 as type information is lost
Solution
-
Run the following commands:
Copypip install Pydantic==1.8.2 / pip install inflect==5.4.0
Error
-
haystack.errors.PipelineSchemaError: Haystack component with the name 'PDFToTextConverter' not found.
Solution
-
Run the following command:
Copypip install pytesseract==0.3.7 / pip install wheel==0.37.0