Install the Smart Previews Web Resources
Deploy the Package in IIS
On the server that will host the Smart Previews Web Resources site, create a new folder called "Web Resources."
This can be the same server that hosts the Smart Previews Hybrid component.
-
Extract the contents of SmartPreviewsFrontEnd-*.zip to your "Web Resources" folder.
Service Account
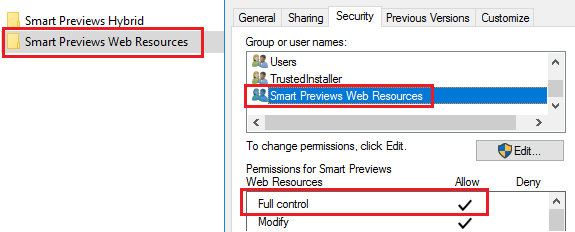
Your Smart Previews Service account requires full control security permissions to the Web Resources folder.
- Navigate to IIS and create a new site that points to the folder that you created in the previous step.

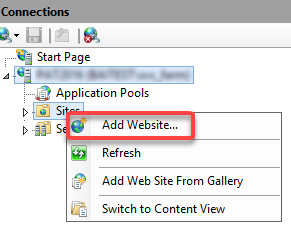
- Right-click on Sites and select Add Website....

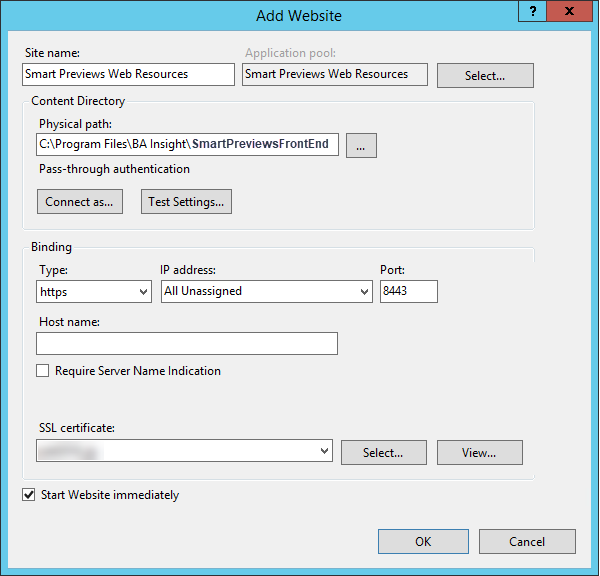
- Site name
- Enter "Smart Previews Web Resources."
- Enter "Smart Previews Web Resources."
- Application pool
- Choose (or create) an application pool
- Choose (or create) an application pool
- Physical path
- Enter the path to the Smart Previews "Web Resources" folder from step 1
- Enter the path to the Smart Previews "Web Resources" folder from step 1
- Type
- Select https
- Only AFTER selecting https does the SSL certificate field appear
- Port
- Enter a port for the application.
- The example above uses port 8443.
- SSL certificate
- Enter a valid certificate to be used for the HTTPS protocol.
Verify Application Pool Permissions on the Installation Folder
The following instructions verify the Identity and permissions of the Application Pool configured above.
- In IIS, select the Application Pools as shown in the graphic below.

- The user shown in the Identity column must have READ/WRITE permissions to the Smart Previews Web Resources folder created in step 1.
- If you use the default ApplicationPoolIdentity user, you must grant READ/WRITE permissions to the auto-generated IIS user named "IIS APPPOOL\Smart Previews Web Resources"

Configure the Smart Previews Hybrid Component
Use the following steps to configure the Smart Previews Hybrid Component.
- Navigate to the Smart Previews Hybrid web site folder.
- Edit the web.config file.
- Locate the section appSettings\CloudServiceAddress.
- Replace the sample server address with your Smart Previews Web Resources URL, including the port number.
- You must include the path …./Services/PreviewProxyService.svc in your edited URL.
Example:
Default: https://previewapp.bainsight.com/Services/PreviewProxyService.svc
After editing: https://webresources:4321/Services/PreviewProxyService.svc
Configure the Smart Previews Web Resources Site
- Navigate to the folder where you extracted the contents of the SmartPreviewsFrontEnd-*.zip file.
- By default, Smart Previews is configured to use Redis as a caching store for increased performance.
- If you do not have access to a Redis cache connection, follow these steps to replace the Redis cache with an in-memory cache:
- Open the Web.config file.
- Locate the unity\containers\container\types\ section. Around line 17.
- The first line (line 18 by default) in the types section contains the text
"mapTo="SmartPreviewAppWeb.Caching.RedisStore". Comment out this line. - The following line contains the text
"mapTo="SmartPreviewAppWeb.Caching.InMemoryCache". Uncomment this line. - When complete, the code looks like this:

- You must configure the Smart Previews Web Resources site to reference the SmartHub URL that is accessible from the server where the Smart Previews Web Resources are being installed.
SmartPreviews Web Resources relies on SmartHub for authentication.- Open the Web.config file if it is not already open.
- Locate the appsettings\SmartHubAddress section, around line 76.
- Change the address to match your SmartHub URL using this format: https://<smarthubsite>.com.
- For example: https://MyCompany.mydomain.com
- Locate the appsettings\SetupModesection, around line 75. Change the value to "SmartHub."

- Locate the system.serviceModel\bindings\webHttpBinding section, around line 114.
- Change the
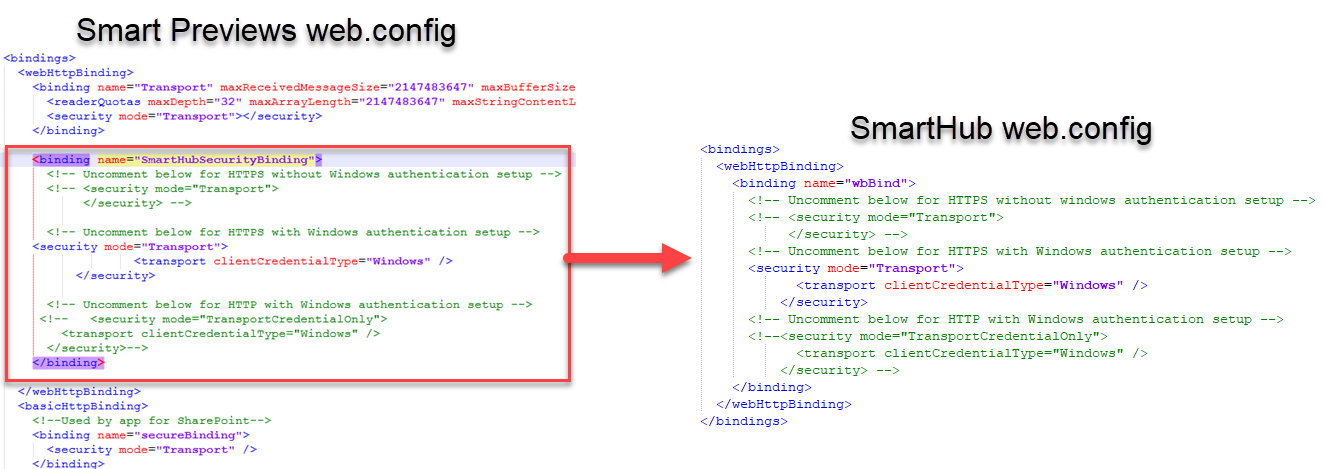
SmartHubSecurityBindingsection to match the security section in your SmartHub web.config file, which is located at the root level of your SmartHub installation directory.- This requires commenting or uncommenting code in the section, as necessary.
- In the example below, the security binding in both files is set to "HTTPS with Windows authentication setup."

Add HTTP IIS Site Bindings
Procedure:
- Navigate to IIS Management.
-
Select the IIS SMP web resources site.
-
Select Bindings... under "Edit Site" on the right-side menu.
-
Add an HTTP binding. Use the same Host Name as the HTTPS binding (step 8).
- Enter a unique port number.
- Click Close.