Certificate-based authentication for Microsoft Teams Connectors
When using certificate-based authentication, you must create an App Registration in the organization's Azure Active Directory.
-
Since the connector will potentially crawl millions of records, please make sure to create a dedicated App Registration for the connector.
-
Sharing the App Registration between the connector and another client may lead to excessive throttling for both clients and poor indexing speed.
Application Permissions
The Azure application must be granted one of the following Microsoft Graph API Application permissions, depending on the level of access that you want to enable (see register the Azure application for more information):
-
ChannelMessage.Read.All: This permission allows the app to read all channel messages in Microsoft Teams
-
Directory.Read.All: This permission allows the app to read data in your organization's directory, such as users, groups and apps, without a signed-in user.
-
Group.Read.All: This permission allows the app to read group properties and memberships, and read conversations for all groups, without a signed-in user.
-
Member.Read.Hidden: This permission allows the app to read the memberships of hidden groups and administrative units without a signed-in user.
-
User.Read.All: This permission allows the app to read user profiles without a signed in user.
Certificate Requirements
For the following topics you need the signed certificate in PFX and CER formats (created here) as well as the password for the PFX certificate.
Register the Azure Application
- Go to https://portal.azure.com/ and login with Azure Global Admin user credentials.
- Click Azure Active Directory and click on the desired directory.
- From the menu select App Registrations.
- Click New registration to register a new app.
- In the Name field, Enter a name for your app.
- In the Redirect URI section, specify the Application type by select Web or API app from the drop-down list.
- Enter a URI of your choosing. The URI is not used in the Microsoft Teams Authorization mechanism.
- Click Register at the bottom of the page.
- Within the app, go to API Permissions.
- Under API Permissions > Add a permission >Microsoft Graph.
- Under Application Permissions, select the following permissions for the app depending on the Authentication mechanism used:
ChannelMessage.Read.All
Directory.Read.All
Group.Read.All
Member.Read.Hidden
User.Read.All
- Click the Add Permissions button at the bottom of the screen.
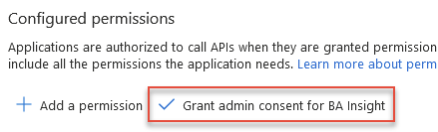
- In the Configured permissions menu, click the Grant admin consent button to grant the selected permissions (requires admin rights).
- Repeat this process (Steps 9 through 13) for each of the Microsoft Graph API permissions listed in the Application permissions:
- Open the Azure app you created in the previous steps, above. Under Manage, click Certificates and secrets
-
Add your newly created certificate.

There are multiple methods that can be used to create a certificate. BA Insight recommends the following instructions to create a certificate: How to Create a Self-Signed Certificate.
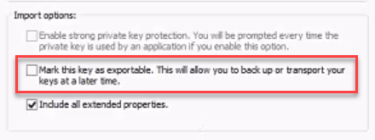
If you use another program, such as IIS, when you export the certificate, ensure you do not mark the key as exportable:
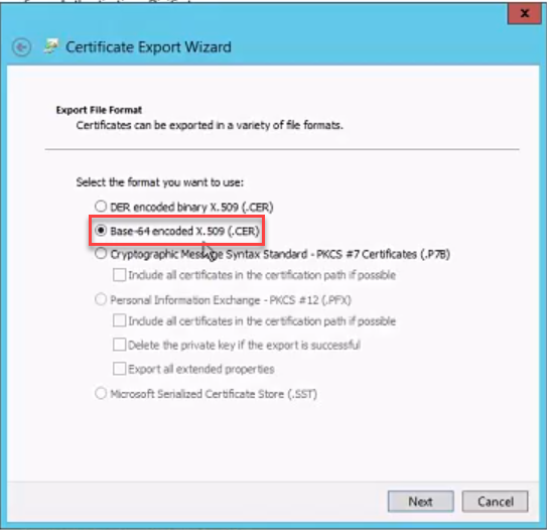
Also, when exporting your certificate using IIS, note that it MUST BE Base-64 encoded:
Certificate Installation Options
When configuring the Teams connector with App Registration and Certificate Authentication, BA Insight supports two certificate installation methods. Both are fully compatible, the correct choice depends on your security model and permissions available to the service account.
| Method | Certificate store | Permissions required | Notes |
|---|---|---|---|
| Recommended (least privilege) | CurrentUser\Personal (CurrentUser\My) | No Local Administrator rights required | rights required Service account imports certificate into its personal store |
| LocalMachine store (legacy/existing deployments) | LocalMachine\Trusted Root Certification Authorities (LocalMachine\Root) | Local Administrator rights required | Remains supported for existing configurations |
Install the Certificate Using the Recommended (Non-Admin) Method
-
Sign in to the server using the service account that will run the connector.
-
Ensure the account is not a Local Administrator.
-
Open the Certificate Manager for the current user by typing certmgr.msc in the start menu.
-
Navigate to Personal > Certificates.
-
Right-click and choose All Tasks > Import....
-
Import your .pfx certificate file.
-
Complete the wizard and verify the certificate appears in Personal > Certificates.
Install the Certificate Using the LocalMachine Store
- Run the Microsoft Management Console (MMC) as an Administrator.
- Add the Certificates Snap-in.
- Expand Trusted Root Certification Authority.
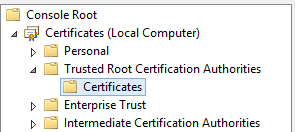
- Use the Actions menu to import your PFX certificate.