How to Configure Your Target
- Configure Your Amazon Credentials File Elasticsearch Service
- Configure Your Azure AI Search Target
- Configure Your AWS OpenSearch Target
- Configure Your Elasticsearch Target with User Authentication
- Configure Your Elastic Target with App Authentication
- Configure Your Kendra Target
- Configure Your Microsoft Search Target
- Configure Your AWS OpenSearch Target
- Configure Your Solr Cloud Target
- How to Configure Your Solr Stand Alone Target
Configure Your Amazon Credentials File Elasticsearch Service
The following topics describe how to create an AWS-hosted Elasticsearch Target with Credentials File in Connectivity Hub.
Note: For more information about Targets, see What is a Target?
Add the Target and Configure the Search Schema
Before you can add your target, you must install BA Insight Connectivity Hub.
- You can add multiple targets, one for each BA Insight Connector content source.
- More than one target can point to the same index.
To add the Elasticsearch Integration target, follow these steps:
- Go to the Connectivity Hub Target page.
- Click the New Target button. The Load Target dialogue appears.
- In the Target Information field, Select the AWS Credentials File Hosted Elastic Target from the drop-down menu:
- Select the Target Info tab. Enter the following information:
- Title
- Required
- Specify a name.
- Target Information:
- Required
- This field is pre-populated: BAInsight.ElasticSearch.ConnectorsExtension.ElasticTargetAwsCredentialsFile, BAInsight.ElasticSearch.ConnectorsExtension.
- Title
- Select the General Settings tab and configure the general settings for your target. For more information on configuring these fields, see the target general settings reference.
- Select the Custom Settings tab.
- Login: Enter the credentials for an account with access to the Elastic instance.
- Password: Enter the password for the account above.
Elastic index URL (required): Enter your AWS Elasticsearch service URL
- AWS profile name (required)
- Enter AWS profile name.
- Example: default
- AWS Credentials file location (required):
- Enter the location of AWS Credential file.
- Example: C:\Users\Smith\Desktop\credentials.txt
Example AWS Credentials File
[{default}]aws_access_key_id = {accessKey}aws_secret_access_key = {secretKey}
- AWS Region (required)
- Click Save.
Configure Your AWS OpenSearch Target
The following topics describe how to create an AWS OpenSearch target in Connectivity Hub.
Note: For more information about Targets, see Filters
Prerequisites
Before you can add your Target, you must install BA Insight Connectivity Hub.
Before you proceed to add and configure your AWS Open Search Target Make sure you have a domain in your AWS OpenSearchService instance
Add the AWS OpenSearch Target
You can add as many targets to Connectivity Hub as you like.
A target is associated with a specific AWS OpenSearch instance.
-
More than one content source can point to the same target
-
The index name will be created from the content source title
To add the AWS OpenSearch Target, follow these steps:
-
Go to the Connectivity Hub Target page.
-
Select New Target.
-
The Load Target page appears.
-
In the Target Information field, Select AWS Hosted Open Search Target from the drop-down list.
-
Click Load.
-
The Target Info tab appears.
-
Title
-
Required
-
Specify a name
-
-
Select the General Settings tab and configure the general settings. For more information on configuring these fields, see the target general settings reference.
-
Select the Custom Settings tab.
Complete the following fields:-
AWS Access Key: Enter your AWS access key
-
Password: Enter your AWS secret key
-
These credentials are used to create/update and delete the index created by Connectivity Hub at index time. Ensure proper permissions.
-
-
AWS OpenSearch Domain endpoint: Enter your AWS OpenSearch domain endpoint.
-
AWS OpenSearch connection timeout: Enter the maximum time allowed to establish a connection with the client (seconds).
-
AWS Region: Enter your AWS region code
-
-
Click Save when done.
Configure Your Azure AI Search Target
The following topics describe how to create an Azure Cognitive Search Target in Connectivity Hub. For more information about Targets, see What is a Target?
Prerequisites
-
Before you can add your target, you must install BA Insight Connectivity Hub.
- Before you proceed to add and configure your Azure Cognitive Search Target, you must create an index in Microsoft Azure.
Index-to-Content Source
In Connectivity Hub, there is one index created per content source for both Elasticsearch and Azure Cognitive Search.
Create a Microsoft Azure index
In order to create a Microsoft Azure index with the 2023-10-01-Preview API version, use the following steps:
-
Install an API management platform (Postman, Insomnia, etc.).
-
Create a PUT request. For example:
PUT https://[servicename].search.windows.net/indexes/[index name]?api-version=[api-version]

Content-Type: application/json
api-key: [admin key] -
Provide the body of the request. The code snippet below describes creating an index with the id field (required), a vector field, and the vector search configuration.
Note the following:- The dimensions attribute of vector field has a minimum of 2 and a maximum of 2048 floating point values each.
- The size of embeddings generated by the Open AI's text-embedding-ada-002 model is 1536, the LLM used in our sample is 1536.
{
    "fields": [
        {"name": "id", "type": "Edm.String", "searchable": true, "filterable": true, "retrievable": true, "sortable": true, "facetable": true, "key": true, "indexAnalyzer": null, "searchAnalyzer": null, "analyzer": "standard.lucene", "normalizer": null, "dimensions": null, "vectorSearchProfile": null, "synonymMaps": []},
        {"name": "vector_field", "type": "Collection(Edm.Single)", "searchable": true, "filterable": false, "retrievable": true, "sortable": false, "facetable": false, "key": false, "indexAnalyzer": null, "searchAnalyzer": null, "analyzer": null, "normalizer": null, "dimensions": 1536, "vectorSearchProfile": "vector-profile-hnsw1", "synonymMaps": []}
        ],
        "scoringProfiles": [],
        "corsOptions": null,
        "suggesters": [],
        "analyzers": [],
        "normalizers": [],
        "tokenizers": [],
        "tokenFilters": [],
        "charFilters": [],
        "encryptionKey": null,
        "similarity": {
            "@odata.type": "#Microsoft.Azure.Search.BM25Similarity",
            "k1": null,
            "b": null
        },
        "semantic": null,
        "vectorSearch": {
            "algorithms": [
            {
                "name": "my-hnsw-config-1",
                "kind": "hnsw",
                "hnswParameters": {
                    "m": 4,
                    "efConstruction": 400,
                    "efSearch": 500,
                    "metric": "cosine"
                    }
            }
        ],
        "profiles": [
            {
                "name": "vector-profile-hnsw1",
                "algorithm": "my-hnsw-config-1"
            }
        ]
    }
} -
Execute the request.
-
Validate that the index and the vector fields were created in the Microsoft Azure portal.
Add the Microsoft Azure Search integration target
You can add as many targets to connectivity as you like. A target is associated with a specific Microsoft Azure Search service. More than one target can point to the same Azure search service. To addd the Microsoft Azure Search integration target, do the following:
-
In Connectivity Hub, navigate to the Target page and select New Target.
-
On the Load target page, select your target from the drop-down menu.
-
Select the Target Info tab and specify a name for your target in the Title field.
- Select the General Settings tab and configure the general settings. For more information on configuring these fields, see the target general settings reference.
-
Select the Custom Settings tab and specify the following fields:
-
Search Service Name (required): Enter the name of your Microsoft Azure Search service.
-
Password (required): Enter the admin key (with full permissions) for you Microsoft Azure Search service.
-
DNS Suffix: Enter the custom DNS suffix to be used when connecting to the Microsoft Azure Search service.
-
This is required if you are connecting to a custom cloud, such as a government cloud.
-
Do not specify this suffix for the public Microsoft Azure Cloud.
-
-
-
Click Save.
Schema Mapping
To plan your Azure Cognitive Search schema, consider the fields you wish to include in your search.
- To configure the fields you want to see in your index, navigate to the Metadata page for your Content Source by clicking Content Source >
 > Edit Metadata.
 - Set the Active, Refinable, Searchable, and Exact match settings for your metadata.
- The fields are automatically created in your index, based on these settings.
- Retrievable:
- Select this for any field you wish to return with the search results.
- Generally, these are fields that are used as part of your displayed result.
- Refinable:
- Select this for any field which might be explicitly searched or used by a refiner.
- For example, a title search: "title = 'Mary had a little lamb'".
- Searchable:
- Select this for any field which should be searched for the keywords used in your query.
Complex Fields
Table data types from Connectivity Hub will be treated as Collection of Complex fields in Azure Cognitive Search schema.
Azure target cannot create these complex fields, so they require manual input:
You need to add the table field and all its sub-fields in you Azure index and then repeat the full crawl.

Configure Your Elasticsearch Target with User Authentication
Elasticsearch Support
Connectivity Hub v4.x supports Elasticsearch v7.x and v8.
Compatibility with Elasticsearch
If using Elasticsearch v7.x and SmartHub, you must use SmartHub v5.5 or later.
Add the Target
Target Definition and Requirements
Before you can add your Target, you must install BA Insight Connectivity Hub.
- A Target is a set of configuration options used by your Content Source (that identify which search engine content is written to).
- Multiple Content Sources can point to the same Target
- Add at least 1 Target per search engine
- If you use the same crawl options across Content Sources, you use 1 Target per search engine
- If you use various crawl options across Content Sources, you must use multiple Targets per search engine
- If you use Elasticsearch, your Target points to the entire elastic cluster
- 1 Content Source = 1 index in your search engine (Elastic, MS Search, etc.)
- You can not map 2 Content Sources to the same index
- Connectivity Hub automatically names the indices based on the Content Source names
Add Your Elasticsearch Integration Target
To add the Elasticsearch Integration target, follow these steps:
- Go to the Connectivity Hub Target page.
- Select New > Target.
- The Load Target page appears.
- From the Target Information field, select Elastic Target.
- Select the Target Info tab.
Enter the following information:- Title
- Required
- Specify a name.
- Target Information
- Required
- Auto-populates
- Enter BAInsight.ElasticSearch.ConnectorsExtension.ElasticTarget.
- Title
- Select the General Settings tab and configure the general settings. For more information on configuring these fields, see the target general settings reference.
- Select the Custom Settings tab.
-
Elastic index URL (required): Enter your URL in the format:
http(s)://[server_name]:[port_number]-
Connectivity Hub attempts to connect to the index in this address [index_name].
-
If the index does not exist, Connectivity Hub creates it.
-
- The Elastic schema is created automatically.
- To define the fields you want to see in your index use the Metadata page (Connections > > Metadata...) and set the Active, Refinable, Searchable, and Exact match settings for your metadata.
-
The fields are automatically created in your index, based on these settings.
- If you need to query against the specific property, mark it as Active and Searchable
- If you need to use the property as a refiner mark it as Active and Refinable
- If you only care about the value of the property and only need to query against the content of the property, then mark Active and Full text index
-
Click Save.
-
Click Connect.
-
Use with caution!
How to Group All Non-refinable/Non-searchable Properties
You can group all non-refinable/non-searchable properties from Connectivity Hub in a bulk property in Elastic by setting the Active and Full text index property on your metadata.
After indexing, all values are found under the ElasticBulkValues property.
How to Run a Full Target Update Job
After you add a target, you must run a Full Target Update job.
To update the target after you have run a Full Target Update job, run a Incremental Target Update job.
To run a Full Target Update job, follow these steps:
- Navigate to the Connectivity Hub Tasks page.
- Click New and the Edit Job page appears.
- In the Scope drop-down field, select the Content Source for which to run the full target update.
- Select Target Full Update from the Job drop-down list.
-
Click Create.
-
Logs - See these logs after you run a job such as:
-
Full
-
Incremental
-
Target Update
-
Configure Your Elastic Target with App Authentication
The following topics describe how to create an Elasticsearch Target in Connectivity Hub.
Prerequisites
Elasticsearch Support
-
Connectivity Hub v4.x supports Elasticsearch v7 and v8.
Add the Elasticsearch Target
Before you can add your Target, you must install BA Insight Connectivity Hub.
- A Target is a set of configuration options used by your Content Source (that identify which search engine content is written to).
- Multiple Content Sources can point to the same Target
- For more about Targets, see What is a Target?
- Add at least 1 Target per search engine
- 1 Target: If you use the same crawl options across all Content Sources, use 1 Target per search engine
- Multiple Targets: If you use various crawl options across all Content Sources, use multiple Targets per search engine
- If you use Elasticsearch, your Target points to the entire elastic cluster
- 1 Content Source = 1 index in your search engine (Elastic, MS Search, etc.)
- You cannot map 2 Content Sources to the same index
- Connectivity Hub automatically names the indices based on the Content Source names
To add the Elasticsearch Integration target, follow these steps:
- Go to the Connectivity Hub Target page.
- Select New > Target.
- The Load Target page appears.
- From the Target Information field, Select Elastic Target with App Authentication.
- Select the Target Info tab.
Enter the following information:- Title (required): Specify a name.
- Target Information (required): Auto-populates. Enter BAInsight.ElasticSearch.ConnectorsExtension.ElasticTarget.
- Select the General Settings tab and configure the general settings. For more information on configuring these fields, see the target general settings reference.
- Select the Custom Settings tab.
Elastic index URL(required): Enter your URL in the format:
http(s)://[server_name]:[port_number]Connectivity Hub attempts to connect to the index in this address [index_name]. If the index does not exist, Connectivity Hub creates it.
To define the fields you want to see in your index use the Metadata page (Connections >
> Metadata...) and set the Active, Refinable, Searchable, and Exact match settings for your metadata.The fields are automatically created in your index, based on these settings.
If you need to query against the specific property, mark it as Active and Searchable
If you only care about the value of the property and only need to query against the content of the property, then mark is Active and Full text indexable
Application ID:
Enter App IDs from Azure App
AppSecret Key:
Enter Secret Key from Azure AppTenant ID
Tenant:
Enter Tenant ID from Azure
Example: contoso.onmicrosoft.com
Azure Scope:
Enter Azure Scope
Example: https://contoso.com/.default
Microsoft Login Endpoint:
Enter Microsoft login endpoint
Example: https://login.microsoft.com
If you need to use the property as a refiner check both:
Active
Refinable (See the graphic below).
-
Click Save.
- Click Connect.
-
The Elastic schema is created automatically.
Target Content Reset
-
When executing aTarget Content Reset job, the existing Elastic index is deleted!
-
Using this option causes the loss of data in your existing index.
-
Use with caution!
How to Group All Non-refinable/Non-searchable Properties
You can group all non-refinable/non-searchable properties from Connectivity Hub in a bulk property in Elastic by setting the Active and Full text index property on your metadata:

After indexing, all values are found under the ElasticBulkValues property.
How to Run a Full Target Update Job
After you add a target, you must run an Full Target Update job.
To update the target after you have run a Full Target Update job, run a Incremental Target Update job.
To run a Full Target Update job, follow these steps:
- Go to the Connectivity Hub Tasks page.
- Click New and the Edit Job page appears.
- In the Scope drop-down field, select the Content Source for which to run the full target update.
- Select Target Full Update from the Job drop-down list.
-
Click Create.
-
Logs- See these logs after you run a job:
-
Full
-
Incremental
-
Target Update
-
Configure Your Kendra Target
The following topics describe how to create a Kendra Target in Connectivity Hub.
When BA Insight applications index into Kendra (via Connectivity Hub), a “Data Source” is created for each content source, such as SharePoint.
For another example: one Kendra "Data Source" is created for the Documentum content source.
A single Kendra Index - "DemoKendra" - that holds multiple data sources, each mapped to a SmartHub content source would look like this:
DemoKendra (Index):
- Documentum → (Kendra Data Source)
- SharePoint → (Kendra Data Source)
- File Share → (Kendra Data Source)
- and so on
This is important if two data sources use metadata properties with the same name but different settings.
For example, one metadata property may be refinable, but not the other of the same name.
How to Create a New Target
To add the Kendra Integration target, follow these steps:
- Go to the Connectivity Hub Target page.
- Select New>Custom API Target.
- Select New>Custom API Target.
- The Load Target dialog appears.
- In the Target Information field, select Kendra Target from the drop-down menu. Scroll down if you do not see your target.
- Enter a Target name.
- The Target name is the name of the Kendra Index.
- The Index can be an existing Index in AWS or else the Target will create the Index upon first usage.
- Select the General Settings tab and configure the general settings. For more information on configuring these fields, see the target general settings reference.
- Select the Custom Settings tab.
Login: Enter an AWS Access Key.
- Password: Enter the AWS Access key secret
- Service/End Point Region: Enter a Kendra Service Endpoint Region. For more information, see the Amazon Kendra documentation.
Role ARN:
Optional (see screenshot above)
Enter a Role ARN (Amazon Resource Name) with either of the following:
Admin access
Permissions listed below:
- Kendra:ListDataSource
- Kendra:CreateDataSource
- Kendra:ListDataSourceSyncJobs
- Kendra:UpdateIndex
- Kendra:StartDataSourceSyncJobs
- Kendra:BatchDeleteDocument
- iam:PassRole
- Kendra:ListIndices
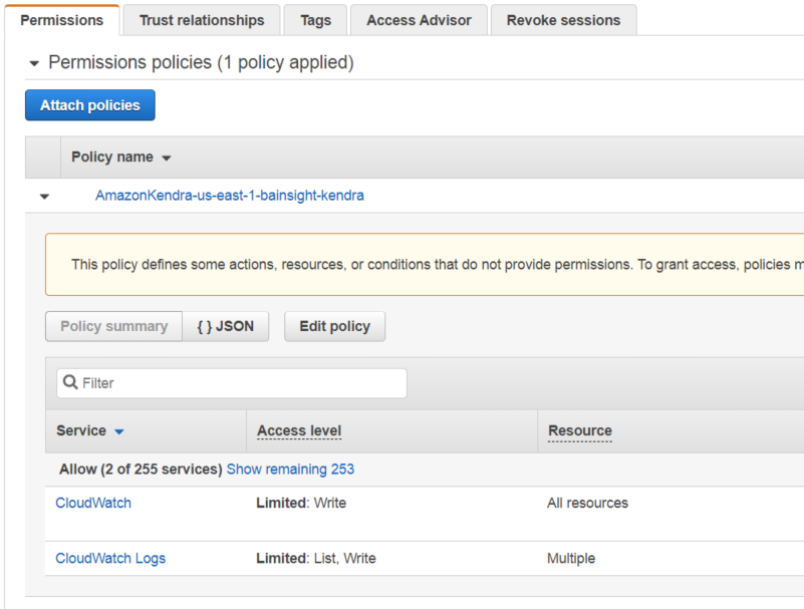
Amazon Kendra requires permissions to access your CloudWatch log.
Choose an existing IAM role with the correct permissions.
Info
Kendra SDK requires a role ARN (Amazon Resource Name) for CloudWatch: it requires permission to write logs to CloudWatch when it interacts with Amazon Kendra.
The role ARN is used to authenticate and authorize the SDK to access the CloudWatch service on your behalf
If you do not provide a role ARN for CloudWatch when using the Kendra Target, then your application cannot write logs to CloudWatch
This means no access to the detailed logs and metrics that can help you troubleshoot issues
Without CloudWatch logs, it may be more difficult to identify and diagnose errors that occur during the Kendra processes
If you do not have an existing Role that has List and Write access to CloudWatch, create a new role in the AWS IAM Console
See the screenshot below:
- In the Index Name field, provide a name for the index in Kendra.
- Click Save.
Configure Your Microsoft Search Target
The following topics describe how to create a Microsoft Search Target in Connectivity Hub. For more information about Targets, see What is a Target?
Prerequisites
See Microsoft Search Engine Prerequisites.
Target directory
Make sure to use this target with Azure or Microsoft search directory. For more information, see Target Directory Configuration.
Important notes for crawl job behaviors
-
Attempting to stop crawl jobs on content sources that are indexing content in MSSearch Targets before the initialization stage can lead to jobs remaining blocked in the stopping phase.* Try and wait for the crawl to begin before stopping a job.
-
*If you find yourself in this situation, please contact support to perform a quartz service restart and an IIS Reset.
-
-
Any manual modifications to your search schema are overwritten during a crawl job if the default values for the search schema from Connectivity Hub are changed, or the Connectivity Hub search schema is different to the search schema that exists in Microsoft Graph.
-
If the search schema in Connectivity Hub is different than the search schema from Microsoft Graph, any manual changes made to the Microsoft Graph search schema must be re-implemented after a complete crawl.
-
BA Insight does not recommend making manual changes to the Microsoft Graph search schema.
-
Limitations
Note the following limitations when configuring your Microsoft Search target:
-
When creating a content source that uses a Microsoft Search target, The Microsoft Search API does not allow you to remove the value for the Description field after it has been set. For more information, see Target and metadata specific settings to enhance Microsoft Copilot functionality.
Register the Azure Active Directory Application
- Login to Microsoft Azure with the tenant Admin credentials.
- Click Identity>Applications>App registrations.
- Create a New registration or select an existing registration. For more information, see Register an application in the Microsoft documentation
- From the Overview page of the application, record the following IDs:
- Application (client) ID
- Directory (tenant) ID
- Navigate to the Certificates & secrets page.
- Click the New client secret button to generate a new client secret. Record the client secret value
- Click API permissions under Manage in the left-side navigation.
- Click Add a Microsoft Graph permission.
- Select the Application permissions category.
- Add the following permissions
-
- ExternalConnection.ReadWrite.All
- ExternalItem.ReadWrite.All
- User.Read.All
- Group.Read.All
- For more information on adding permissions, see Application permission to Microsoft Graph in the Microsoft documentation.
- Grant admin consent by selecting "Grant admin consent for <tenant>."
Target Configuration
To add the Microsoft Search Target, follow these steps:
- Go to the Connectivity Hub Target page.
- Select New Target.
- The Load Target page appears. See below.
- Use the drop-down menu to select your Target.
- Select the Target Info tab.
- Title (required): Enter a name in the Title field.
- Select the General Settings tab and update the default settings as needed.
- Select the Custom Settings tab:
- Enter the Client ID recorded from the "Register the Azure Active Directory application" section.
- Enter the Client Secret recorded from the "Register the Azure Active Directory application" section.
- Enter the Tenant ID recorded from the "Register the Azure Active Directory application" section.
- Specify the Authority endpoint:
- Optional.
- Default: https://login.microsoftonline.com .
- For tenants in the Azure Government cloud this value must be changed to https://login.microsoftonline.us.
- Specify the Graph endpoint.
- Optional.
- Default: https://graph.microsoft.com
- For tenants in the Azure Government cloud this value must be changed to https://graph.microsoft.us.
- Specify the Schema Registration Timeout.
- Optional.
- See Microsoft graph search doc for guidance.
- Security tab:
- Specify TargetDirectoryAcl as Security model.
- In the connection associated to the MS Search content, on the Security:Directory tab, check Create security groups.
- Specify TargetDirectoryAcl as Security model.
How to Configure Metadata Properties for Graph Search
Currently, Microsoft Graph Search application is in beta.
-
The options for configuring metadata in MS Graph Search are in flux.
See the following Microsoft resources for guidance:
-
https://docs.microsoft.com/en-us/graph/api/resources/externalitem?view=graph-rest-beta:
-
https://docs.microsoft.com/en-us/graph/api/resources/property?view=graph-rest-beta
You must configure your content source metadata to satisfy Microsoft's requirements.
Connectivity Hub Metadata Management page for your content source displays a warning if you exceed the current known limitations.
Note: The MS Search does not allow "_" and "." characters in metadata property names.
The Target automatically trims these characters from the property names.
How to Search for Indexed Items
Set up a Custom Vertical and Display Template (Tenant Level)
Use the following instructions to set up a custom vertical and display template (tenant level) for displaying indexed ExternalItems.
-
See Microsoft documentation for more information about creating a custom search vertical.
Note: Site collection level search for ExternalItems is not currently available.
- Perform a full crawl on the configured MS target.
- Go to the modern Admin Center: https://admin.microsoft.com.
- Navigate to Settings → Microsoft Search → Connectors
- Verify that the Connector was created.
- Note: Connectors that index ExternalFiles do not appear in the list.
- Navigate to the Settings → Microsoft Search → 'Verticals' tab.
- Click 'Add a new vertical' and enter a name.
- Pick your Connector as the Content Source.
- Provide a filter query to narrow the scope of your vertical (optional).
- Click 'Add vertical' and be sure to 'Enable' it after you reorder verticals as needed.
- Navigate to Settings → Microsoft Search → Result Types
- Click 'Add a new result type'.
- Use the card designer to craft your display template.
- Copy the JSON file and complete display template creation.
Set Up a SharePoint Site
Use the following instructions to set up a SharePoint site and display ExternalFiles in the 'All" and 'Files' tab:
- Create a SharePoint site collection with a modern search page.
- Import a SharePoint module in PowerShell using the following command:
Install-Module -Name Microsoft.Online.SharePoint.PowerShell3 -
Set up SERP using the below PowerShell script:
$orgName = Read-Host -prompt 'Enter the name of your organization'

$userName = Read-Host -prompt 'Enter user name'

$userCreds = Get-Credential -UserName $userName -Message "Type the password"

Connect-SPOService -Url https://$orgName-admin.sharepoint.com -Credential $userCreds

$url = Read-Host -Prompt 'Please enter the SharePoint site URL'

$site = Get-SPOSite -Identity $url

Set-SPOSite $url -DenyAddAndCustomizePages 0

$pwd = Read-Host -AsSecureString 'type the password'

$context = New-Object Microsoft.SharePoint.Client.ClientContext($url)

$credential = New-Object Microsoft.SharePoint.Client.SharePointOnlineCredentials($userName, $pwd)

$context.Credentials = $credential

$web = $context.Web

$context.Load($web)

$web.AllProperties["AllVerticalContent"] = "Combined"

$web.Update()

$context.ExecuteQuery()

$web.AllProperties["FilesVerticalContent"] = "Combined"

$web.Update()

$context.ExecuteQuery()

Write-Host "Success" -ForegroundColor Cyan

Read-Host -Prompt 'Press enter to exit'
Configure Your Solr Cloud Target
The following topics describe how to create a Solr Cloud target in Connectivity Hub.
Tip: For more information about Targets, see What is a Target?
How to Create a New Target
To add the Solr Cloud integration target, follow these steps:
- Go to the Connectivity Hub Target page.
- Select New Target. The Load Target dialog appears.
- In the Target Information field, select Solr Cloud Target from the drop-down menu. Scroll down if you do not see your target.
- Enter a Target Title on the Target info tab.
-
Select the General Settings tab and configure the general settings. For more information on configuring these fields, see the target general settings reference.
- Click the "Custom Settings" tab.
Complete the Solr settings:- Login.
- If Solr is secured with basic security, provide the username here.
- (Leave empty if no security.)
- Password.
- If Solr is secured with basic security, provide the password here.
- (Leave empty if no security.)
- Solr Address.
- The base address to your Solr instance.
- Example: If your Solr admin can be reached at: http://solrsearch.company.local:8983/solr/#/ then your base address is:
http://solrsearch.company.local:8983/
- Custom Configuration Name (optional).
- Specify a Solr configuration name to be used.
- Connection Timeout
- Default value (if nothing is entered in this field) is 30 seconds.
- Use this setting to extend the length of time Connectivity Hub will wait for a response when attempting to connect to Solr.
- Login.
- Click Save.
How to Configure Your Solr Stand Alone Target
The following topics describe how to create a Solr target in Connectivity Hub. For more information about Targets, see What is a Target?
How to Create a New Target
To add the Solr Integration target, follow these steps:
- Go to the Connectivity Hub Target page.
- Select New Target. The Load Target dialog appears.
- In the Target Information field, Select Solr Stand Alone Target from the drop-down menu. Scroll down if you do not see your target.
- Enter a Target Title on the Target info tab.
-
Select the General Settings tab and configure the general settings. For more information on configuring these fields, see the target general settings reference.
- Click the Custom Settings tab. Complete the Solr settings:
- Login.
- If Solr is secured with basic security, provide the username here. (Leave empty if no security.)
- Password.
- If Solr is secured with basic security, provide the password here. (Leave empty if no security.)
- Solr Address. The base address to your Solr instance.
- For Example, if your Solr admin can be reached at:
- http://solrsearch.company.local:8983/solr/#/
- then your base address is:
http://solrsearch.company.local:8983/
- For Example, if your Solr admin can be reached at:
- Connection Timeout
- Default value (if nothing is entered in this field) is 30 seconds.
- Use this setting to extend the length of time Connectivity Hub waits for a response when attempting to connect to Solr.
- Login.
- Click Save.