After you define your data sets with the Input nodes, you use Operation Nodes to change, manipulate or combine your data to show you the required volume. This is done by using a number of nodes, which will help to give you the required answer.
The "And" Element
If you have two sets of data you may want to merge the criteria together, to see what volume of overlap you have between records. To do this, you combine Input Nodes together using an "And" node.
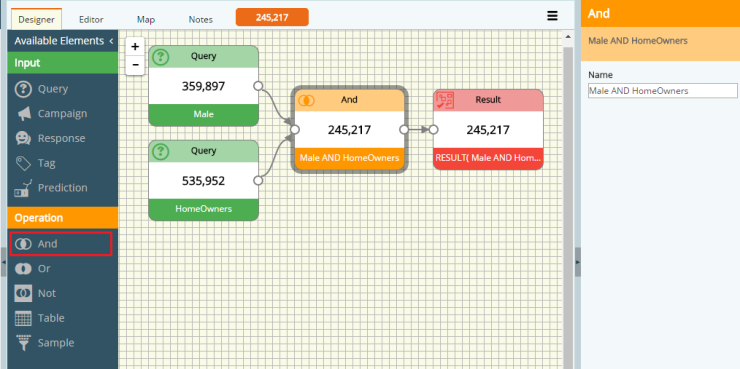
As with the above screenshot, there are two sets of data in the inputs. The first Input selects all Males in the database (Where [Gender] = "Male") - 359,897. The Second Input node selects all HomeOwners in the database (Where [HomeOwnership] = "Owner") - 535,952.
You can combine these two data sets together to calculate how many Male Homeowners are in the database. To do this, combine both together using the And node. This looks at both sets of data and selects the overlap where an individual fits into both sets of criteria, for example they have a gender of "Male" and a Home ownership of "Owner."
Overall, our final output is every individual in our database who is a male homeowner.
The "Or" Element
In contrast to the "And" node, you may want to select all of the individuals in two or more data-sets. For example, you can combine the two Input audiences, regardless of whether the individuals fit both sets of criteria or not.
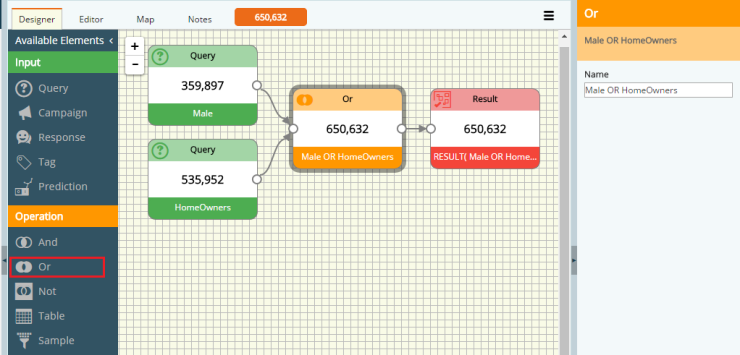
As with the above screenshot, there are two Input nodes for Males and Homeowners. Using the And node there were 359k Males, 535k Homeowners, in which the overlap between these was 245k.
Using the "Or" node selects both sets of data (All Males, and All Homeowners) and combines the two sets of data together. This increases the result volume, as it is a combined list of every male and every homeowner.
Overall, our Result node is now outputting everyone who is Male, regardless of their ownership status, but also all homeowners, regardless of their gender. This includes Female Homeowners and Males who are renting.
The "Not" Element
The "Not" Element is used as a method of selecting a group of data, then inverting the selection.
In the below screen shot, the query selects all Males in the database (359k). The "Not" node inverts this, to give us every individual who does not have a Gender record of "Male". This will give us all individuals who have a gender of Female, Undisclosed, Unknown and Nulls, and any combination of these.
This can be useful for excluding particular behaviors, for example if your query selected everyone who purchased a particular item, and combined this with a Not Element, you would be left with everyone who has not purchased that item.
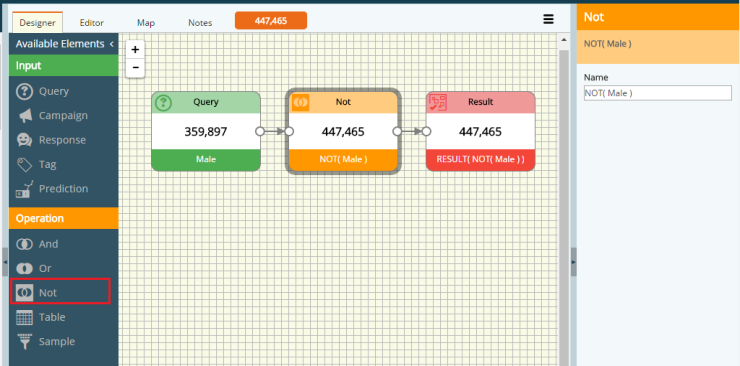
Table Element
The Table Element allows you to grab a selected group of data, and move it to a different table level, to view the linking records from another table.
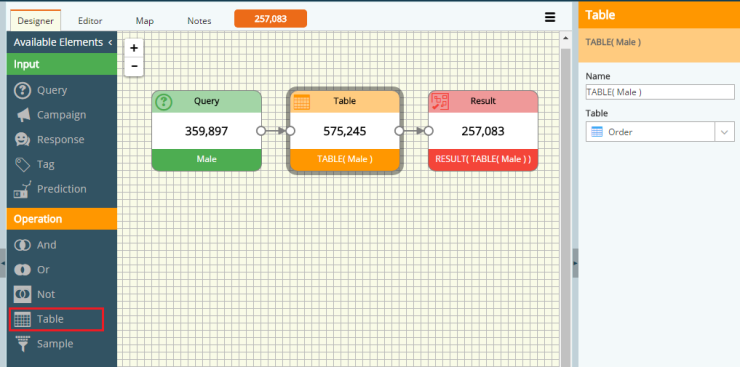
In the below example, there are 3 different volumes in our view, each reporting on a new volume and segment of information:
-
Query node - 359,897 is the selection of Males in the database
-
Table node - 575,245 changes the level of data being reviewed.
-
The original volume of 359k records (the count of our male individuals) has now increased to 575k. Looking at the config settings on the right, you can see that this node is getting the selected Male Individuals from the Query node, and rolling the data down to the [Order] Table. This means all the records being counted are now Orders, rather than Individuals. This number increased to 575k because it is the number of all of the Order records, which link to the original selection of 359k males. From this you can deduce that 575k Orders have been made by those Individuals
-
-
Result node - 258,083
-
The table node has 575k Orders, however the final Result node has decreased because the selection is calculating at the Individual table. This means that, no matter what level of data you are working with, the final step will always calculate to the Individuals based on the data set. This means of the 575k Orders, there are 257k Individuals which link to those orders.
-
Why doesn't this number go back up to the original 359k Male volume? This is because the query is running in 3 steps:
-
Show me all the Males in the Database
-
Show me all the Orders which link to those Males
-
Show me all the Individuals which link to those Orders
From this you can deduce that, of the 359K Males in the database, only 257k of those have made an order. The males who are no longer in the selection don't link to an Order record, therefore have never made an order.
-
-
Sample Element
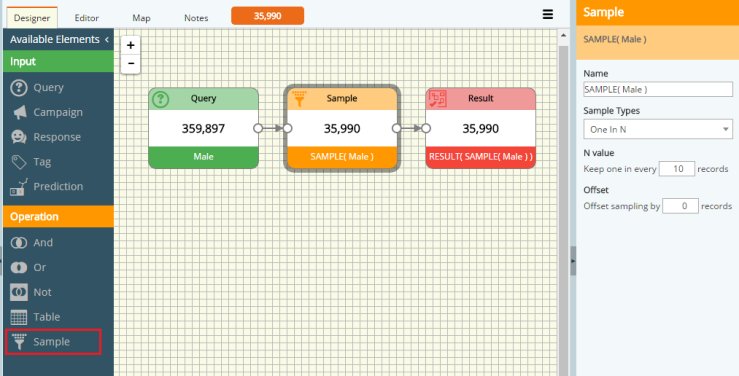
If you want a smaller sample or more refined set of data, use the sample element to reduce this number. The Sample Element comes with a number of sampling methods depending on the needs to reduce this number. This is useful if you want to sense check a smaller segment of data.
-
One in N - select a record, then skip the next N amount of records, before selecting another.
-
N value - determines how many records will be skipped before the next is selected.
-
Offset - decides how many records to skip before sampling, e.g. an offset of 100 would mean the first record chosen would be record 101.
-
-
Size Selection - select a defined volume of records as a block.
-
Size - defines how many records to select.
-
Offset - determines how many records to skip before sampling, e.g. if Offset is 1,000 and size is 1,000, it would select records 1,001-2,000.
-
-
Top N - select a defined volume of records as a block from a group of data that is sorted by a defined field, e.g. select the top 100 individuals based on their lifetime spend.
-
Field - field which will be used to sort and rank your data.
-
Sort order - select if you want the smallest values at the start of the data set (Ascending) or the largest values at the start of the data set (Descending).
-
Size - defines how many records to select.
-
Offset - determines how many records to skip before sampling.
-
-
One per table - used as a deduping method. Select only one record per parent table record, e.g. selects one individual per household.
-
Table - defines the Parent table you are using for your sample.
-
-
Random N - select a random number of records to keep.
-
Size - defines how many records you want in your sample.
-
-
Random Percentage - select a random percentage of records to keep.
-
Size - define what percentage of records to keep.
-
Example: The example below shows the initial selection of all males in the database (359k). The Sample uses a sample type of "One in N", where the N value is 10. This means it will pull 1 record out of every 10, leaving an even sample of 10% of the database.