Scheduling a campaign allows Engage to automate campaign runs, reducing the amount of time you need to dedicate to managing the system. The campaign will run to schedule for the duration of the campaign, pulling qualifying leads into an audience and moving them through the campaign.
Alternatively, you may only want to refresh a campaign. Scheduling a refresh allows you to process wait and response steps without pulling new leads in via an audience step.
Note: if a campaign shows as outside valid date range in the schedule window, the schedule screen will appear gray and indicate that the campaign is outside of the valid date range. When this occurs, go to the campaign properties pane and check that the campaign has a start date before current date, and an end date after current date.
Note: in addition to viewing campaign schedules individually on the campaign page, the Home page shows a list of all campaign schedules.
Running a scheduled campaign
-
Open or create a campaign to be scheduled and click the schedule tab.
-
Open the Edit dropdown and select Add Schedule Item.
-
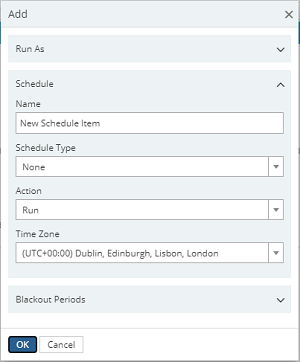
In the Add window, give the schedule a name and a Schedule Type (e.g. monthly).
-
Upon selecting a Schedule Type, additional schedule options will be provided to further define the schedule (e.g. which day of the month to run the campaign). There is also the option to add Blackout Periods if there are specific dates/times that the campaign should not be run.

-
Clicking on the Today button expands the option list. Custom dates can be entered by selecting Custom from the dropdown list and entering the dates on a calendar view.

Note: if using a custom date window, be sure to assign the dates by clicking OK before clicking Add otherwise the system will select the dates shown on the button, i.e. the system will blackout the whole of Next Month in the example above instead of 29-Apr to the 3-May unless OK is clicked first.
-
Once the schedule and any blackout periods have been defined, click OK to save the schedule. The schedules will appear beneath the campaign with the newest schedule first. A crescent moon indicates that a schedule includes blackout periods.
Note: every time a campaign runs, Engage will run your audience queries and push any individuals that match your campaign criteria through the campaign. If you only want to move individuals already in the campaign, e.g. to move them from a wait or response step, you can schedule a refresh instead.
Editing a scheduled campaign
-
Open the campaign to reschedule and select the schedule tab.
-
Open the edit dropdown and select edit trigger.
-
Within the edit window, make the required changes to the schedule and click OK.
Deleting a campaign schedule
-
Open the campaign to delete and select the schedule tab.
-
There are two methods for deleting a schedule:
-
If the trigger is live, i.e. has not expired, open the Edit dropdown and select Delete Trigger.
-
If the trigger has expired, open the Edit dropdown alongside the campaign and select Delete Schedule.
Note: using this method, all schedules under the campaign will be deleted.
-
Refreshing a campaign
The schedule tab provides you with the option to refresh a campaign and move individuals from wait and response steps.
-
Open the campaign and select the schedule tab.
-
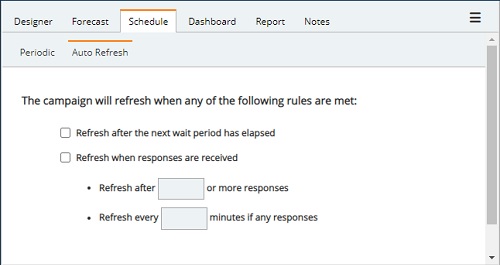
Select the auto-refresh menu to see your options.
-
Select the checkboxes as required.
-
Refresh after the next wait period has elapsed - Engage will check the campaign for leads with the shortest wait period. This includes the wait periods in response steps.
Example: if you have a campaign with a response step where:
-
The no response node has a wait period of 2 days,
-
And a conversion node with a period of 1 day,
Engage will refresh after 1 day if there are leads on the conversion node or 2 days if there are no leads on the conversion node but leads on the no response node.
Caution: if the wait time has elapsed, Engage will begin moving leads from the response step to the next step in your campaign, i.e. in the above example, the refresh after 2 days would simultaneously move leads off the no response step and check for responses. This could result in a conversion being exited from the response step as a no response before it has been re-categorized as a conversion.
Tip: To allow time for leads to move to the appropriate node based on their response condition, you can set a time-based refresh for before the no response node period elapses using the refresh after responses option.
-
-
Refresh after responses are received - allows you to schedule refreshes aimed at ensuring leads on a response step are assigned to the right node before their wait periods elapse and they exit the step. You can either schedule based on a number of responses received or a time duration.
Example: if you have a campaign where 10000 communications are sent, you could:
-
Set the campaign to refresh after every 1000 responses are received. Note, a communication could go from a no response to an open during the first 1000 refreshes and then convert during the second batch of 1000 responses and thus change node twice.
-
Set the campaign to refresh every 1430 minutes to move leads to their corresponding response nodes ahead of a 1 day wait period expiring, e.g. move conversions off a no response node before the no response wait period elapses and leads start passing through that node.
-
-
-
When you are satisfied with your refresh schedule (and batch sizes or time constraints where relevant), save your changes using the hamburger menu.