Upland BlueVenn's Omnichannel Marketing Hub, Engage, allows you to captivate and engage your customers on all channels, leveraging insights to craft journeys and marketing messages tailored to match their interests.
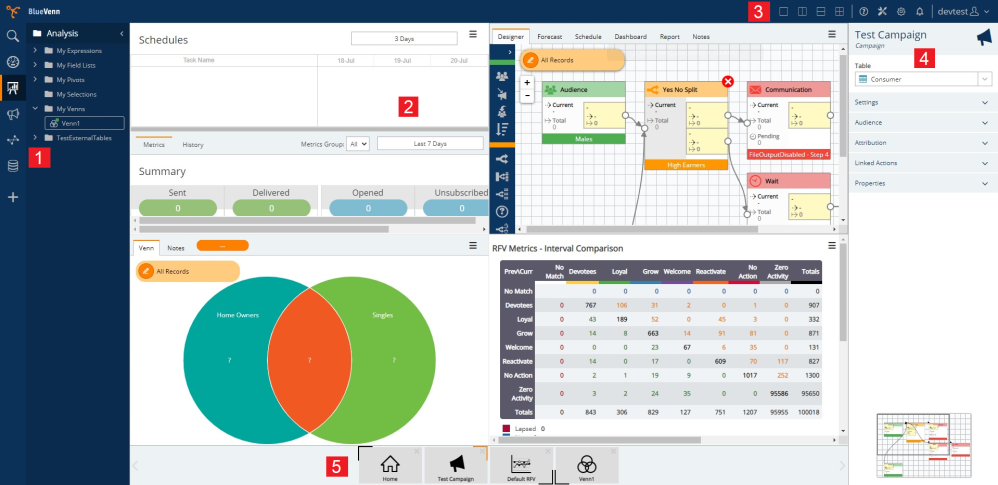
The application interface is divided into 5 main areas.
-
Navigation Pane - contains all your menu icons. Clicking each icon expands the associated menu.
-
Workspace - the area where elements are created and altered. You can set the workspace to be a single screen or split screen in the Title Bar.
-
Title Bar - contains screen options (single workspace, vertical split, horizontal split, or four-way split), an Admin Menu, and the Profile Menu.
-
Properties Pane - for some Engage elements (e.g. campaigns) an additional properties pane with element-specific settings is displayed to the right of the workspace.
-
Tab Bar - displays the currently open elements.
The Home Screen
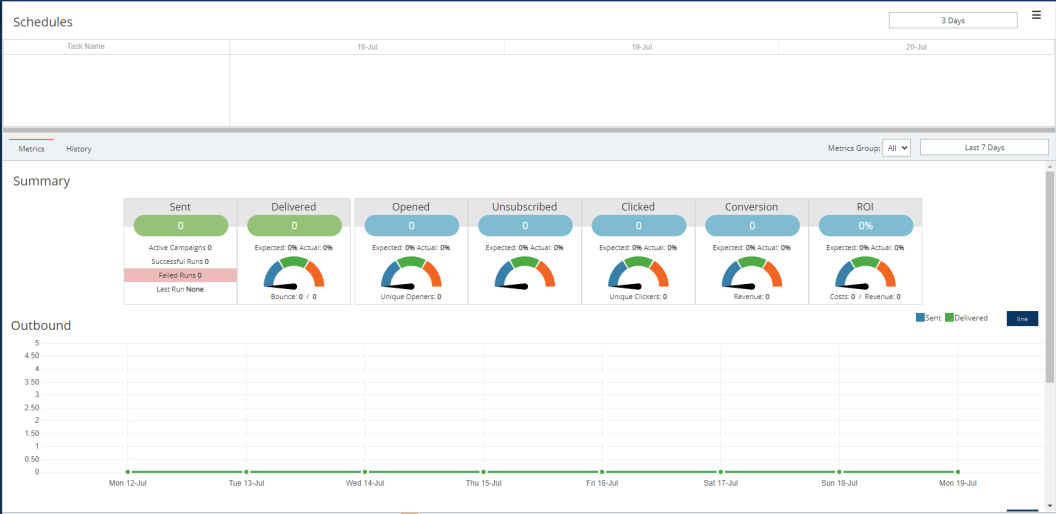
The Home screen appears by default upon first logging in. The Home screen shows various campaign activity measurements and results.
-
The top section shows the schedule for all currently scheduled Campaigns.
-
The center section shows summarized activity for the last 7 days, this can be adjusted to a time period of your choosing.
-
The bottom section shows volumes for outbound (green) and inbound (blue) counts for digital Campaigns delivered through Engage.
-
The outbound and inbound sections can be switched to display the data as a line or bar graph for the time period chosen.
Navigation Pane
The Navigation Pane contains all your menu icons. Clicking each icon expands the associated menu, granting access to elements created within that menu, e.g. clicking the Chart icon expands the Analysis menu to show folders and elements belonging to Analysis.
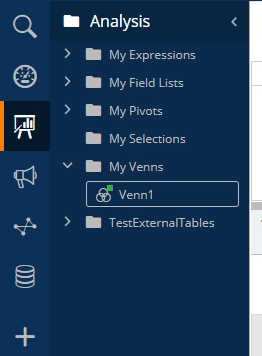
The icons, from top to bottom, are:
-
Search (magnifying icon) - lets you find any element in the source data plus any element created in Engage.
-
Reports (gauge icon) - shows saved reports and allows you to create new map, RFV, campaign performance, and task run reports or add a link to an external report.
-
Analysis (chart icon)- allows you to create new analysis objects such as field lists, expressions, tags, Venn diagrams, priority matrices, pivots, selections, and nurture scores or define external data imports.
-
Campaigns (megaphone icon) - gives access to new and existing campaigns, dynamic content tools for email creatives, voucher code sets, data seeds, and attribution sets.
-
Models (model icon) - allows you to produce predictive and cluster models using R capabilities to derive insight from.
-
Data (data stack icon) - this is the source database and will reflect the name of the database e.g. Retail. This menu option expands to show you all tables, fields, etc. in your source data.
-
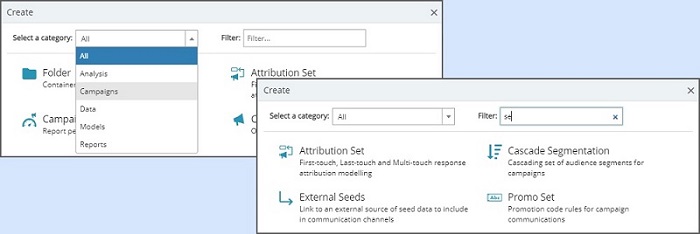
Create (plus icon) - opens the create window where you can select and create new elements. You can filter the displayed elements by category or by typing into the filter text box. If you have previously clicked on one of the menus, the create window will open with that category pre-selected, e.g. if you click the campaign menu then click the + icon, the create window will open with the campaign category selected.
Workspace
The Workspace view is a multi-purpose area that allows the user to create new analysis items, build campaigns and view reports.
It is possible to view one large window, or multiple, split-screen windows at once to benefit from easy access to data elements. The illustration below shows how the workspace looks when working on a campaign and RFV Metrics with a horizontal split-screen view.
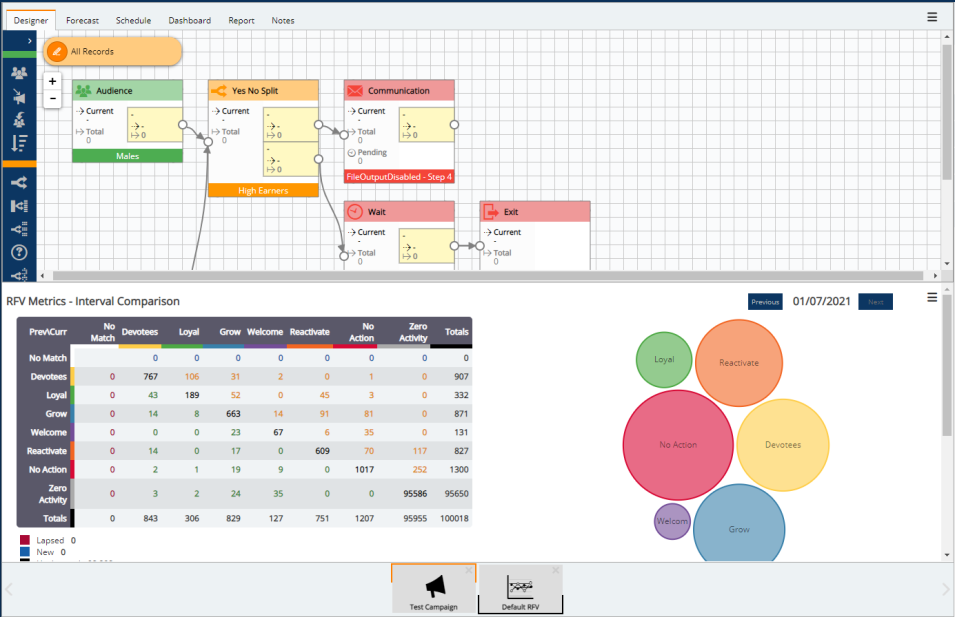
To change the split screen options, use the Screen Options in the Title Bar.
Title Bar
The Title Bar contains three option groups: the screen options, an Admin Menu, and the Profile Menu.
Screen Options
The screen options allow you to view the workspace as a full screen or split screen (vertical, horizontal and four-pane), making it possible to view and work with multiple analysis items and campaigns at once.
Admin Menu
The admin menu contains four icons/links:
-
Question mark - a link to the help center.
-
Tools - allows you to define additional elements such as Create a Category Set and Creating External Tables within Engage.
-
Settings - provides the software version information, session defaults, and campaign global configurations.
-
Notifications - opens a notifications pane so you can review recent automated activities conducted by Engage.
Profile Menu
The profile menu allows you to set profile details, change your password, and sign out of the application.
-
To change the language preference, select the desired language from the drop-down, then click Sign Out. On signing in again, the preference will be set.
-
To change the display name, over-type the current name for it to change immediately. Display names will be re-applied to objects created by the user within the properties of saved objects.
-
To add an Avatar or picture, click the current image (Engage displays initials by default) and browse for your image. The image will be scaled automatically to fit . jpg, png, bmp or gif files are supported.
-
To change your password, select the change password button. You will be prompted to enter your existing password, a new password, and confirm your new password. Select OK to save your changes or cancel to exit the change password menu.
Tab Bar
The Tab Bar is the area at the base of the Workspace that displays minimized windows.
In full screen, the currently active screen is indicated by an orange line above the tab.

In split screen, the active screen is indicated by an orange line around the portion of the window where the active screen is positioned. Inactive windows that are displayed will be shown with a black line indicating their position.

To rearrange the positioning of the screens in split-screen view:
-
Hover over a tab in the area you want that screen to display, e.g. the lower left quadrant of a tab. That area will go dark.

-
Click the highlighted area to reposition that screen in that location. The screen currently in that position will swap places with the screen selected e.g. clicking the highlighted area in the image above will put the Test Campaign screen in the lower left quadrant of the window and move the Venn1 screen to the upper right quadrant of the window.