Unify's data import template menu offers a number of predefined field types that can be used to quickly set the attributes of a column to fit common uses.
If you need to manually set the attributes for each column:
-
Click on the template name in the data import templates table.
-
Go to the columns tab and click on the column’s name in the list of column headings.
-
Use the multi-tabbed dialogue box to set each attribute.
-
The import tab allows you to define the mapping of the column.
-
The rules tab sets validation parameters for the column.
-
The conversions tab contains settings that alter the values imported from the file.
-
The whitelist values tab allows you to define a list of values for look up and transform.
-
The blacklist values tab allows you to define a list of values and associated error actions.
-
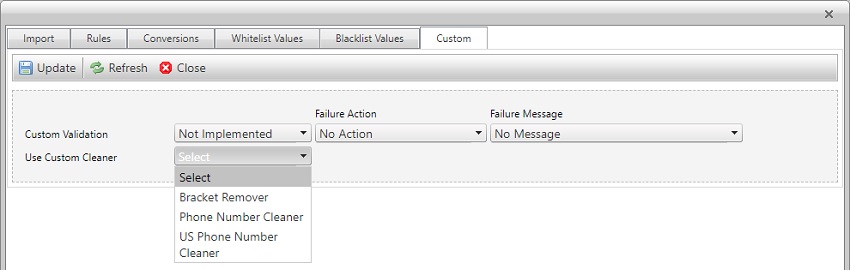
The custom tab provides optional content cleaners to remove brackets and format telephone numbers.
-
-
Use the “Update” button to save changes on each tab.
Import tab
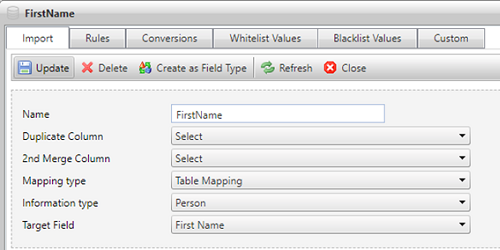
Use the Import tab to set the name used to identify the column in the file, define the destination of the data it contains, and create merged columns. The column’s name must match what will be supplied in the file header. If the file doesn’t supply headers, then the column name is cosmetic.
Duplicate and merge
When importing data you can duplicate and merge columns to reuse the data. To do this:
-
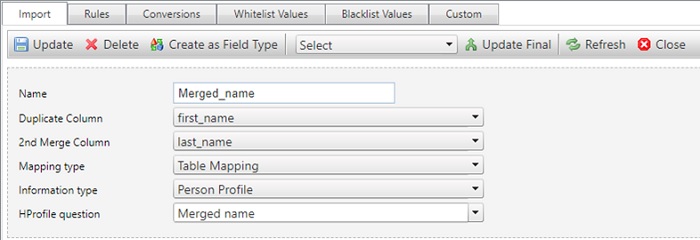
Select the column to contain the merged data. Typically, this would be a new column added to the template, e.g. add a column called Merged name then select it.
Note: you may need to adjust field settings, e.g. string length, in the rules tab before attempting a merge.
-
Select your first column of duplicated data from the duplicate column dropdown, e.g. to merge a first name column with a last name column, select your first name column as the duplicate column.
-
Select your second column of duplicated data from the second merge column dropdown, e.g. to merge a first name column with a last name column, select your last name column as the second merge column.
Note: The second column must be lower down the table than the first or the data will not merge. If necessary, reorder your columns before selecting merge columns.
-
Select a mapping type, e.g. table mapping.
-
Select an information type, e.g. person profile.
-
The information type selected determines which dropdowns appear next. Complete any additional selections, e.g. information type = person profile and profile question = merged name.
-
Click update to save your changes. A confirmation will appear to confirm the update was successful or advise of any errors.
-
Return to your columns table and click refresh to update your display. The columns will now show which are duplicate columns and which are being used to merge data.
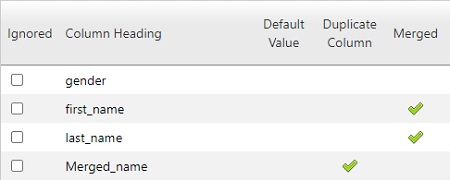
Merged columns are concatenated using a % symbol, e.g. first%last. You can use the replace characters tool in the conversions tab to change this.
Data destinations
You can define the database destination for your imported data using the following settings.
Mapping type
For most data, table mapping is used. Date-based data types use either created source datetime or amended source datetime.
-
Table mapping - refers to any data that is mapped into a specific table in the database.
-
Created source datetime - maps any data creation timestamps that are supplied in the file.
-
Amended source datetime - maps any data modification timestamps that are supplied in the file.
Information type
The information type indicates which kind of data is in the column and generates additional dropdowns depending on the tables and fields within your Unify configuration.
-
If the information type is set to Person, Person Address or Transaction, the target field dropdown will appear, allowing you to select a specific field into which to insert the data.
-
If the information type is either Person Address or Person Address Permission, the address type dropdown displays the available address types. This feature allows multiple addresses (of different types) to be supplied in the same file, if necessary, with permissions and data mapped separately.
-
For Person Contact Point or Person Contact Permission, the contact point type dropdown allows you to select the type of contact point the data applies to.
-
For Person Contact Permissions and Person Address Permissions, the permission type dropdown determines which of the various types of contact permission on the system are set from this data column.
-
For Contact Point Suppressions and Address Suppressions, the suppression type dropdown determines type of contact suppression, such as Goneaway or Bounced.
-
For person profile data, the profile question dropdown determines which profile header this column will affect for the target record.
-
If the header accepts freeform text answers, the column data will directly be read into the answer.
-
If it is a lookup that requires only one answer, the ETL will accept only strings that match answers in the lookup field. A whitelist should be set up to ensure the data are prepared appropriately.
-
If it is a lookup that accepts multiple answers, the Profile Answer box will appear, from which the user must choose
-
If one of the answers to the profile question can accept extra text, e.g. an "Other, please state” option on a questionnaire, the extra text field dropdown will appear, from which the user should select the column in which the extra text is stored. If this dropdown is left unspecified, the ETL process will assume that the extra text is stored in the column itself.
-
Rules tab
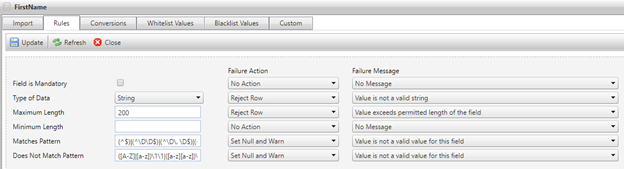
The rules tab sets validation parameters for the column and the action to take if the values supplied in the column fail to pass that validation. The failure action and message fields determine what action will be taken and what message will be generated when a rule is not met.
Note: Failure to specify an error action that will resolve errors, e.g. by setting the value to null or rejecting the row entirely, may result in a fatal error when the importer attempts to load the data.
Rules
-
Field is mandatory - sets a field as mandatory. This field must appear in every row of the input file. If a mandatory field is entirely absent from the file, the importer will always generate a fatal error.
-
Type of data - sets the expected data type of the incoming data, e.g. integer. It also affects which data rules incoming values are checked against.
-
Maximum length/value - defines the maximum length for string data types or maximum value for integer and decimal data types.
-
Minimum length/value - defines the minimum length for string data types or minimum value for integer and decimal data types.
-
Matches pattern - allows for the addition of a regular expression against which incoming strings are compared, triggering an error if the pattern is not matched, e.g. an expression to validate an email address is in the correct format and triggering an error if it is not.
-
Does not match pattern - allows for the addition of a regular expression against which incoming strings are compared, triggering an error if the pattern is matched.
Note: Dates cannot be constrained with Data Rules.
Actions
-
Abandon processing – halts the processing of the entire file and logs an error with the specified error message.
-
Reject row – rejects the entire current row from the import, moves on to the next row, and logs a warning with the specified error message.
-
Set null and warn – sets the offending value to null and logs a warning with the specified error message.
-
Set null and ignore – sets the offending value to null without logging an error message.
-
Truncate to max and warn (for maximum length rules) - truncates the string so that it no longer exceeds the specified length and logs a warning with the specified error message.
-
Truncate to max silently (for maximum length rules) – truncates the string so that it no longer exceeds the specified length without logging an error message.
Conversions tab
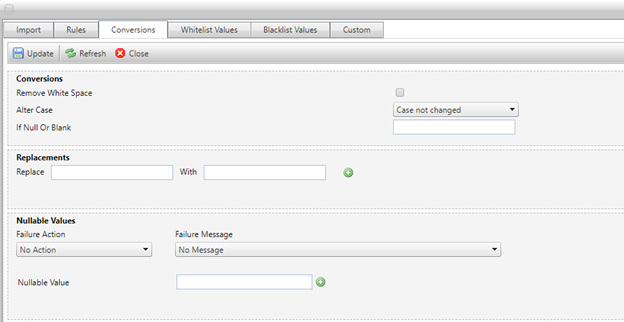
The conversions tab allows you to alter the values imported from the file.
-
To remove white space from your data, check the remove white space box. Any white space in the field’s value will be stripped out before it is loaded into the database, i.e. before whitelist or string replacements are processed
-
To set the case of string data, select one of the options from the dropdown box.
-
Case not changed – imports data as it is written.
-
Lower case – transforms the entire string to lowercase.
-
Upper case – transforms the entire string to uppercase.
-
Proper case – sets the first character of every word in the string to uppercase and all the rest to lowercase.
-
Surname proper case – applies proper case formatting then applies additional capitalization specific to surnames, e.g. MacDonald, van Dyke, etc.
Caution: The proper case and surname proper case functions will both cut short input strings that contain hyphens.
-
-
To define a value for null or blank fields, enter a value into the text box, e.g. set null values to be represented by $£& to make it easier to tag fields.
-
To swap out characters in a string, insert the values to be replaced and substituted into the text boxes. Each string can be up to 50 characters long.
Note: The ETL system will replace any occurrence of a target string in the column data (even as part of a larger string) with the replacement string.
Example: a rule to replace % with _ would turn a merged field from "first%last" to "first_last".
Example: a pair of replacement rules "replace [at] with @" and "replace [dot] with .” would turn the value “dave[at]mail[dot]com” into “dave@mail.com”.
String replacements are applied to string data after the data rules, whitelist and blacklist have been run.Care should be taken that the results of one replacement rule on a given column do not result in a new string containing the target string of another rule on that column.
-
Null Values are a list of strings that the importer should treat as null if encountered as data for this column. The selectable error action and message have no effect.
Whitelist values tab
A column’s whitelist is a set of pairs of string values. If the column’s value matches a string on the left, it is transformed into the corresponding value on the right. If the column’s value does not match any of the values on the left, the error action specified at the top is triggered.
This system merges two separate functions:
-
Whitelist – constrain incoming values to a known set, e.g. for a profile field. By providing pairs that have the same left and right value, and setting the error action to “Set Null and Warn”, the system will permit only those values on the list for the field; all others will be nulled.
-
Value transformation – By setting up a series of pairs of different values, the incoming data can be altered as desired. This is useful for turning inconsistent fields into a usable form, or for converting fields into a form usable by the database. In particular, it is necessary to set up this kind of conversion for multivalued profile lookups and permissions, which the backend can only successfully interpret as bit flags (1 and 0) and literal versions of the permission types (“yes”, “no”, “unknown”), respectively.
Note: unmapped values can be left unchanged if the error action is left on “No Action”.
Note: Whitelist value pairs can either be input one at a time manually, using the input fields for “Whitelist value” and “Resulting value”, or automatically in bulk from a two-column comma-separated variable file, using the upload box (and header and quote settings) above the whitelist in the UI.
Caution: If the profile is set to look up and no rules are set to reject values not found in the whitelist new values will be created for each value not found.
Blacklist values tab
A column’s blacklist is a set of string values and error actions, displayed in the “Blacklist” tab of a column specification. Incoming data are compared against all these values, and if any match then the error action is triggered. The entire blacklist also has a default error action and message that can be chosen instead of a specific one, allowing users to set the error behavior for large portions of the list at once.
Note: the entire blacklist can be entered manually or imported from a .csv file.
Custom tab
Custom cleaners are specific, complex rulesets that are used to process particular types of data.
Bracket remover
The bracket remover removes any part of the string enclosed in brackets [like this], parentheses (like this), or braces {like this}, e.g. the string “3, Petunia Rd. (behind no. 4)” would become “3, Petunia Rd.”
Phone number cleaner
The phone number cleaner applies a number of transformations to data specifically intended to improve the quality of incoming phone numbers. There are two options, one for US phone numbers and one for UK numbers, with some features that are common to both.
Common features
-
Turns multiple consecutive “+” characters into one.
-
Turns any occurrences of the letter “o” to the number “0”.
-
Strips out any optional zeroes.
-
Strips out anything that is neither a digit nor a “+”.
-
If the number starts with a “+” character, replaces it with “00”.
-
Strips out any other + characters.
-
Sets to null any values that:
-
Are empty.
-
Are entirely composed of zeroes.
-
Are too short or too long to be phone numbers.
-
UK specific features
-
If the number starts with a two-digit country code followed by a 0, e.g. +44077…, strips out that 0.
-
Removes the strings "44", "044" and "0044" from the front of the number.
-
Prepends a “0” to the number if it doesn’t already start with one.
-
Removes numbers that start with “07” and are shorter than 11 characters long.
US specific features
-
Removes the strings "1", "01" and "001" from the front of the number.
-
Removes a 0 from the number if there is one already.