Cimpl Spring Release Notes - April 2025
Enhancements/Improvements
Self-Service
-
When creating a service request, the Cost Center dialog box will now list the cost center(s) for the selected employee or department.
Inventory
Inventory Management
-
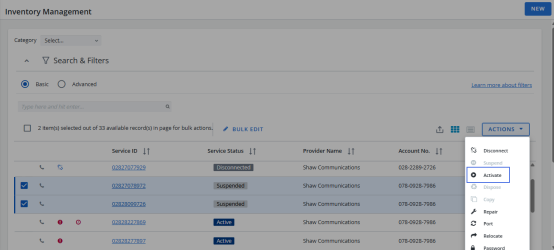
You are now able to activate multiple suspended services at once. Select the services that you want to activate and then select Activate from the Actions dropdown menu.
-
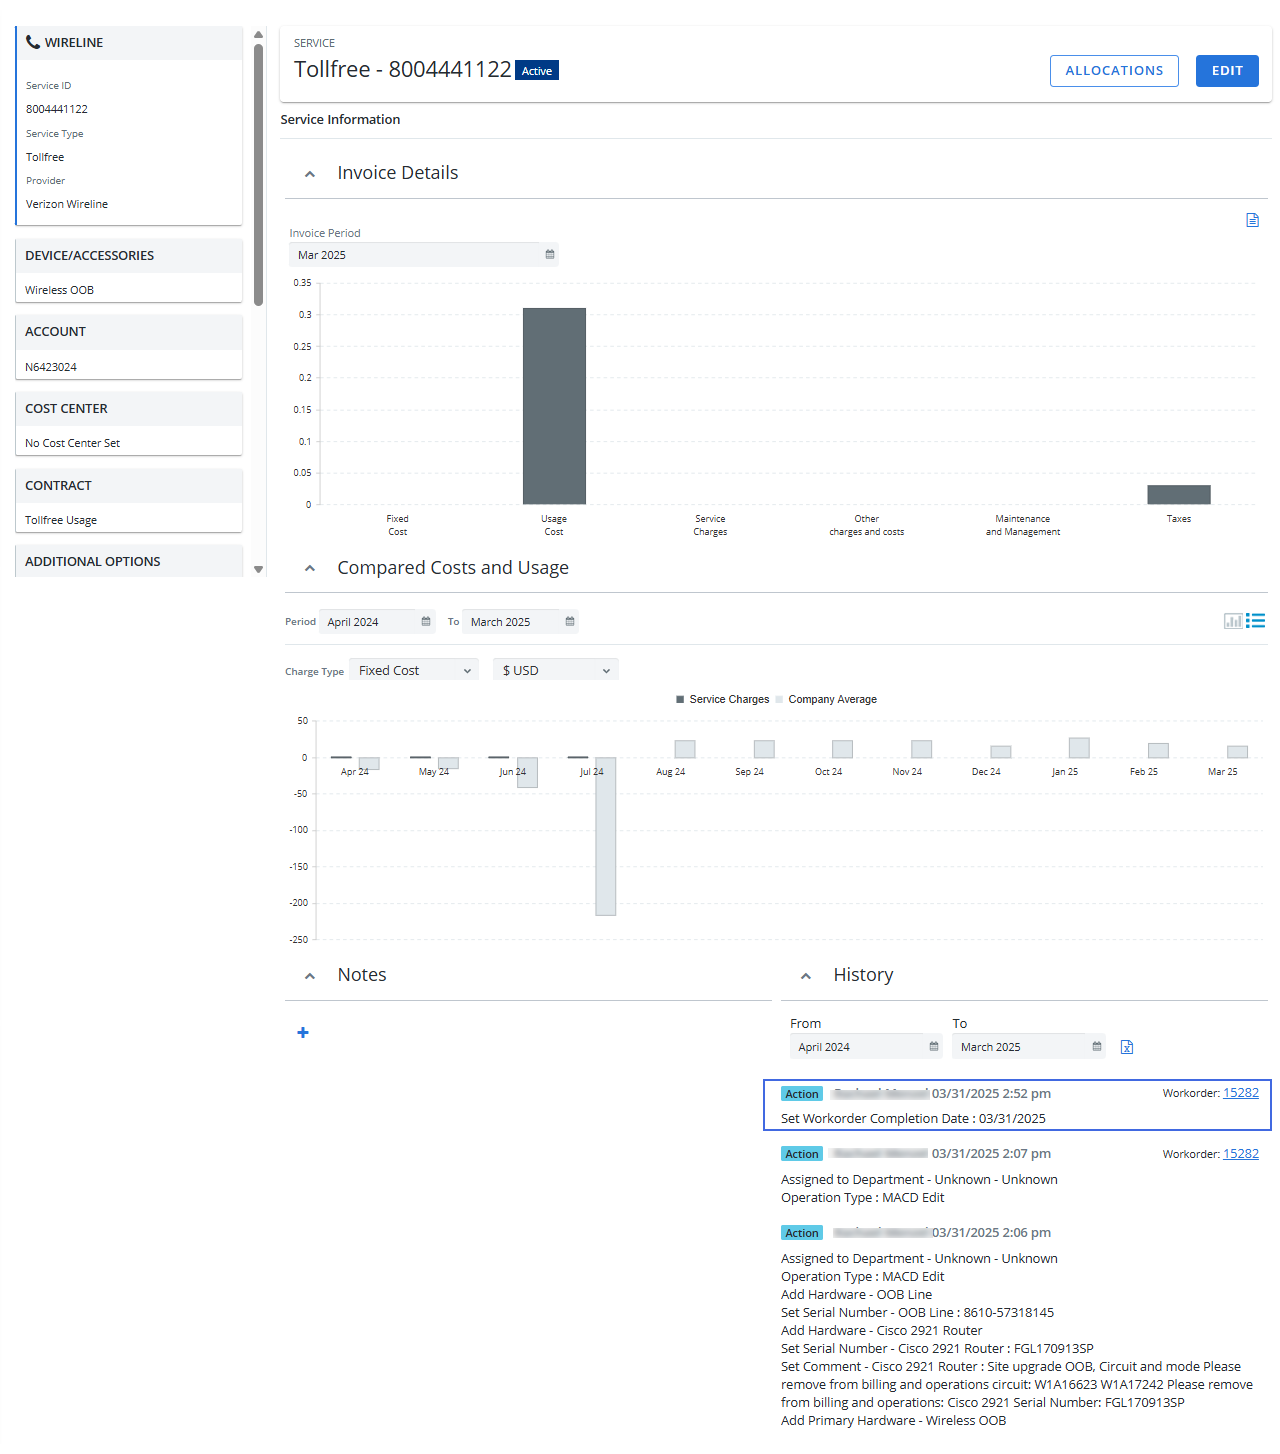
When a workorder is completed, the workorder completion date is now added to the service inventory history.


Workorders
-
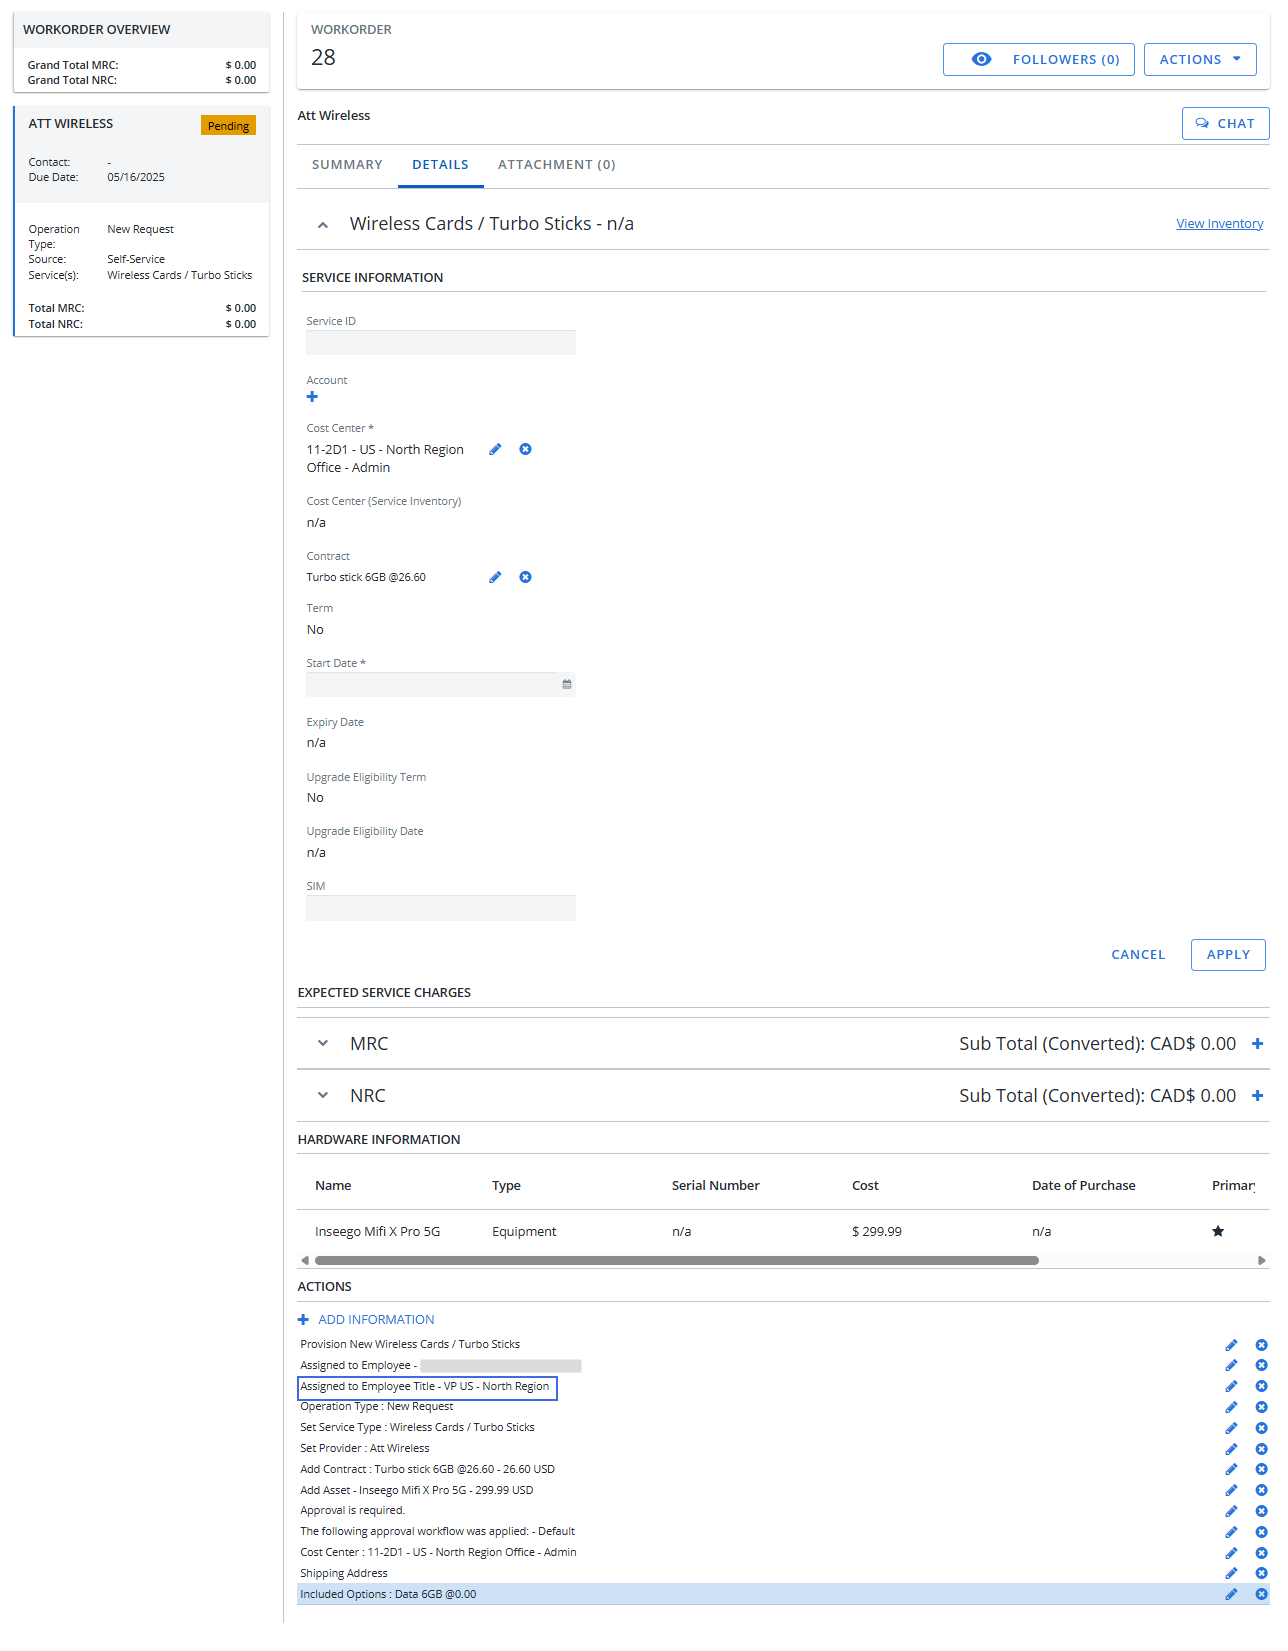
The Assigned To Employee Title field has been added to the workorder. The value is retrieved from the Title field on the Employee card.

-
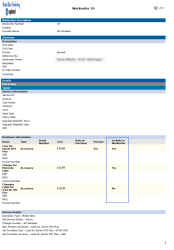
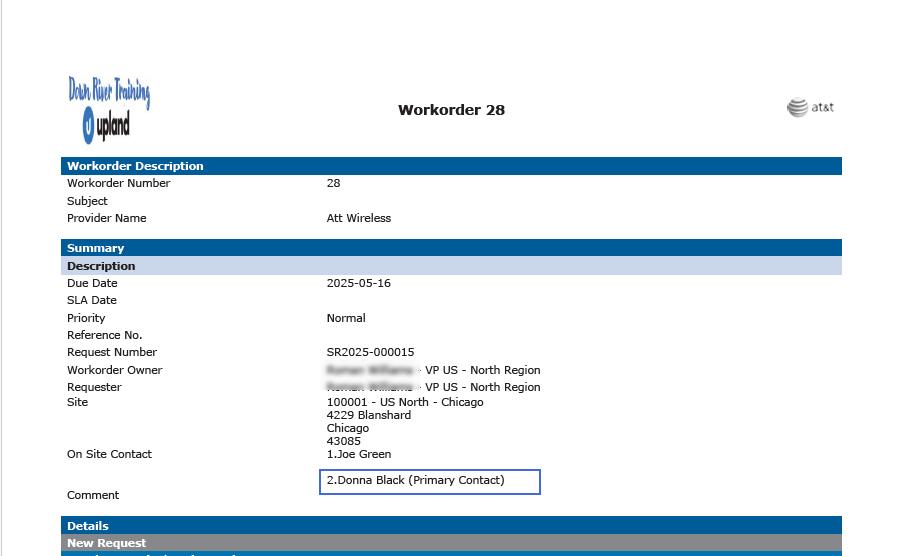
The workorder PDF will now show the assigned primary onsite contact as the Primary Contact.

-
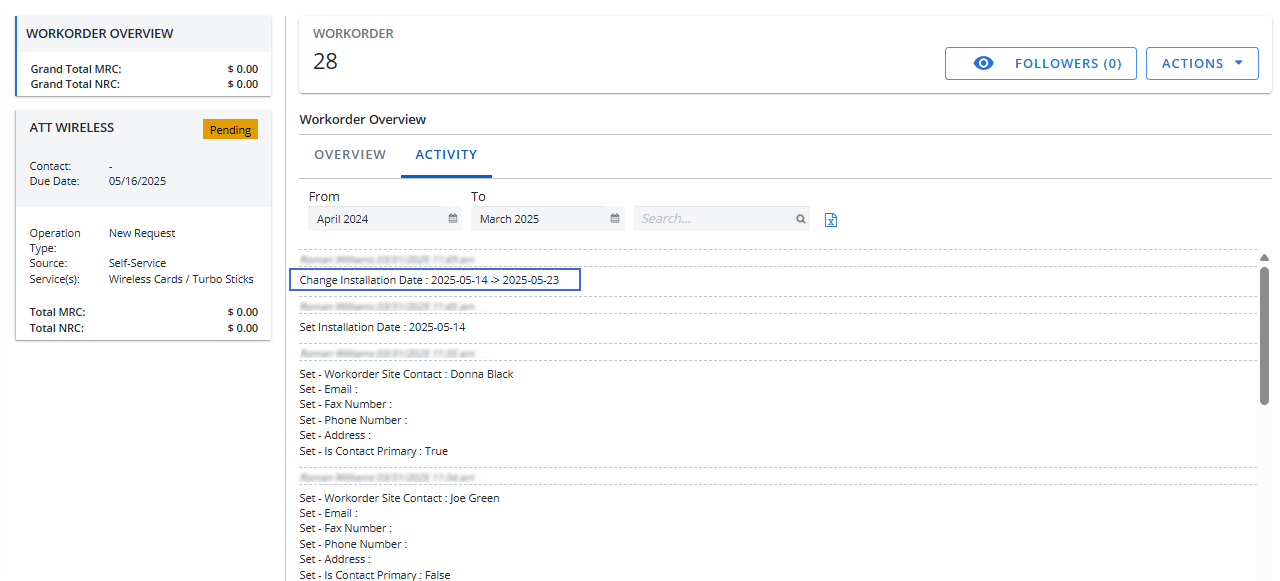
When the installation date on a workorder is updated, the change will now be recorded in the workorder's activity log on the Activity tab.

-
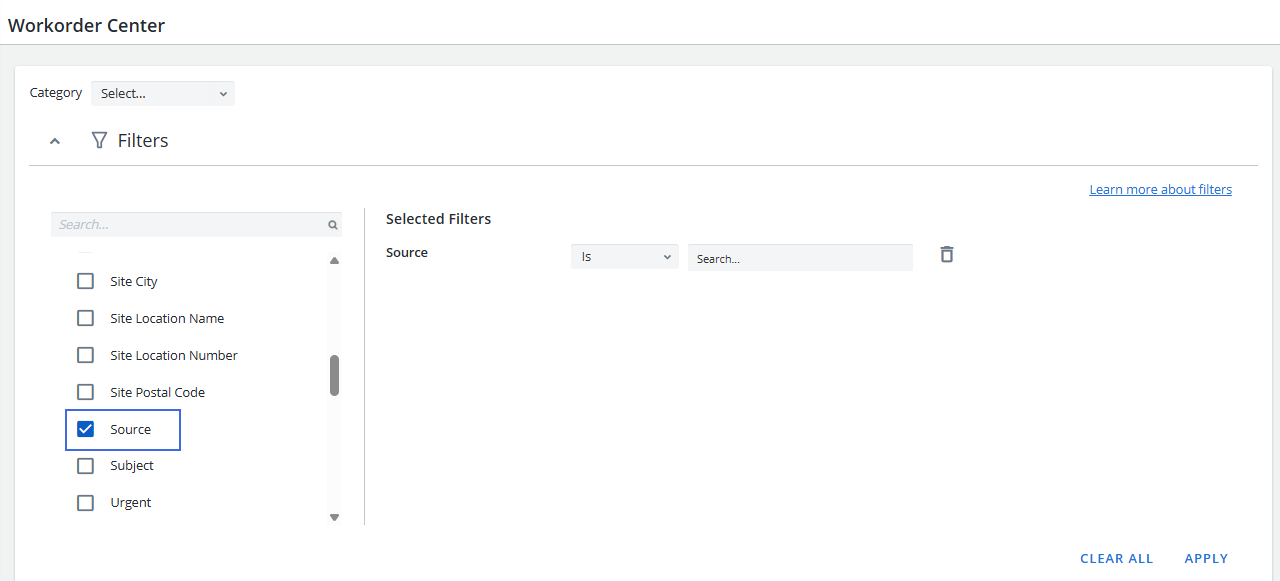
You can now filter to search for a workorder by Source. The values are API, MACD, Quote and Self-Service.

-
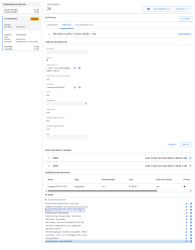
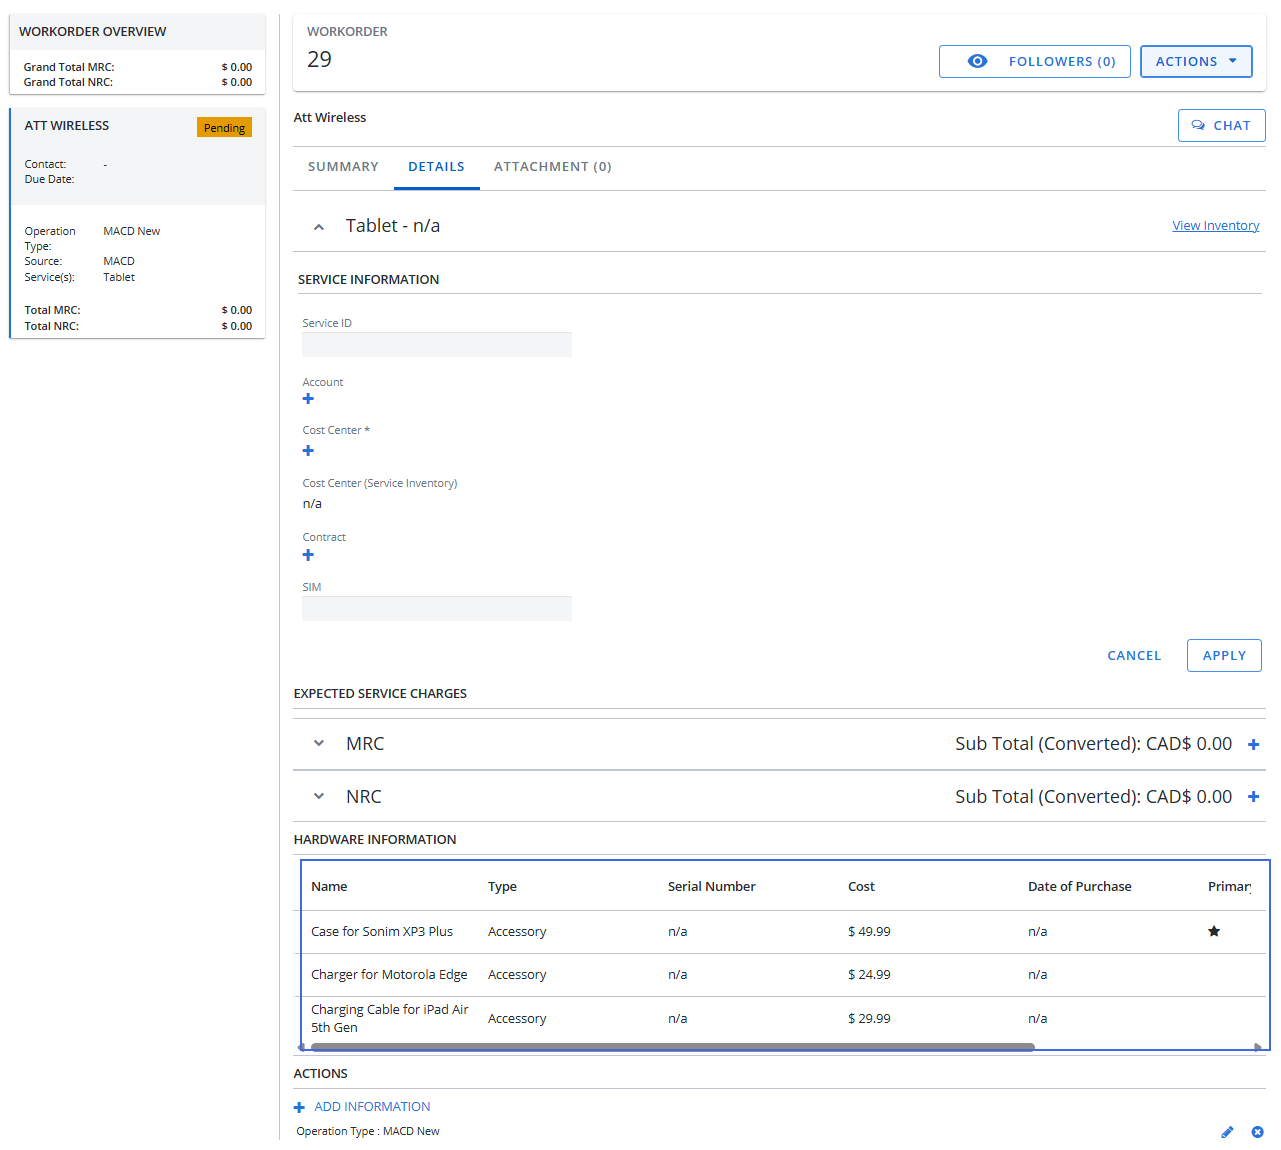
You are now able to select which hardware to include or exclude on the workorder sent to the provider.
-
Go to Inventory > Inventory Management.
-
Create a new workorder with hardware.
-
Click Execute. A workorder is created.
-
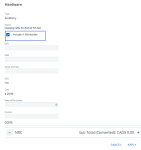
In the Hardware Information section, select the hardware that you want to exclude from the workorder sent to the provider.
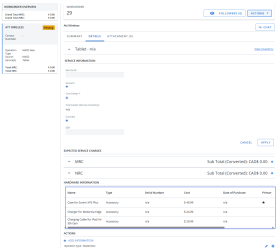
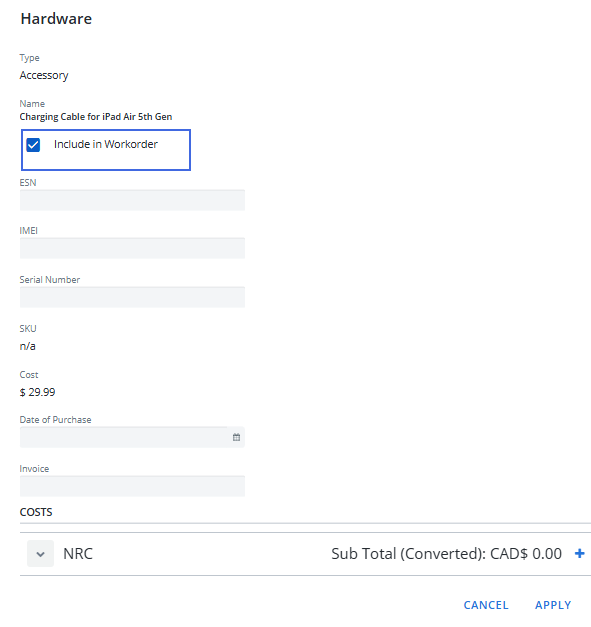
The Hardware dialog box displays.
-
Click the Include in Workorder checkbox to deselect the option.
-
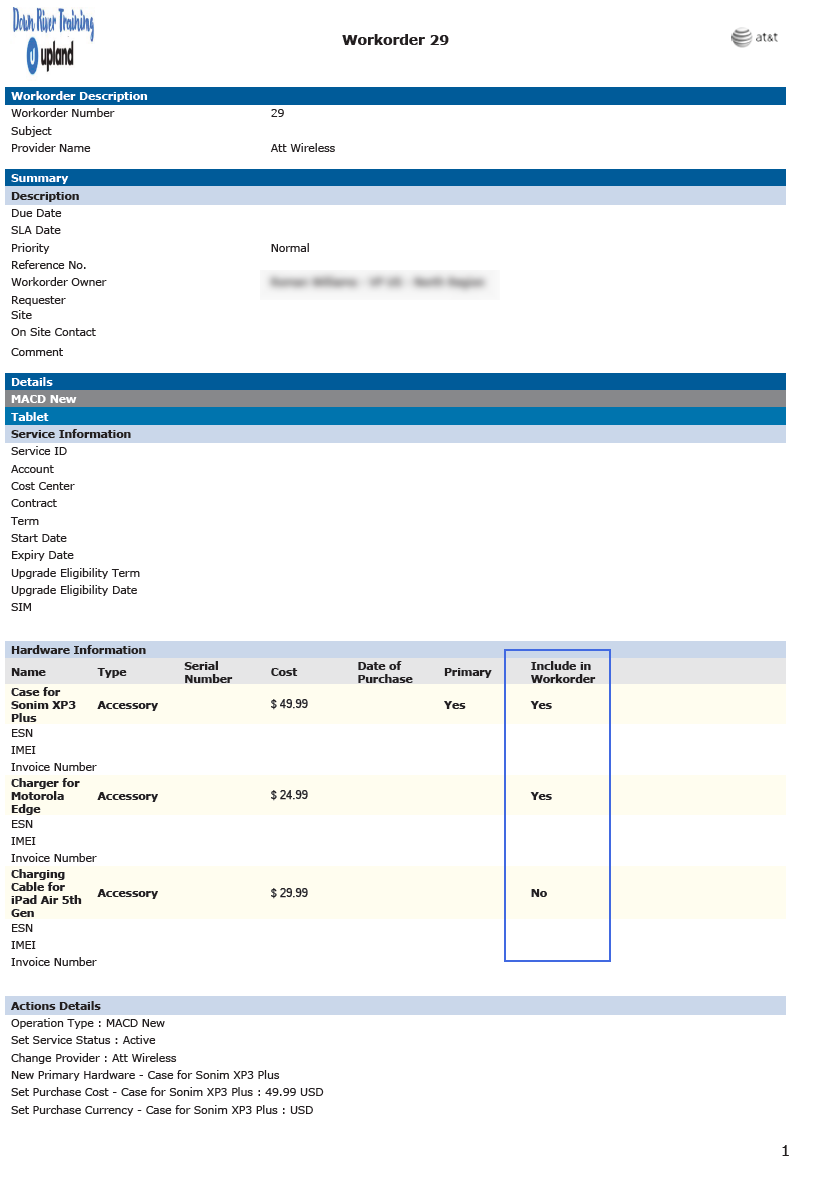
Click Apply. The Include in Workorder column displays No for any hardware that has been excluded.

When the workorder is exported to a PDF, the new Include in Workorder column has been added to the Hardware Information section.
-

Billing Center
Payment Readiness
-
You can now filter to search for an account by provider name. Select your filter options and then click Apply.


-
You can now add comments to multiple selected invoices. Select multiple invoices and click Add Comments from the Bulk Action(s) dropdown menu.
-
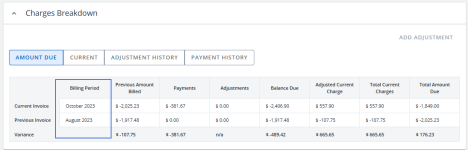
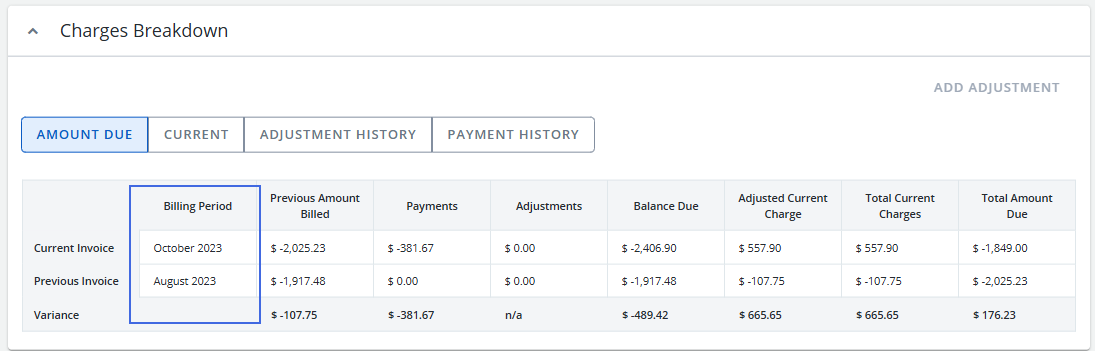
Invoices are now validated on the current loaded invoice, not the current month. Also, we’ve added a Billing Period column to the Charges Breakdown card so you can easily see which months are being validated.
Account Payable/Chargeback Posting
-
The Account Payable module has been renamed to Chargeback Posting.
AP Posting
Invoice Adjustment (Account Level)
We're excited to announce that you can now add adjustments directly to new invoices at the account level. This enhancement streamlines your invoicing process by providing greater flexibility and control over invoice modifications. Now, you can make necessary adjustments before finalizing any new invoices, improving accuracy and simplifying your workflow. The following is an overview of the implementation, workflow and new functionality to support the new feature:
-
Implementation
-
Turn on the Enable Invoice Adjustment Feature permission:
-
Go to Configuration > System Access and open the Administrator User Profile.
-
Click the Details tab and click the Enable Invoice Adjustment Feature checkbox.
-
Go to Configuration > Billing Center Configuration.
-
On the Payment Readiness tab, click the Enable Invoice Adjustment Feature checkbox on the Payment Readiness Configuration card.
-
-
-
Workflow
-
To add an adjustment:
-
Go to Billing Center > Payment Readiness and open an invoice with a New readiness status.
-
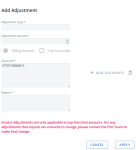
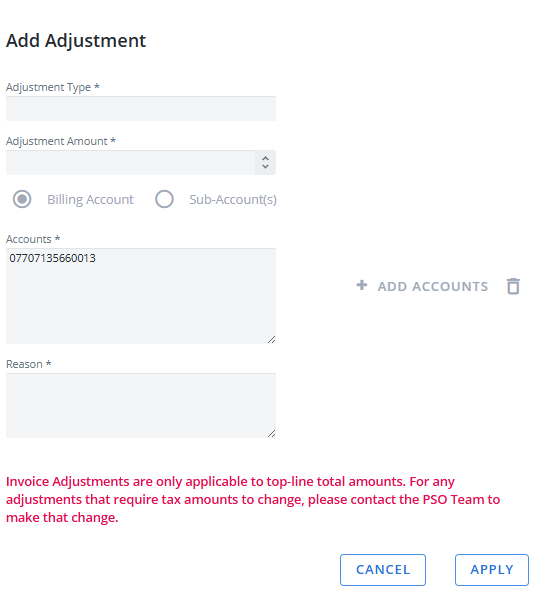
Click the Add Adjustment button on the Charge Breakdown card.

The Add Adjustment dialog box displays.
-
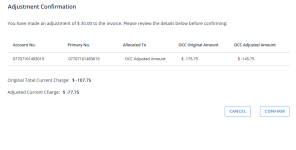
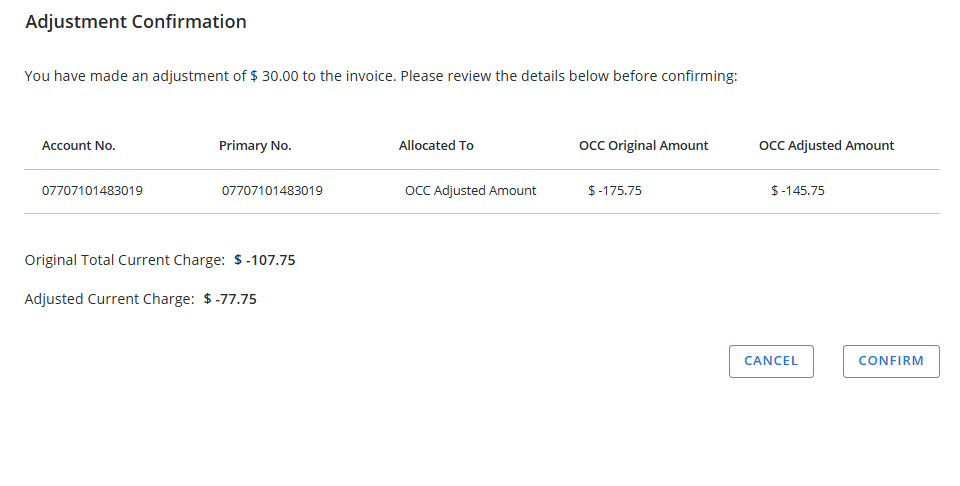
Complete the required fields and then click Apply. A confirmation dialog box displays.
Note: All adjustments will be assigned to a primary number, which matches the account number. If there have been previous adjustments, the 999999 number will not change.
-
Click Confirm.
-
-
-
New adjustment functionality in Payment Readiness:
-
You can filter by Adjusted, yes or no.
-
You can filter by Readiness Status is Adjusted Amount Confirmed, yes or no.
-
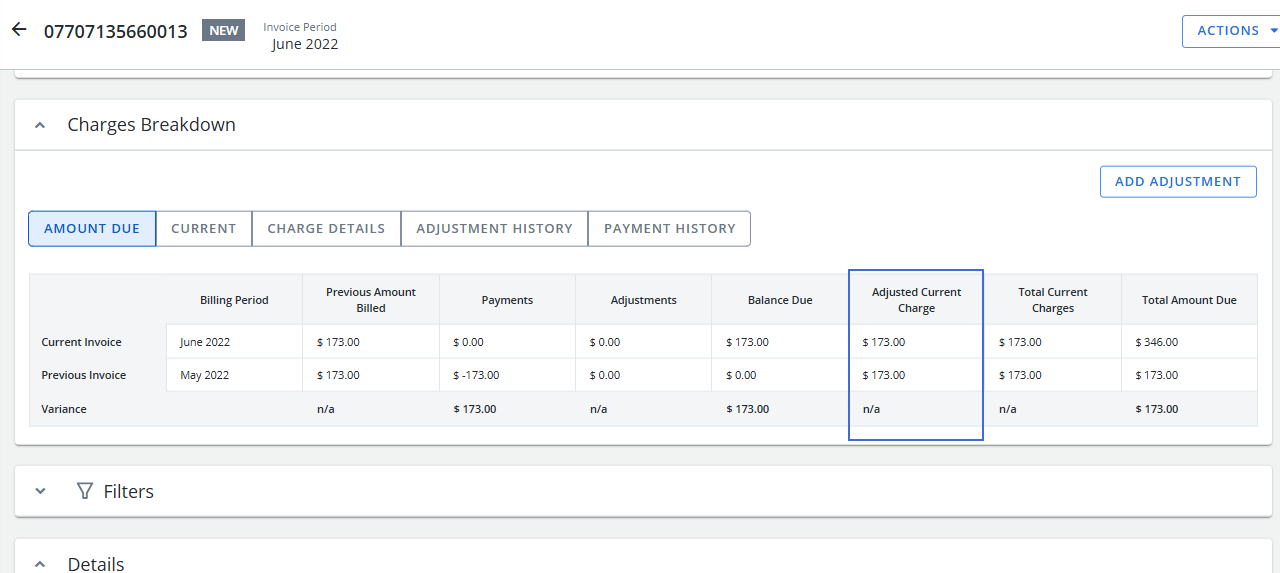
The Confirmed Amount column has been added.
-
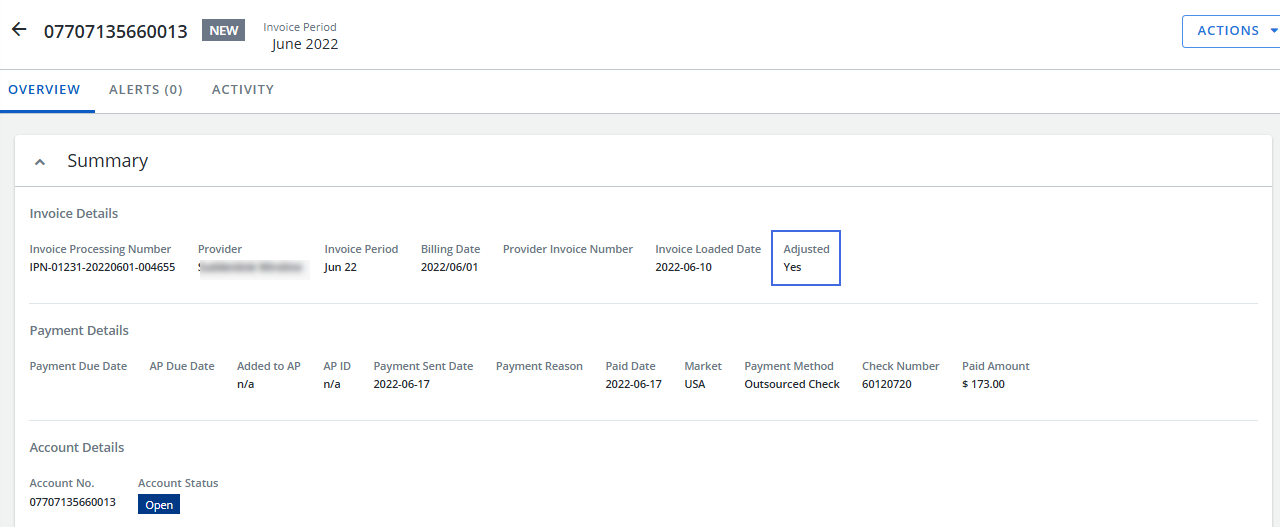
The Adjusted flag has been added to the Summary card.

-
The Adjusted Current Charge column has been added to the Charge Breakdown card.

-
The new Adjustment History tab on the Charge Breakdown card allows you to edit or delete an adjustment.
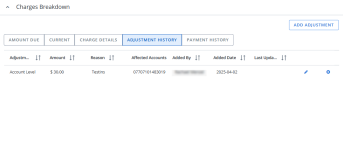
-
Adjustment activities are recorded in the history on the Activity tab.
-
The Total Adjusted Other Charges and Credits and Adjusted Total Charge columns have been added to the Services card.
-
When you confirm the invoice, the Adjusted Current Charge option is selected by default. You cannot confirm the full amount.
-


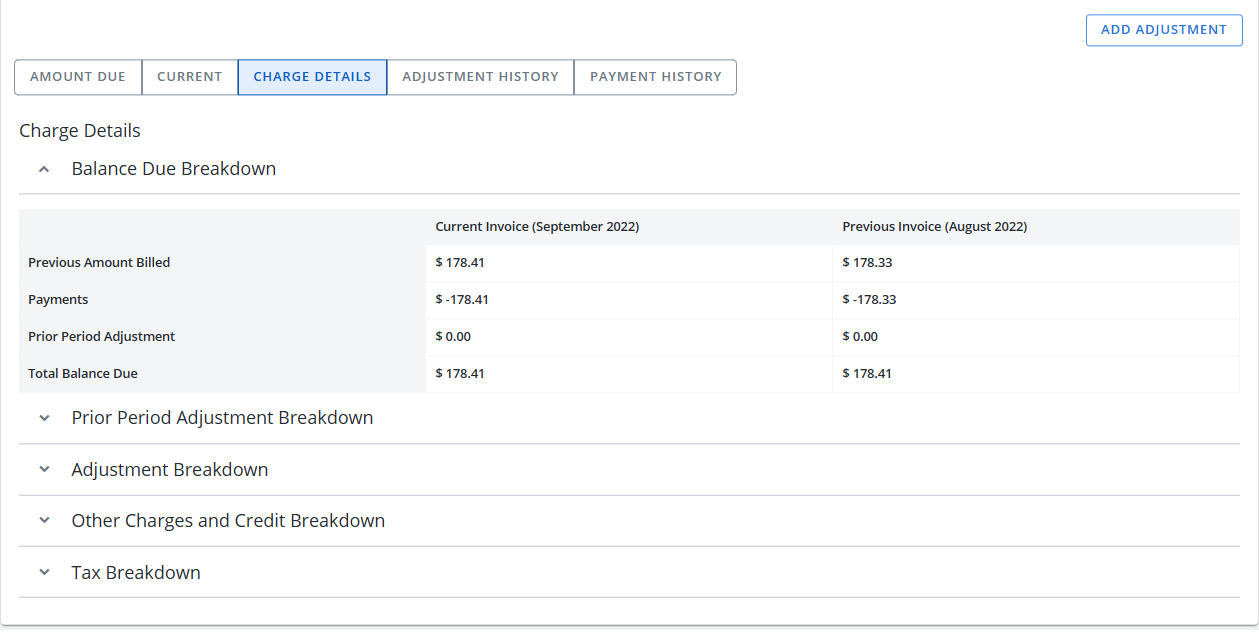
Expanded Invoice Visibility
The load indexing process has been updated to capture and display all detailed charges and service level line items from the provider file in Cimpl. Providers completed for all clients as of April 11:
-
AT&T Wireline
-
Verizon Wireline
-
Rogers Business Solutions
-
BT Americas
-
Implementation
-
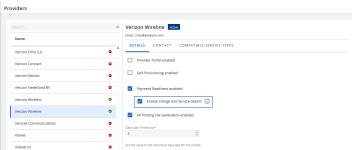
Go to Configuration > Providers and select a provider.
-
On the Details tab, click the Enable Charge and Service Details checkbox.
-
Click Apply.
-

-
Workflow
-
Open an invoice.
-
Click the Charge Details tab on the Charge Breakdown card to view a breakdown for all of the summarized charges.

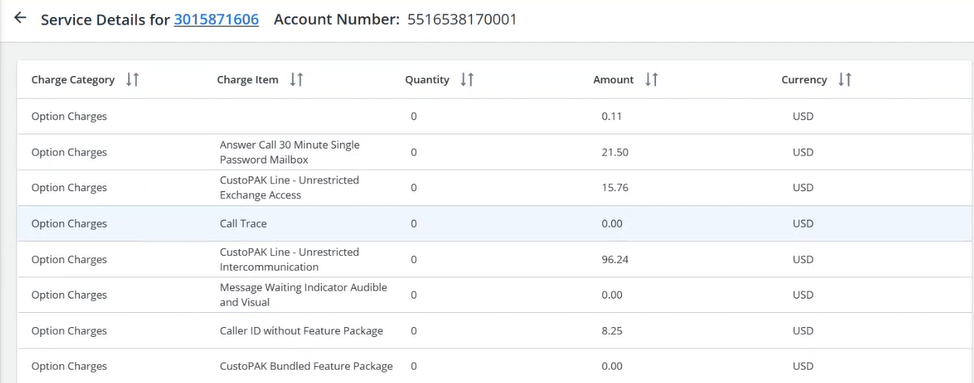
To view line items at the service level by category:
-
Click an account on the Details card.
-
Click on a service on the Services card.

-
-
Reports
-
The Total Adjusted Other Charges and Credits and Adjusted Total Charge fields have been added to the Invoice Base Report.
-
The Include Account in AP filter has been added to the following financial reports:
-
Duplicated Charges Report
-
Zero Usage Base Report
-
Wireline Mapping Charges
-
User Contact Report
-
Usage Summary Report.
-
Average Three Months
-
Requests
-
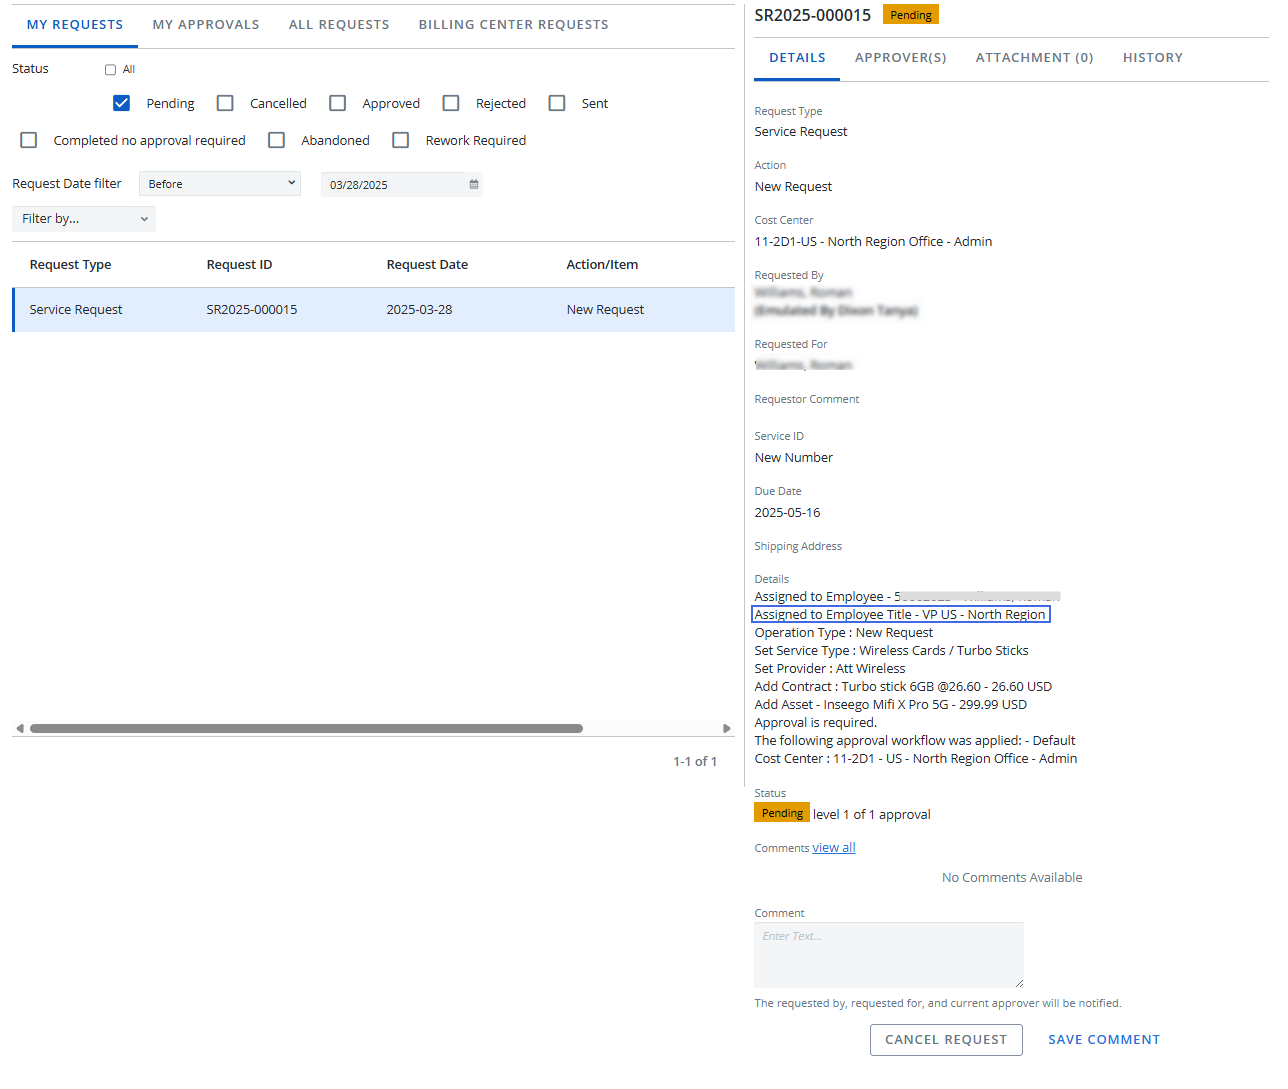
The Assigned To Employee Title field has been added to the Request Details tab. The value is retrieved from the Title field on the Employee card.

-
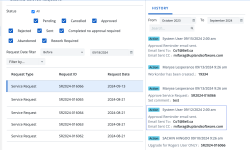
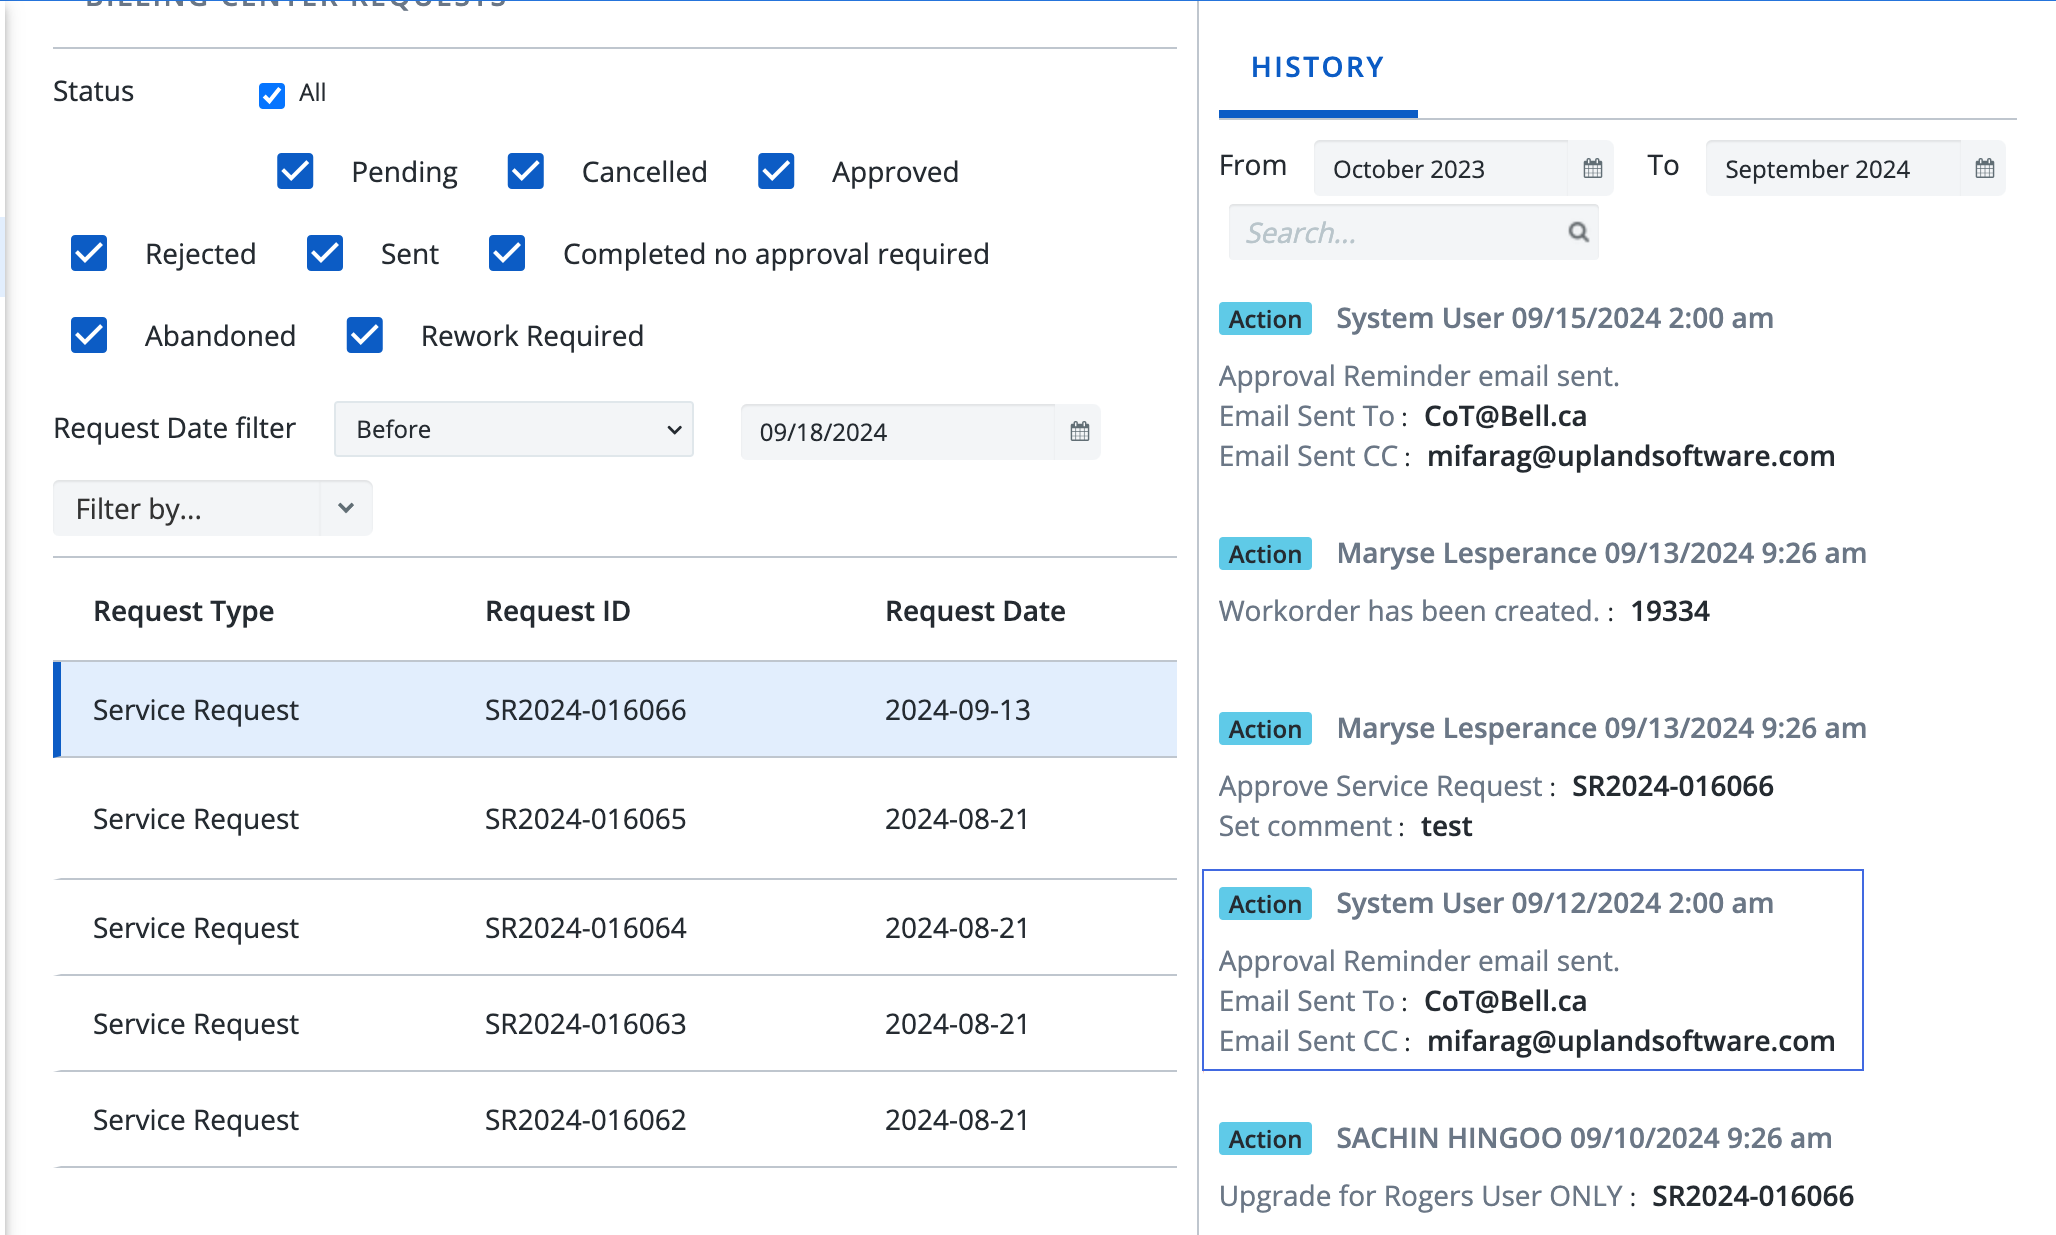
Approval reminder emails are now logged on the History tab.
Scheduler
Reports Scheduler
-
Report Scheduler history can now be exported to Excel.
-
Go to Scheduler > Reports Scheduler and open a scheduled report.
-
Click the History tab.
-
Click
 .
.
-
Configuration
-
The Export
button has been added for the following modules:-
History tab
-
Addresses
-
Executive Analytics Report
-
Employees
-
Catalogue Management
-
Workorder Configuration
-
- Activity tab
- Options
Contract Management
Accounts
Currency
-
Addresses
-
When exporting an address, the exported file name is as follows:
-
Location Number field is populated:
Address_<%Location Number%>_History.xlsx -
Location Number field is empty:
Address_<%Address Line 1%>_History.xlsx
-
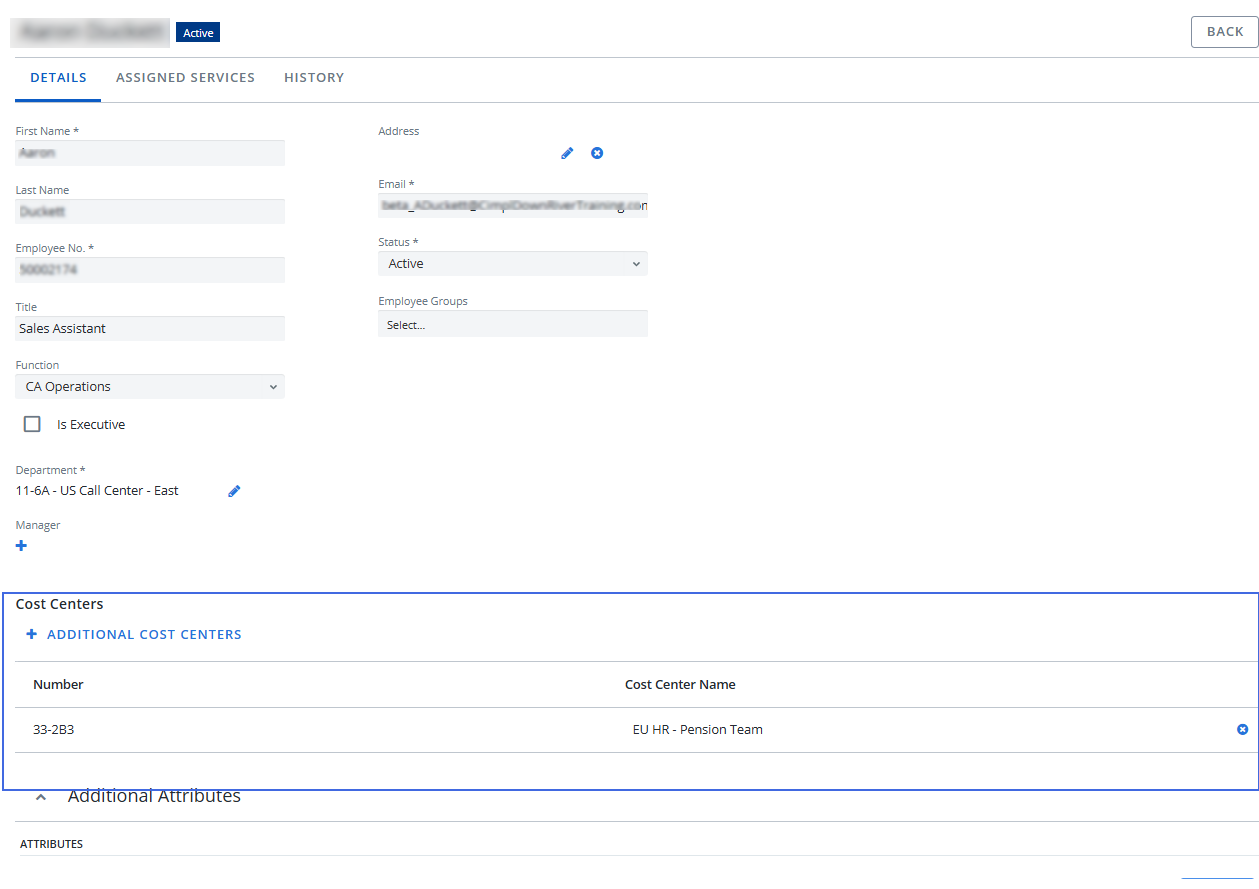
Employees
-
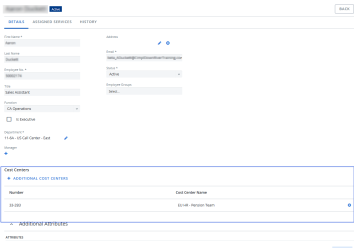
You can now add and remove cost centers for an employee.
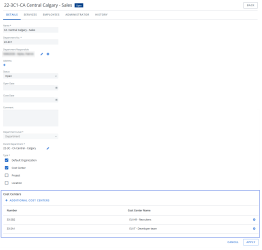
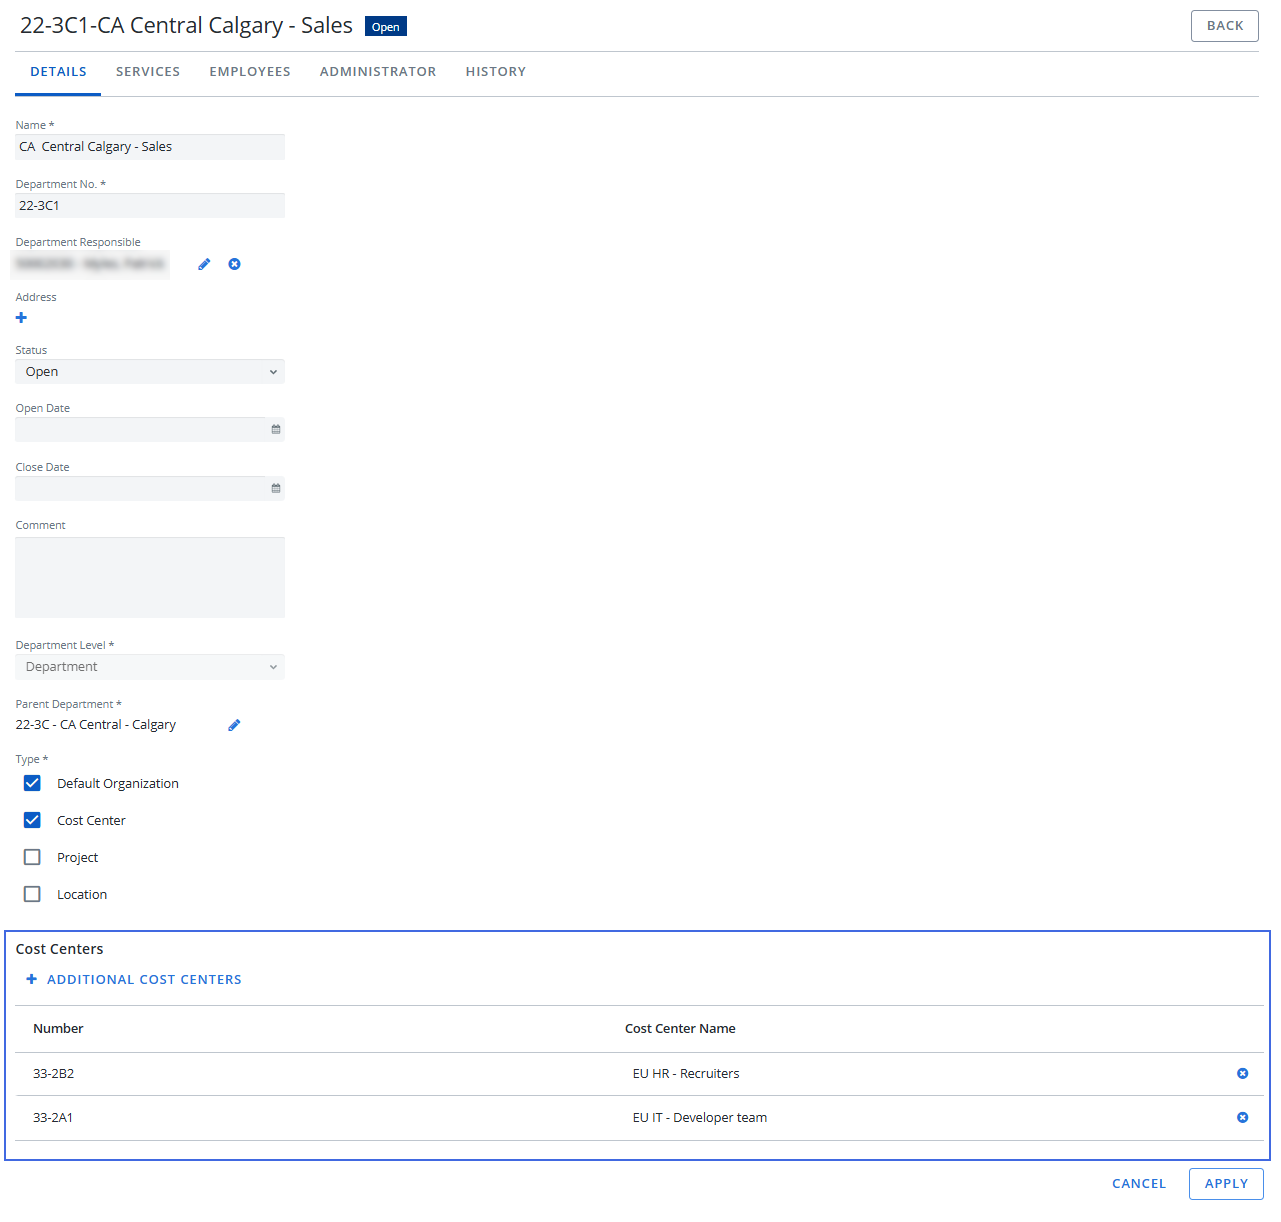
Departments
-
You can now add and remove cost centers for a department.
Providers
-
The Export
button has been added to the Contacts tab to allow you to export the provider's contacts list.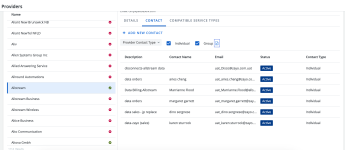

Request Configuration
-
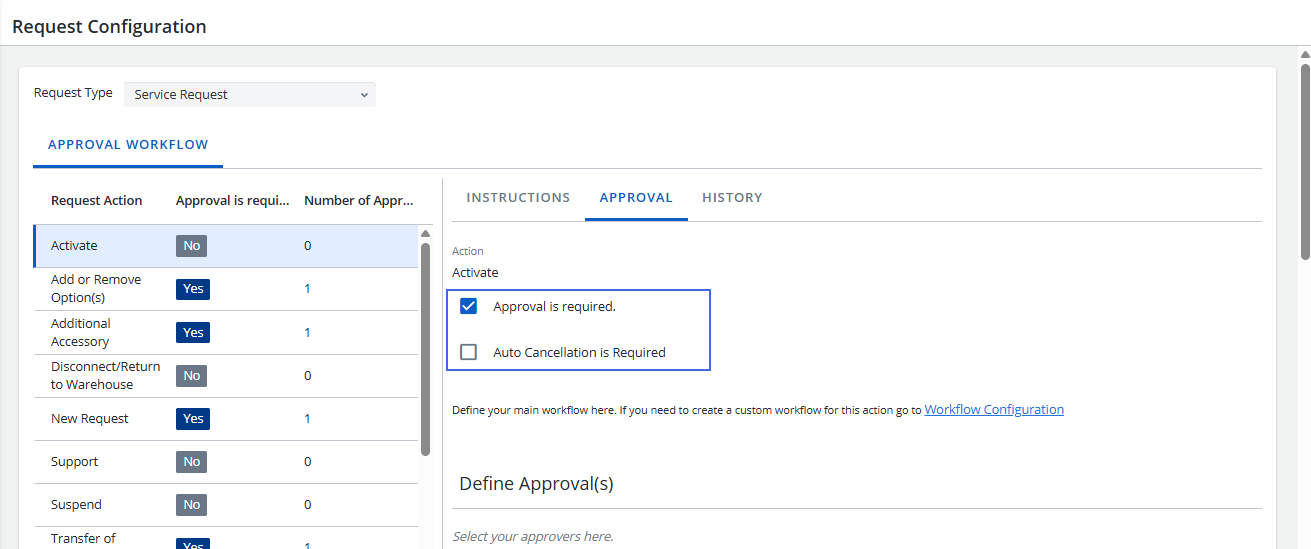
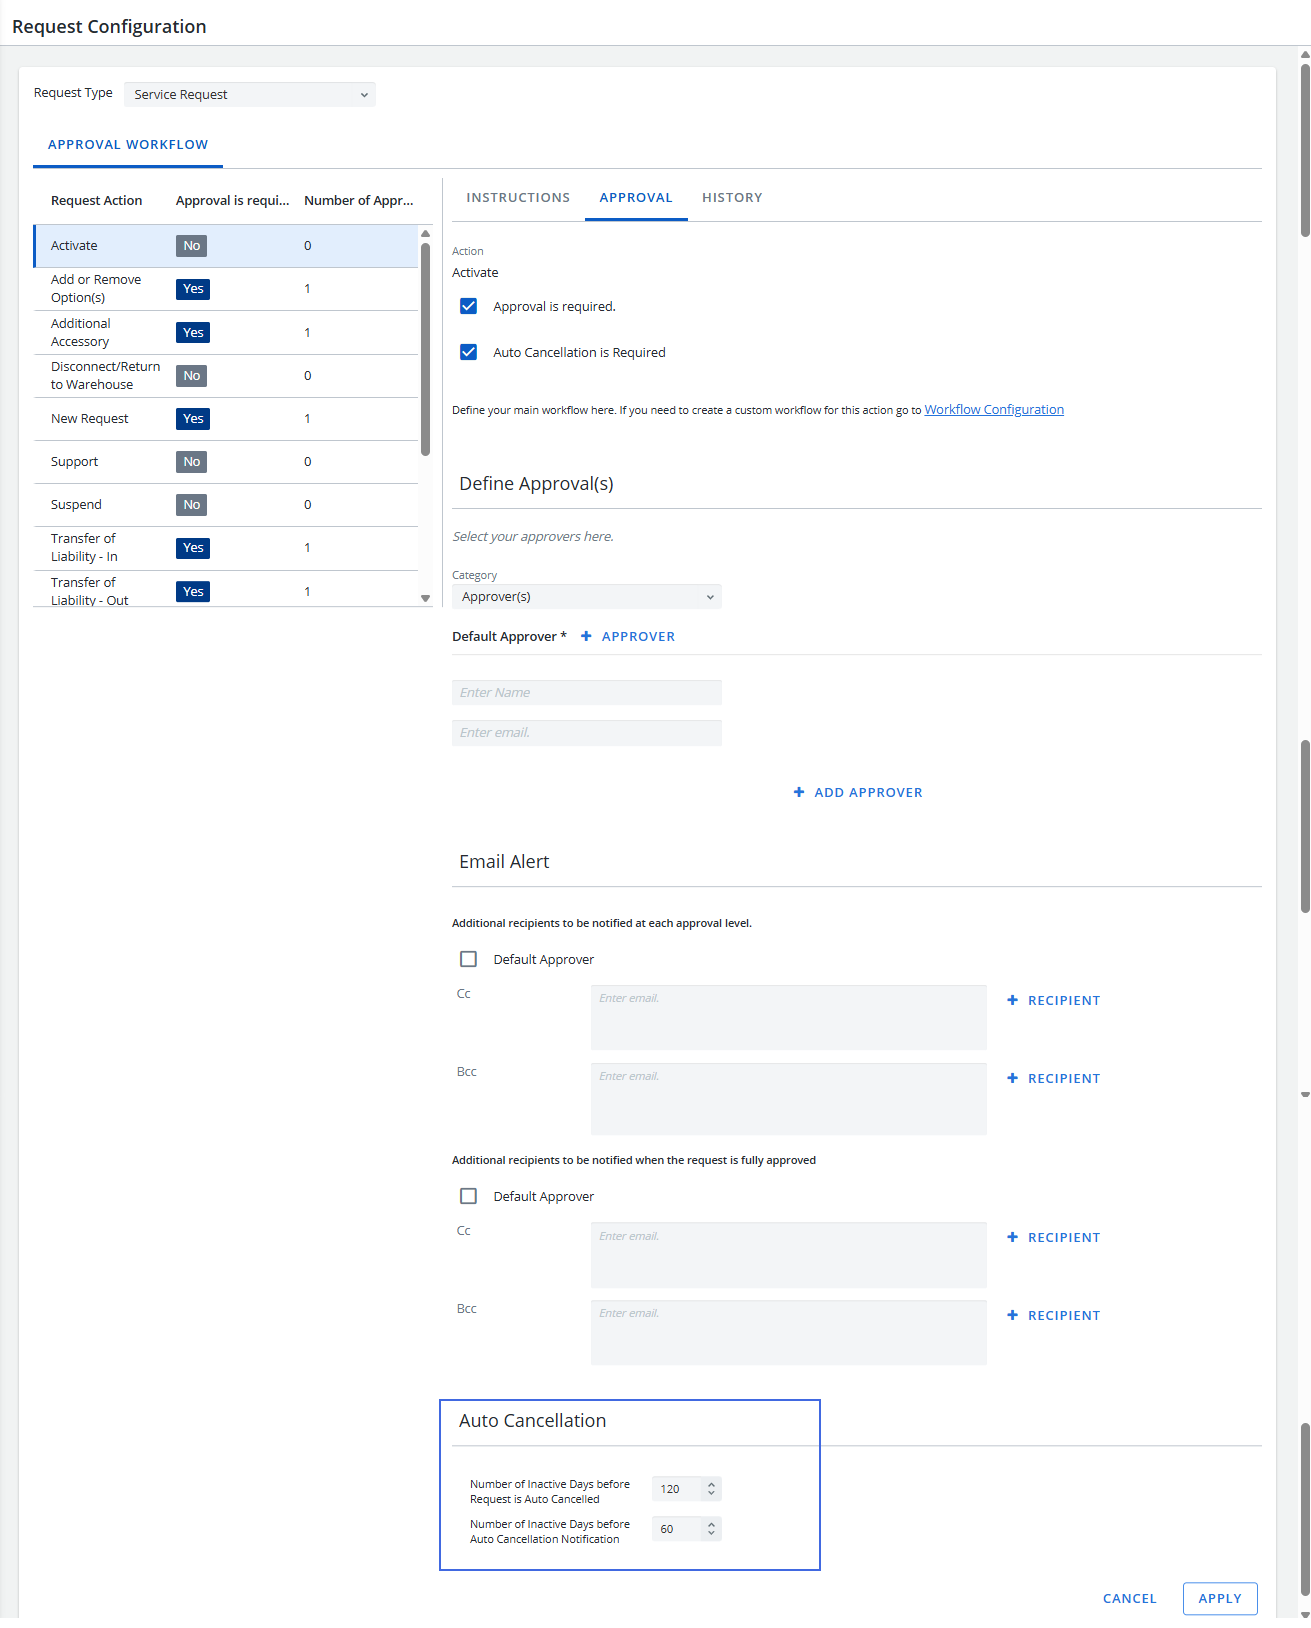
For Service Requests, when approval is required, three new configurations have been added to allow Cimpl to notify users that their service requests will be cancelled if no action is taken before it expires.
-
Click the Approval is required checkbox. The Auto Cancellation is Required checkbox displays.
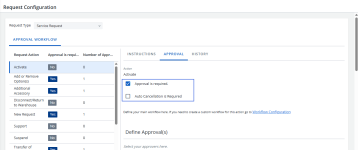
-
Click the Auto Cancellation is Required checkbox.
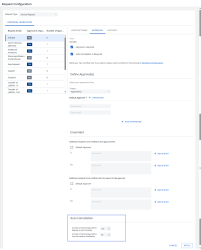
-
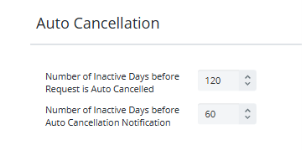
Scroll to the bottom of the page and complete the following fields:
-
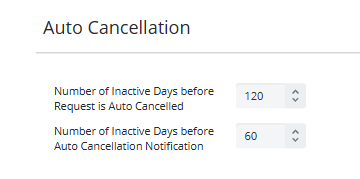
Number of Inactive Days before Request is Auto Cancelled: Type the number of inactive days after which a request will be automatically canceled.
-
Number of Inactive Days before Auto Cancellation Notification: Type the number of inactive days after which notification will be automatically sent.
-
-
Click Apply.
Note: Changes made to the above fields are logged on the History tab.
-